Manage virtual tape libraries
In the section 'Libraries', you can manage the libraries and SAN clients. You can also view the statistics of the libraries.
The selection of the correct settings depends on the respective software that is to be connected.
Add Libraries
To add a library, proceed as follows:
➤ Click on the 'List' tab.
➤ Click on the 'Add' button.
➤ The 'Add Library' window will be displayed.
The installation wizard will guide you through the following steps in this order:
Add Drives
Add Bricks
Add SAN Client.
Remove Libraries
Please note that all Silent Bricks and SAN clients must be removed from a library before the library can be removed. Set them to 'offline' if necessary.
To remove a library, proceed as follows:
➤ Click on the 'List' tab.
➤ Click on a library to select it.
➤ Click the 'Remove' button.
➤ The 'Remove Library' window will be displayed.
➤ To remove the library, click the 'Remove' button.
➤ To cancel the operation, click the 'No' button.
Configure Libraries
Please note that all SAN clients must be disconnected to make settings on a library.
To configure a library, proceed as follows:
➤ Click on a library in the navigation bar under the folder 'Libraries'.
➤ Click on the 'Settings' tab in the main window.
➤ You will now see an overview of the configuration options for the selected library.
To configure the name, description, and type of the library, proceed as follows:
➤ Click the 'Edit' button in the 'Library Name, Description and Type' section.
➤ The 'Library Name, Description and Type' window will be displayed.
➤ Enter a library name.
➤ Enter a description of the library.
➤ Select a library type.
➤ To save your entries, click the "Save" button.
➤ To cancel your entries, click the 'Cancel' button.
To configure the slots of the library, proceed as follows:
➤ Click the 'Edit' button in the 'Slots' area.
➤ The 'Slot Settings' window will appear.
➤ Select the number of slots.
➤ Select the number of import/export slots.
➤ To confirm your entries, click the ‘Save’ button.
➤ To cancel the operation, click the "Cancel" button.
To configure the behavior for tape export, proceed as follows:
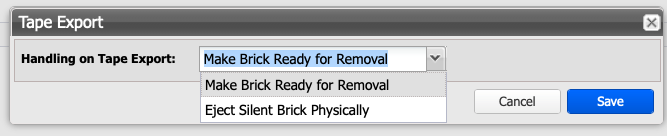
➤ Choose the required behavior from the dropdown box:
➤ Make Ready for Removal
The Silent Brick is taken offline by the export command and can now be manually ejected via the touch display (not Silent Brick Pro) or by the eject command in the user interface (Silent Brick Pro). From the application's perspective, the associated virtual tape is located in the so-called I/E slot.➤ Eject Silent Brick Physically
The associated Silent Brick (not Silent Brick Max) is physically ejected from the Silent Brick Controller (not Silent Brick Drive) by the export command. The ejection is carried out via a motor mechanism. To reuse the Silent Brick, it must be removed and physically reinserted into the device. The associated virtual tape is then back in the so-called I/E Slot.
➤ Click on the 'Edit' button in the 'Tape Export Settings' area.
➤ Choose between the options
➤ Unlock Brick
In this case, the Silent Brick is set offline and unlocked for physical removal when executing the export command.➤ Eject Silent Brick Physically
In this case, the Silent Brick is set offline and physically ejected when executing the export command (only with the Silent Brick Controller).
To set the barcode range of the library, proceed as follows:
➤ Click the 'Edit' button in the 'Barcode Range' section.
➤ The 'Barcode Range Settings' window will appear.
➤ Enter a start value for the barcode range.
➤ Enter an end value for the barcode range.
➤ To confirm your entries, click the ‘Save’ button.
➤ To cancel your entries, click the 'Cancel' button.
To set the interval for the digital audit, proceed as follows:
➤ Click the 'Edit' button in the 'Audit Management' section.
➤ The 'Audit Management' window will appear.
➤ Select a time interval for the digital audit.
➤ To confirm your input, click on the button "Save".
➤ To cancel your input, click the 'Cancel' button.
View library statistics
Under the 'Statistics' tab, you can view the write and read statistics.
➤ Select the statistics for the bricks or the libraries from the 'Dropdown Menu'.
Manage Bricks
To manage the bricks in a library, proceed as follows:
➤ Click on a library in the navigation bar under the folder 'Libraries'.
➤ Click on the 'Bricks' tab in the main window.
➤ You will now see a list of all bricks used in the selected library.
To add a brick to a library, proceed as follows:
➤ Click on the 'Add Bricks' button.
➤ The 'Add Bricks to Library' window will be displayed.
➤ Click on a brick to select it.
➤ Hold down the 'Ctrl' key and click on additional bricks to select them.
➤ To confirm your entries, click the 'Add' button.
➤ To cancel your entries, click the 'Cancel' button.
To remove a Brick from a Library, proceed as follows:
➤ Click on a brick to select it.
➤ Click on the 'Remove Bricks' button.
➤ The 'Remove Bricks from Library' window will be displayed.
➤ To remove the brick from the library, click on the 'Remove' button.
➤ To cancel the operation, click the 'No' button.
To delete a brick, proceed as follows:
➤ Click on a brick to select it.
➤ Click on the 'Erase' button.
➤ The 'Erase Bricks' window will be displayed.
Risk of data loss due to accidental deletionData may be accidentally deleted when a brick is deleted. Ensure that the data to be deleted is not needed.
➤ To empty the brick, click the 'Erase' button.
➤ To cancel the operation, click the 'No' button.
To format an empty brick, proceed as follows:
➤ Click on an empty brick to select it.
➤ Click the 'Format' button.
➤ The 'Format Bricks' window will open.
➤ Enter the prefix of the brick name.
➤ To format the brick, click the 'Format' button.
➤ To cancel the operation, click the "Cancel" button.
Add or remove drives
To add drives to a library, proceed as follows:
➤ Click on a library in the navigation bar under the folder 'Libraries'.
➤ Click on the 'Drives' tab in the main window.
➤ Click on the 'Add' button.
➤ The 'Add Drives' window will be displayed.
➤ Enter a prefix for the drive labels.
➤ Select the number of drives.
➤ Select a drive type.
➤ To confirm your entries, click the button 'Add'.
➤ To cancel the operation, click the "Cancel" button.
To remove drives from a library, proceed as follows:
➤ Click on a library in the navigation bar under the folder 'Libraries'.
➤ Click on the 'Drives' tab in the main window.
➤ Click the 'Remove' button.
➤ The 'Remove Drives' window will be displayed.
➤ Select the number of drives.
➤ To remove the drives from the library, click the button 'Remove'.
➤ To cancel the operation, click the "Cancel" button.
Add or remove SAN Client
To add a SAN Client to a library, proceed as follows:
➤ Click on the 'SAN Clients' tab.
➤ The 'Add SAN Client' window will be displayed.
➤ Select a data connection, either iSCSI or Fibre Channel.
➤ If you have chosen the iSCSI method 'Client', the 'iSCSI' subsection will automatically open in the 'Add SAN Client' window.
➤ Enter a client name.
➤ Enter the initiator name of the client.
➤ For unrestricted access, select the option 'Allow Unauthenticated Access'.
For restricted access, select the option 'User Who Can Authenticate for the Client' and make the following settings:
➤ Enter a username.
➤ Enter a password for the user.
➤ Repeat the password.
➤ Select a target IP.
➤ To confirm your entries, click the button 'Add'.
➤ To cancel your entries, click the 'Cancel' button.
If you have chosen Fibre Channel, proceed as follows:
➤ Select a World Wide Port Name (WWPN) for the device that will later gain access.
➤ Select a port. The numbering is from right (0) to left (1).
➤ If every WWPN should gain access, select the option 'Everyone'. In this case, port 1 is released.
To display advanced Fibre Channel options, proceed as follows:
➤ Select the corresponding volume
➤ Switch to the "SAN Clients" tab
➤ Select the "Fibre Channel Info" button in the menu bar
To remove a SAN client from a library, proceed as follows:
➤ Click on the 'SAN Clients' tab.
➤ Set the SAN client to "offline" via the context menu
➤ Click on a SAN client to highlight it.
➤ Click the 'Remove' button.
➤ The "Remove SAN Client" window will be displayed.
➤ To remove the SAN client, click the "Remove" button.
➤ To cancel the operation, click the 'No' button.