Introduction
The following reference manual for the Silent Cube System software is primarily aimed at technically experienced users or administrators and outlines all functions of the Silent Cubes Software.
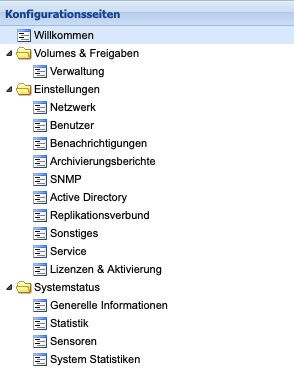
The Silent Cubes Software divides all functions within the three menus Volumes & Approvals, Settings, and System Status. This Part C of the manual addresses these menus hierarchically from 'top to bottom,' making it as easy as possible to look up a function.
The chapter on storage management of the Silent Cubes and Silent Cubes Software serves to provide a fundamental understanding and operation of the system.
Storage Management of the Silent Cubes
To understand some functions and settings of the Silent Cube Storage System, a basic knowledge of the principles of storage management is required.
Cache and Archive Storage
The Silent Cube Storage System features both a cache and an archive storage. The cache memory is located in the Head Unit of the Silent Cube Storage System, with the capacity of the cache memory varying depending on the selected product. The use of cache and archive storage enhances performance and offers a variety of additional functions for long-term data archiving.
Externally, both storage media are transparent and therefore neither directly recognizable nor is the distinction after a configuration of great relevance.
File System
The Silent Cube Storage System has its own virtual file system. The management of the file system is located on the Cache memory. The virtual file system allows, for example, the creation of Volumes across multiple Silent Cubes (not externally recognizable), the modification of Volumes in their capacity, or the creation of WORM Volumes with retention, whose archived data can be destroyed after a certain lifespan. Furthermore, the file system is characterized by the highest security features: Should the Cache memory fail or be defective, the file system can be completely restored after replacing the Head Unit.
Silent Cubes Software
The Silent Cubes Software represents the management of the Silent Cube Storage System. With the help of the software, all settings and configurations can be made. The Silent Cubes Software is already installed on the Head Unit of the Silent Cube Storage System. To start the software, only network access to the Head Unit is required.
Access Silent Cubes Software
Accessing the Silent Cubes Software is done through a Webbrowser and an IP address set up during the initial installation via HTTPS (see installation instructions). It is recommended to use an up-to-date version of a modern web browser.
This will open the login dialog window of the Head Unit.
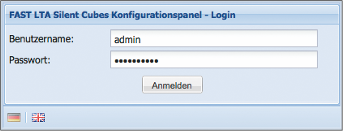
If the password for the user admin has not been changed beforehand, the login credentials are as follows:
Username: admin
Password: adminadmin
Overview of the Silent Cubes Software Window
The following illustration provides an overview of the windows and some fundamental buttons of the Silent Cubes Software.
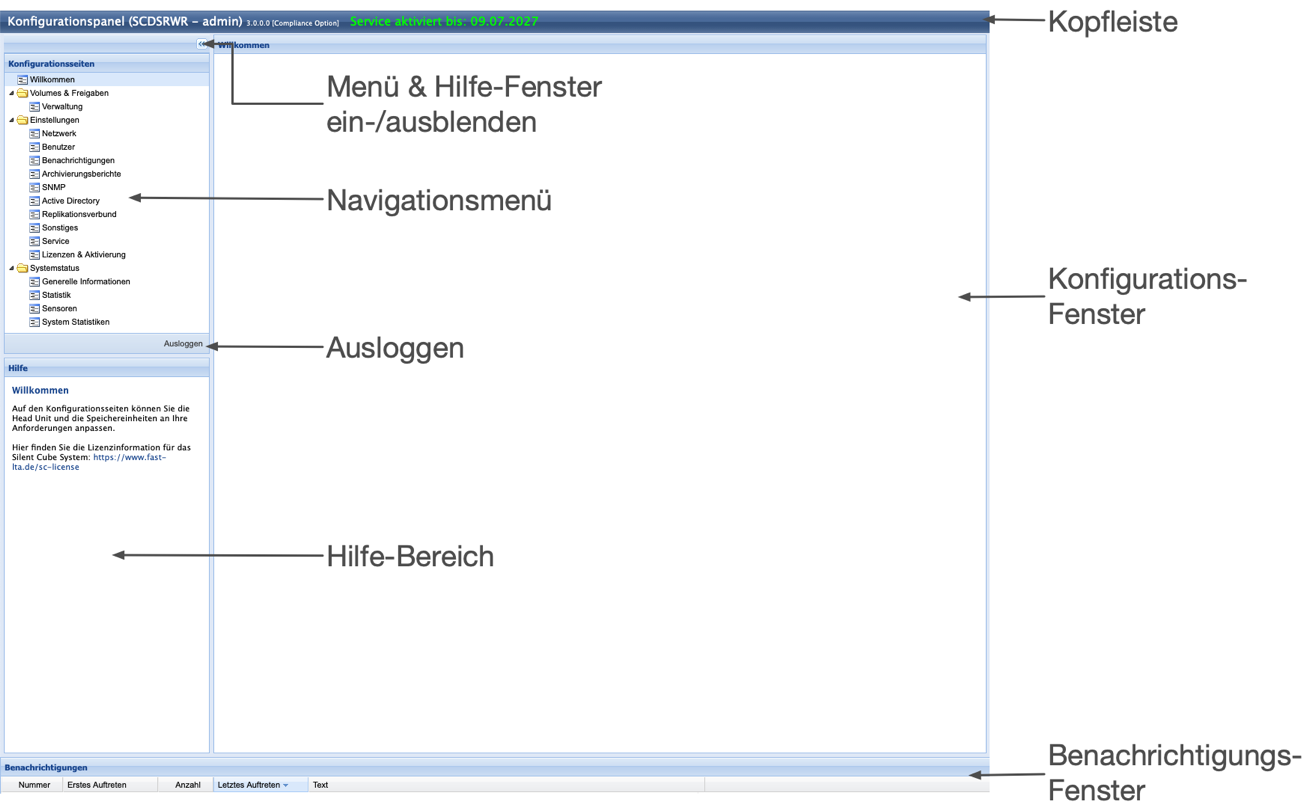
Illustration: Overview of the Silent Cubes Software
Manage Volumes
Introduction
In order to archive data on the Silent Cube Storage System, a volume must first be created. This is a reserved storage area where arbitrary directory structures and approvals can be defined.
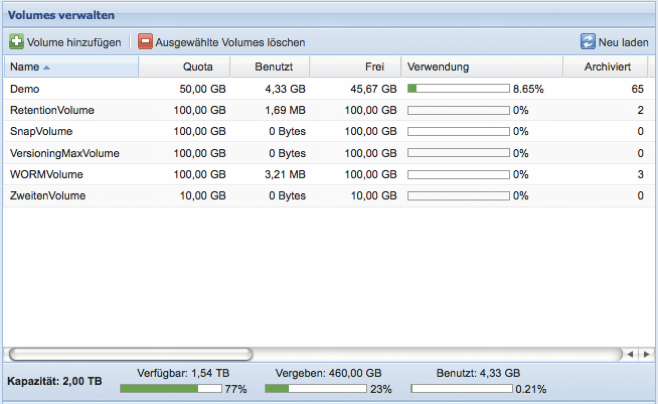
In the Management menu, the Silent Cubes Software lists all volumes that have already been created. For each volume, current information regarding capacity and quantities of archived and unarchived files is also displayed. Furthermore, the volume type and special options are visible. Some settings for an already created volume can also be adjusted later by double-clicking on the corresponding list entry.
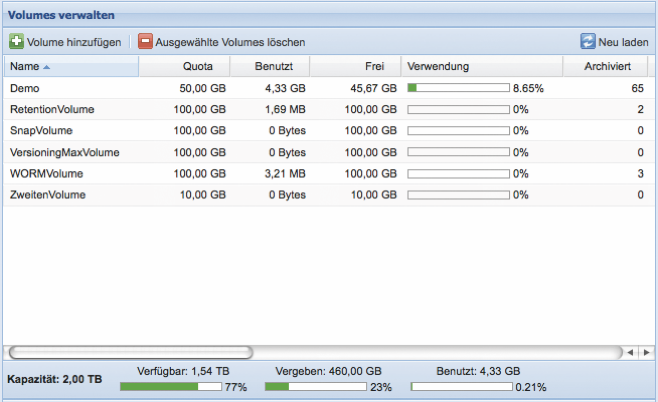
Volumes and approvals are inextricably linked. In order for users to access a volume and archive data on it, approvals must be provided for created volumes. The settings for the approvals are therefore also located in the Management menu.
Add Volume
By clicking the Add Volume button, the dialog window for creating a new volume will be displayed.
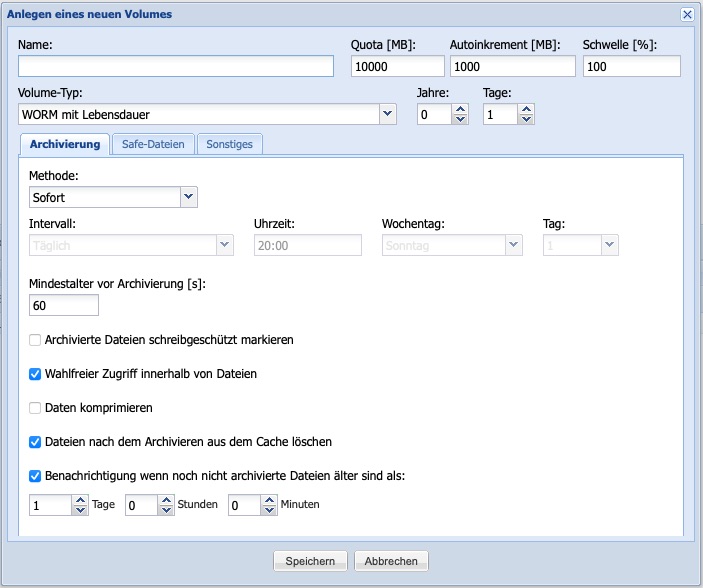
In the Name input field, a designation for the volume must first be entered. The use of spaces and specific special characters is not permitted.
The capacity of the volume is defined via the Quota [MB] input field in MByte. The maximum Quota corresponds to the available storage space of all connected Silent Cube Storage Units. The Quota of a Volume can be increased at a later time within the limits of the maximum available capacity. It is also possible to reduce it down to the limit of the already stored data volume.
If the free available storage capacity of the Volume is nearly exhausted and another file is pending for archiving that exceeds the Quota of the Volume, the Quota will be automatically increased by the specified size in MByte using the Auto Increment [MB] option. If the notification function has already been set up (see Chapter 6.3), a warning message will be sent via eMail. If the value 0 is entered, there will be no automatic increase of the volume.
Depending on the application, it may be necessary to adjust the threshold for automatic increase of the Quota. The field Threshold [%] serves to set the percentage threshold at which the automatic increase should be performed.
Volume Type
The Volume Type determines how data is archived on a volume. The Silent Cubes Software offers several archiving methods via the Volume Type drop-down menu.
Volume Type and Compliance Option
The available Volume Types depend on an acquired and activated Compliance Option (Further information on activation can be found in Chapter 6.10). Without an activated Compliance Option, only the Volume Type WORM is available.
Note: If one of the FAST LTA Approved Solutions (e.g., document or image management system) is used upstream, the Compliance Option is usually required!
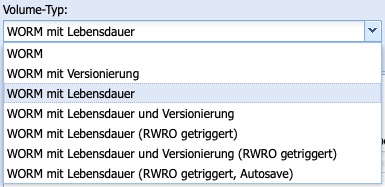
Volume Type WORM
A volume created with the Volume Type WORM acts like a conventional WORM storage. Files stored in it are permanently archived (infinite lifespan) and can never be deleted. The volume itself also cannot be removed once data has been archived in it. Archiving occurs on a scheduled basis and is configurable.
Volume Type WORM with Versioning
Corresponds to the Volume Type WORM, but additionally offers functionalities for versioning. This allows a previously archived file to be virtually overwritten. In this process, revisions of a file are created, which can be accessed using special methods (Revert and Switch Revision). The FAST LTA Support Team provides a separate background paper on the topic of versioning upon request.
Volume Type WORM with Lifespan
Corresponds to the Volume Type WORM, but offers the possibility to assign an adjustable 'Lifespan' (Retention Date) to the data to be archived. After the expiration of the Retention Date, the files can be deleted manually or with an attached software system.

The Retention Date of a file is defined by its Access timestamp (part of the metadata of a file in the file system). Until the expiration of the date defined as Access timestamp, the archived file cannot be deleted.
When creating a volume of the WORM type with lifespan, a default value (years/days) can be set, which determines the future Access timestamp.
When a file is transferred to the Silent Cube Storage System (Cache memory), the time and date of the creation of this file in the Silent Cube file system are recorded (Creation Date). This Creation Date + the set default value results in the Access timestamp, which is noted in the file system.
Connected software systems can change the access timestamp until the time of archiving, but only if it is further in the future than the time value calculated by the Silent Cube Storage System. The default value thus also represents a minimum value for the immutable archiving time. The default value can be increased at a later time, but not reduced.
If the access timestamp of an archived file is in the past (expiration of the Retention Date), it can be deleted. A whole volume of type WORM with lifespan can also be removed if the Retention Date of all files archived on it has expired.
To delete a file, its reference is irretrievably eliminated from the file system of the Silent Cubes. Reconstructing the deleted reference is no longer possible, although the raw data (bits) of a file still remain on the storage system. The storage space used by the file remains write-protected and will not be released.
Volume Type WORM with lifespan and versioning
Corresponds to the Volume Type WORM with lifespan, but additionally offers functionalities for versioning (see Chapter 4.2.1.3).
Volume Type WORM with lifespan (RWRO triggered)
Corresponds to the Volume Type WORM with lifespan, but does not use time-controlled archiving and includes a different treatment of lifespan.
The archiving process (transfer from cache memory to archive storage) of this volume type only begins when the access rights of a file are set from Read Write (RW) to Read Only (RO). This volume type should therefore only be chosen if the software system used and preceding the Silent Cube is capable of initiating the archiving process accordingly.
Regarding the lifespan of a file, a modified access timestamp from the upstream software system is always adopted for this volume type, provided it is in the future. Only for files without a modified access timestamp will this be calculated and assigned using the adjustable default value.
Volume Type WORM with lifespan and versioning
(RWRO triggered)
Corresponds to the volume type WORM with lifespan (RWRO triggered), but additionally offers functionalities for versioning (see Chapter 4.2.1.3).
Volume Type WORM with Lifespan
(RWRO triggered, Autosave)
The Volume Type WORM with Lifespan (RWRO triggered, Autosave) takes into account that some systems require temporary files, which change more frequently, to access the actual data. Only after switching from RW to RO are these files immutable.
With the previous volume types, these temporary files were only stored in the cache of the Head Unit and not on the secure Silent Cube before switching to RO. In the event of a failure or technical issue with the Head Unit, these temporary files could be lost, which could render the actual data unusable depending on the system.
This volume type now introduces the Auto-save function. Here, all data is always backed up on the Silent Cube. Data that is still marked as RW is 'modifiable' and 'deletable' - each of these actions results in a new file on the Silent Cube. Only when switching to RO are these files marked as immutable.
Even though a new 'version' of the file is created with each change or deletion of a temporary file before switching to RO, these 'versions' are not transparent - true versioning does not take place. Only the last version is always visible; after 'deletion', the file is removed.
Volume Type Options
When creating a new volume type, numerous options are available depending on the selected volume type and an activated Compliance Option, which are distributed across the tabs Archiving, Safe Files, and Others.
Volume Type and Available Volume Type Options
Each volume type offers individual configuration options. The following table provides an overview of the relationship between the volume type and the available volume type options.
A volume type with versioning largely corresponds to the associated volume type without versioning.
|
Option |
Volume Type |
|||
|
WORM |
WORM with lifespan |
WORM with lifespan (RWRO triggered) |
WORM with Lifespan (RWRO triggered, Auto-save) |
|
|
Lifespan Years/Days |
- |
yes |
yes |
yes |
|
Minimum Age before Archiving [s] |
yes |
yes |
- |
- |
|
Mark archived files as read-only |
yes |
yes |
- |
- |
|
Optional access within files |
yes |
yes |
yes |
yes |
|
Compress files |
yes |
yes |
yes |
yes |
|
Delete files from the cache after archiving |
yes |
yes |
yes |
yes |
|
Notification when unarchived files are older than |
yes |
yes |
yes |
yes |
|
Notification when untriggered files are older than |
no |
|
yes |
yes |
|
Creating Safe Files |
yes |
yes |
yes |
yes |
|
Optimizations for Robocopy |
yes |
yes |
- |
- |
|
Do not archive 0-Byte files |
yes |
yes |
yes |
yes |
|
Intelligent Replacement |
yes |
yes |
- |
- |
|
Prohibit renaming of empty directories |
- |
- |
yes |
yes |
|
Prohibit renaming of files |
- |
- |
yes |
yes |
|
Optimizations for Quantum StorNext |
yes |
yes |
yes |
yes |
|
Change Volume Type to 'WORM with Versioning' |
yes |
- |
- |
- |
|
Change Volume Type to 'WORM with Lifespan and Versioning' |
- |
yes |
- |
- |
|
Change Volume Type to 'WORM with Lifespan (RWRO triggered, Auto-save)' |
- |
- |
yes |
- |
Table: Volume Type and available Volume Type options
Archiving / Method
Files transferred to the Silent Cube Storage System are initially written to the Cache memory. The Method option now allows files in the Cache memory to be transferred to the archive storage either immediately (default) or periodically after a configurable time interval. The use of the periodic archiving method provides the opportunity to continue modifying or deleting files as long as they are still in the cache memory and have not yet been archived. The disadvantage is that until the time of archiving, no data and revision security is guaranteed. For this reason, periodic archiving is mostly used for testing purposes.
The time interval can be chosen between Daily, Weekly, and Monthly. Furthermore, the time, the day of the week (for Daily and Weekly intervals), or the day within the month (for Monthly intervals) can be set.
The choice of the time interval must be in accordance with the amount of data generated and the capacity of the cache memory. If large amounts of data are to be archived, a shorter time interval should therefore be chosen.

Figure: Archiving Method
Archiving / Minimum Age before Archiving [s]
The Silent Cube Storage System archives a file only if the last access to this file (Modification Date) occurred at least more than 5 seconds ago (Standard = 60 seconds).
A variety of upstream software systems (including file managers such as Windows Explorer or Mac OS X Finder) modify the metadata of a file only after a copy process has occurred. The waiting time ensures that a file copied to the cache memory is fully available for archiving, thus preventing data loss. The default value should only be changed in special cases.
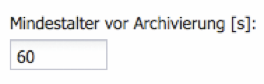
Figure: Minimum Age before Archiving
Archiving / Mark archived files as Read Only
If this option is activated (Default = Off), the access rights of each file on this Volume are set to Read Only (RO). This also applies to files that are still in the Cache. This access right is also retained when the archived file is copied or loaded from the Silent Cube Storage System to an external directory.
Figure: Mark archived files as Read Only
Archiving / Optional access within files
This option (Default = On) allows storage access to any area within files in a container format. In container formats, multiple files are combined into one file for performance reasons. Container formats are commonly used, for example, in archiving, image, and video applications. Random access now ensures that a software system accessing the file does not need to read the entire container. It is therefore recommended to keep this option enabled (default).
Figure: Random access within files
Archiving / Compressing files
If this option is enabled (default = off), files will be compressed during archiving. A ZIP-like algorithm is used, which can save storage capacity when primarily compressible files are archived (e.g., documents).
Figure: Compressing data
Archiving / Deleting files from the cache after archiving
If this option is disabled (default = On), files will remain in the cache memory after archiving. The advantage is that files from the cache memory are available more quickly than if they had to be loaded from the archive storage. However, to keep the cache memory 'clean', it is recommended to leave this option enabled.
Figure: Delete files from the cache after archiving
Archiving / Notification when unarchived files are older than
If this option is enabled (default = On / 1 day) and the notification function is configured, an email will be sent as soon as there are files in the cache memory that should have already been archived. It is possible to define days, hours, and minutes. If the periodic archiving method is selected, the time until a notification should be longer than the set periodic time interval.

Archiving - Notification when untriggered files are older than
This option is only available for volumes of the type 'RWRO triggered'. If this option is activated (default = Off) and the notification function is configured, an email will be sent as soon as there are still files in the cache memory that should have been triggered (RWRO) and thus archived after a certain minimum age. It is possible to define days, hours, and minutes.

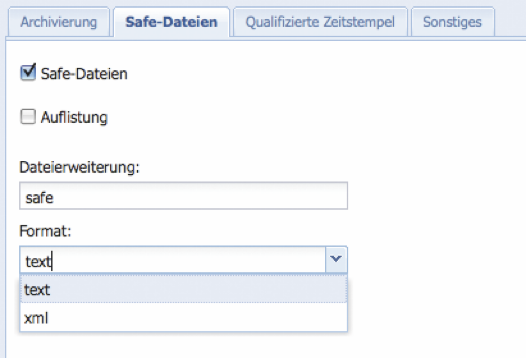
Safe Files
To obtain detailed information about the entire archiving process of a file, a so-called Safe File can optionally be created (default = off). This log file is automatically generated and additionally saved after a successful copy process of a file to the Silent Cube Storage System. The file name corresponds to the name of the archived file plus a user-defined file extension (default = *.safe).
The Safe File can be created in either text or XML format. This also allows external software systems to retrieve or process information about the archiving process. The option can also be activated retroactively. The FAST LTA Support Team provides a separate background paper on the topic of Safe Files.
<?xml version="1.0" encoding="UTF-8"?>
<fileData>
<hash>4216475b55472f890aff212079ffa303b6f1cfb33e5fa5802882aa37968f78a4…
<lookupkey>64c26d29cf7ffce5333957539d8bbb04c7d2a556dad5ed967f3eb6dfea6…
<size>17210</size>
<stored>1</stored>
<safe>1</safe>
<ciphercode>0</ciphercode>
<compressioncode>12289</compressioncode>
<online>1</online>
<ingest_epoche>1250155996</size>
<ingest_iso8601>2009-08-13T11:33:16+0200</ingest_iso8601>
<creation_epoche>1250095987</creation_epoche>
<creation_iso8601>2009-08-12T18:53:07+0200</creation_iso8601>
</fileData>
Figure: Example Safe File (XML Format)
Miscellaneous / Prioritize Archiving
When multiple Volumes are created within a Silent Cube System, the Silent Cubes Software ensures that the storage of all Volumes follows a specific logic in the WORM area. This consists of processing a certain number of files to be archived per Volume, in order to subsequently process the same number in the following Volume. This process repeats cyclically until all outstanding files are archived.
If one has a Volume that is continuously filled with very large files (for example, image data), and another that is continuously filled with very small files (for example, compressed text documents), an imbalance in storage occurs. To rectify the imbalance, the archiving for the Volume with the small files can be prioritized.

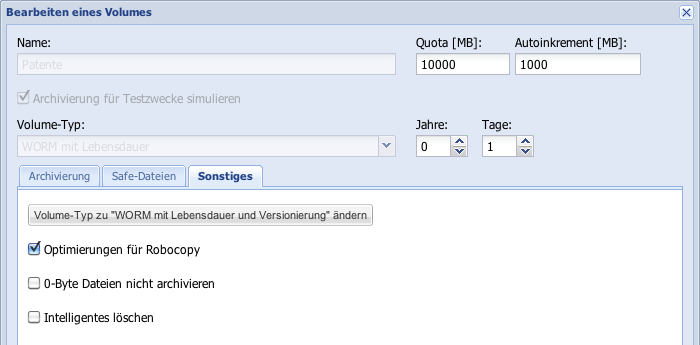
Miscellaneous / Optimizations for Robocopy
Copy processes over the network are not without risks. A network failure or a timeout can occur, for example, during a copy process. Since the Silent Cube Storage System cannot verify the copy process itself, there is a risk that incomplete and thus corrupt files may be archived. To mitigate this risk, there is, for example, the program Robocopy for Microsoft operating systems. Robocopy is capable of resuming interrupted file transfers as well as verifying a transfer.
Robocopy first creates the copied file with a specific and always identical Modification-Timestamp (January 1, 1980 00:00:00 GMT to January 2, 1980 00:00:00 GMT) on the Silent Cube Storage System (Cache memory). Only after the copy process has been verified is the original Modification-Timestamp assigned to the copied file.
If the option for Robocopy optimizations is enabled (default), the Silent Cube Storage System determines based on the Modification-Timestamp whether a file has been transferred correctly or not. If not, the file is ignored and not archived. Based on the Modification-Timestamp, data remnants can also be identified and deleted from the Cache of the Silent Cube Storage System.

Miscellaneous / Optimizations for Quantum StorNext
Quantum StorNext uses special mechanisms that are supported by enabling the option for Quantum StorNext optimizations.
For all other software connections, this option should not be enabled.
Figure: Optimizations for Quantum StorNext
Miscellaneous / Do not archive 0-Byte files
If the option is activated (default = Off), temporary 0-byte files will be filtered out during the archiving process and not archived. It is recommended to activate this option only if it is ensured that these files are truly not needed and serve only temporary purposes.

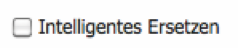
Other / Intelligent Replacement
This option (default = Off) allows for a pseudo-deletion of a file by automatically assigning a new filename as soon as a delete command is received. This allows for another or more current file to be archived with the original filename. Revision security is still guaranteed.
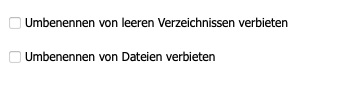
Miscellaneous / Prohibit renaming of empty directories / files
For RWRO-triggered Volumes, this option can prevent the preceding software from renaming empty directories and files.
Miscellaneous / An error is returned when attempting to delete files within the lifespan
For Volumes of type 'WORM with lifespan and versioning', it can be defined whether an error should be returned when attempting to delete within the lifespan (Default). If this option is disabled, no error message will be received when attempting to delete, but the file will remain.

Miscellaneous / Read before appending
For Volumes of type 'WORM with lifespan and versioning (RWRO triggered)', it can be defined whether the content should be read back before appending data to an existing file, making it available in the Cache.

Convert Volume Type
For an already created Volume, the existing Volume Type cannot be converted to another type, with two exceptions. If the already created Volume is of Volume Type WORM or WORM with Lifespan (each without Versioning), these can be converted to the respective same Volume Type with Versioning. This process is unidirectional and therefore irreversible. The function can be found in the editing mode of a Volume under the Miscellaneous tab.
Volumes of Type WORM with Lifespan (RWRO-triggered) (see Chapter 4.2.1.6) can be converted once and irreversibly to the type WORM with Lifespan (RWRO-triggered, Auto-save).
Figure: Convert Volume Type WORM with Lifespan (RWRO triggered)
Delete Selected Volumes
In the overview, managing Volumes allows for the deletion of a Volume. For a Volume to be deleted, it must either be unused (0 Bytes used and 0 files already archived) or all files from this Volume must be deleted. Please note that this is only possible for Volumes where the Retention Date (only for Volumes with Lifespan) has expired for all files in the Volume.
Manage Approvals
In order for users to access a Volume and archive data on it, a share must be provided on the Volume using the SMB/CIFS or NFS protocol. In the Management menu, approvals can be added, configured, and deleted. By double-clicking on an already created approval, it can be edited in the overview of managing approvals.

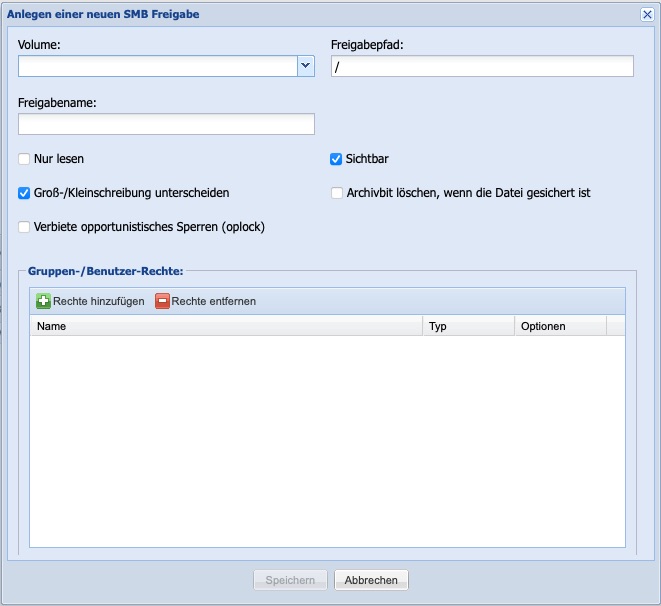
Add SMB Share
By clicking the button Add SMB Share in the Manage Shares window, the dialog window for adding a new SMB share opens.
First, a Volume must be assigned to an SMB/CIFS share. A drop-down menu is available for this purpose, displaying all previously created Volumes. The share can be further refined by specifying a specific share path. If the input field for the approval path is left empty, the entire volume will be released. Each approval requires a unique approval name for identification. The input of spaces and specific special characters is not permitted.
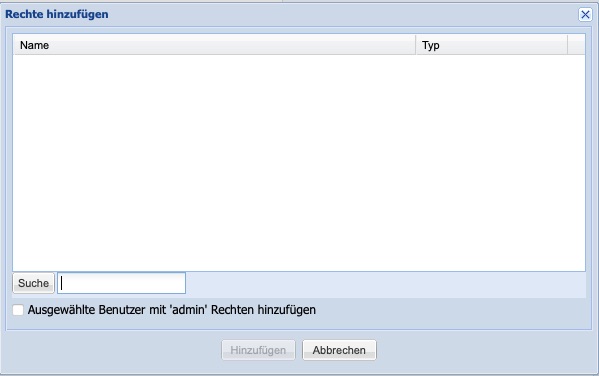
If only individual users or groups are to be granted access, the Public option must be disabled (default = Yes). In this case, the Search button will then become selectable. Depending on whether an Active Directory directory service has been set up (see Chapter 6.6) or not, clicking the Search button will either display the users or groups from the directory service or the internally created users. To grant the selected users or groups the approval, they must be added to the list using the Add button.
"If you activate the button to add selected users with 'admin' rights when adding, these users will receive administrative filesystem permissions on all created files and folders upon access.
"If the share is to allow read-only access, the option 'Read Only' must be activated (default = Off). "If the share should not be visible on the network, the option 'Visible' must be deactivated (default = On). "A verification of a completed archiving can be performed using the option 'Delete Archive Bit' when the file is secured.
"In exceptional cases, it may also be necessary for certain applications to"prohibit opportunistic locks. zu verbieten. "Please refer to the corresponding connection documentation to determine whether your application requires this setting.
Add NFS Share
By clicking the Add NFS Share button in the Manage Shares window, a dialog window opens to add a new NFS share. The Silent Cube Storage System currently supports NFS protocol version 3.
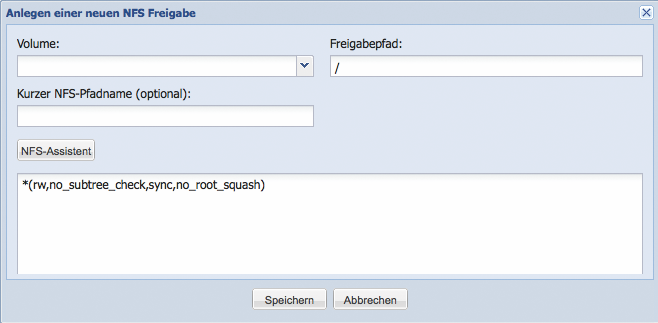
First, a Volume must be assigned to an NFS share. A drop-down menu is available for this purpose, displaying all previously created Volumes. The share can be further refined by specifying a specific share path. If the share path input field is left empty, the entire Volume will be shared.
For some Unix or AS/400 systems, it may be necessary to shorten the NFS path of the Silent Cube Storage System. For this purpose, the field Short NFS Path Name is optionally available.
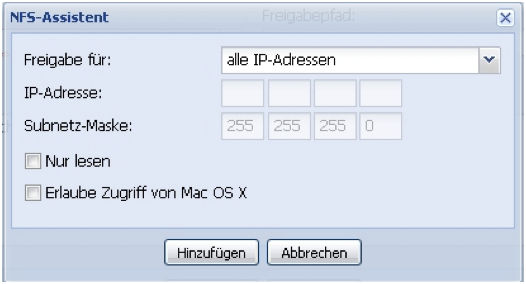
In the lower input field, options for the NFS share can be defined manually. Manual input is only recommended for experienced administrators. Alternatively, the configuration of the options can be done via a dialog window using the NFS assistant.
An NFS share can be defined for all IP addresses, a single IP address, or a subnet. Furthermore, access rights can be restricted. Since Mac OS X attempts to use ports that are not intended for NFS connections under Linux, the option Allow access from Mac OS X must be enabled as soon as Apple computers are to gain access to the share.
By default, an NFS share with options is already defined (all IP addresses, with read and write permissions, without Mac OS X support). If this default share is not desired, the entry can be marked and deleted.
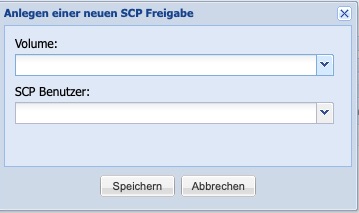
Add SCP Share
By clicking the button Add SCP Share in the Manage Shares window, the dialog window for adding a new SCP share opens. SCP shares always refer to the entire Volume and apply to a selected user from the SCP only user group.
Access to shares under Windows, Linux, and Mac OS X
Access to shares under Windows
Under Windows, an SMB/CIFS share created in the Silent Cubes Software is integrated as a network resource. The IP address of the Head Unit is specified as follows:
\\IP address Head Unit\
Shared subdirectories of the Volume are then automatically displayed in the wizard and can be selected (For more information on adding network environments and network resources, please refer to the Windows Help).
Access to shares under Linux
NFS shares
NFS shares can be mounted under Linux via the console as follows:
mount -t nfs IP address:/Approval/ /local_directory
SMB/CIFS approvals
SMB/CIFS approvals can be mounted under Linux via the console as follows:
mount -t smbfs //IP address/Approval/ /local_directory
If access to the approval requires a username, the command line must be extended as follows:
mount -t smbfs -o username=Username//IP address/Share/ /local_directory
If the password is to be transmitted simultaneously, the command line must be extended as follows:
mount -t smbfs -o username=Username, password=Password//IP address/Share/ /local_directory
Access to shares on Mac OS X
On Mac OS X, both the Finder and the Terminal can be used to access SMB/CIFS shares. If the Terminal is used, access is performed at the command line level, similar to Linux. The Finder on Mac OS X has the menu entry Go » Connect to Server (Shortcut: ⌘ + K).
The server address to be entered is:
smb://IP-address
Subsequently, all available volumes will be displayed. After selecting the desired volume, the username and password will be requested.
Edit share
By double-clicking on an already created share in the Manage Shares overview, it can be edited.
Remove share
In the overview of managing approvals, there is the option to delete an approval. To do this, an approval must first be marked. Using the button 'Delete Selected Approvals', the marked approvals can then be deleted.
Settings
Network
A Head Unit of the Silent Cube Storage System has network interfaces for management (User Interface), for data transfer from the network, as well as for data transfer to connected Silent Cubes. The properties of the interfaces can be configured in the Network menu.
Note: Depending on the Head Unit, network interfaces may vary and are partially designed to be redundant. Refer to the respective Quick Start Manual to see the configuration of the respective interfaces.
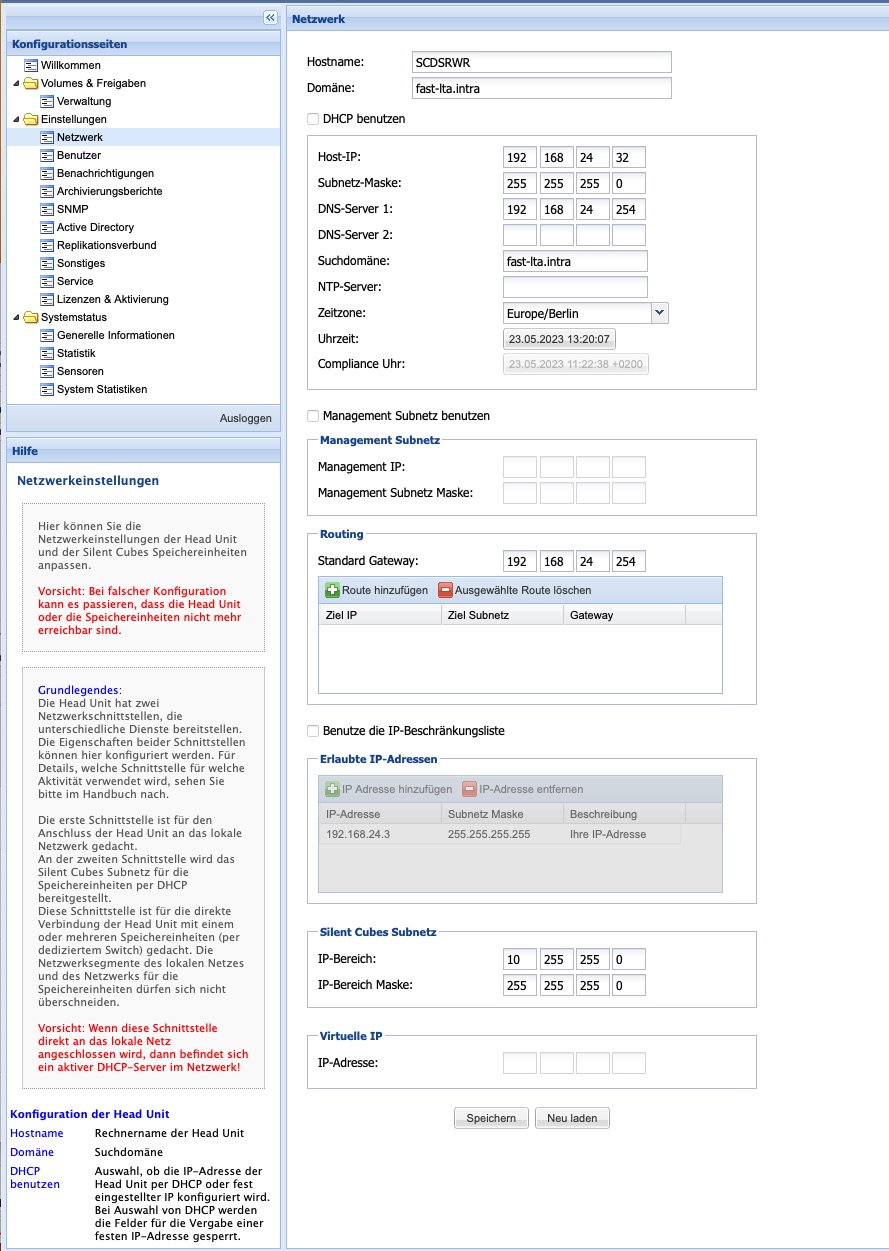
The LAN network interface (Label LAN) is used to connect the Head Unit to the local corporate network. The CUBES network interface (Label CUBES) provides the Silent Cubes subnet via DHCP. The optional management network interface (Label MGMT) is used to manage the Silent Cubes installation.
Note: If more than one Silent Cube storage unit is to be connected to the Head Unit, the CUBES network interface must be connected to a dedicated switch, to which all Silent Cubes storage units are connected.
It is essential to ensure that the LAN network interface and the CUBES network interface(s) are not swapped, as otherwise the Head Unit will act as a DHCP server in the corporate network.
Configuration of the LAN network interface
|
Option |
Description |
|
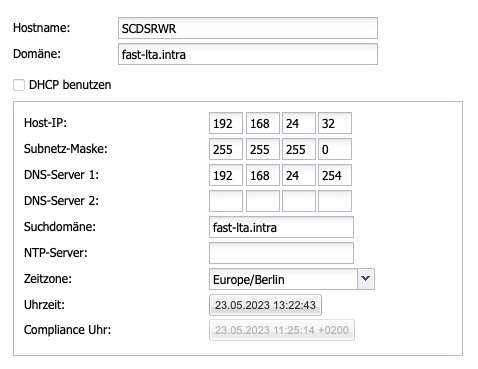
Hostname |
Computer name of the Head Unit |
|
Domain |
Search domain |
|
Use DHCP |
Selection of whether the IP address along with options is configured via DHCP or a fixed IP address. When DHCP is selected, the fields for manually assigning a fixed IP address are locked. |
|
Host IP |
IP address of the Head Unit |
|
Subnet mask |
Subnet mask of the subnet in which the Head Unit is located |
|
DNS server #1 |
DNS server in the LAN subnet |
|
DNS server #2 |
DNS server in the LAN subnet |
|
Search domain |
Name suffix in the used network (your-domain.intra) |
|
NTP server |
Server for Time Synchronization |
|
Time Zone |
The time zone in which the Silent Cube Storage System is located |
|
Time |
Current Date and Time |
|
Compliance Clock |
The current compliance time (time of the first Silent Cube Storage Unit) |
Table: Network Settings - LAN
Configuration of the MANAGEMENT Network Interface
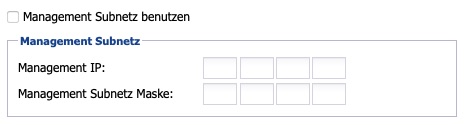
If a separation between data and management network is desired, the management network can be activated and configured here.
|
Option |
Description |
|
Management IP |
IP address of the management network. The user interface of the Silent Cubes Software can be accessed through this after activation. |
|
Management Subnet Mask |
Subnet mask of the management network |
Routing

|
Option |
Description |
|
Default Gateway |
This gateway is set as the default system-wide. |
|
Routes |
Using the buttons 'Add Route' and 'Delete Selected Route', additional routes for target IPs or target networks can be defined. |
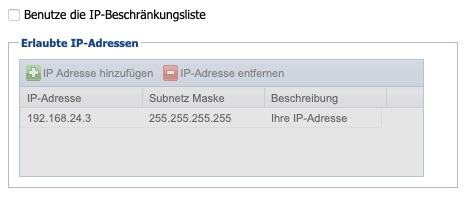
Configuration of the IP Restriction List
To enhance network security, a list can be maintained to restrict access from specific IP addresses/networks. Please note that this setting also affects the management interface, and by enabling this option, you may exclude yourself from the system.
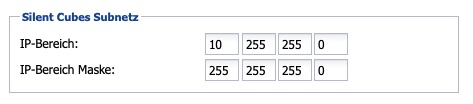
Configuration of the CUBES network interface
|
Option |
Description |
|
IP range |
IP range of the DHCP subnet at the CUBES network interface of the Head Unit |
|
IP range mask |
Network mask of the Silent Cubes network |
Table: Network Settings - CUBES
Additional Network Settings
If the Head Unit is part of a replication group, the corresponding configured IP address will be displayed under Virtual IP. The configuration of the virtual IP address is done in the Replication Group menu (see Chapter 6.7).
Separate networks for data and administration
Users
In the Users menu, user accounts are created that can be used for access management to the Silent Cubes Software as well as for SMB/CIFS shares, should Active Directory not be configured. The predefined user groups from user management cannot be used for SMB/CIFS sharing.
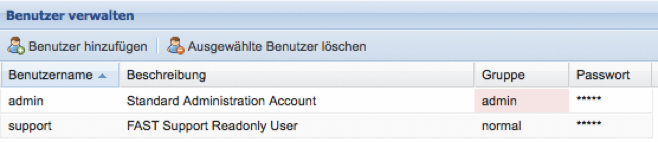
Predefined Users
The pre-configured user admin cannot be deleted. It is therefore recommended to change the default password (adminadmin) of this user.
Furthermore, a pre-configured user support is already present. This user only has read rights and can be deleted at any time. It serves the FAST LTA customer support to obtain access to the system status for maintenance purposes without being able to make changes to the Silent Cube Storage System itself. It is recommended not to delete this user.
User Groups
The Silent Cubes Software distinguishes between five user groups that have different access rights.
Group: admin
Only users from the admin group have full access to all settings of the Silent Cubes Software and can also change them. Moreover, only users of this group are able to add new users.
Group: normal
Users from the normal group have access to the Silent Cubes Software, but can only change their username and personal password. Furthermore, these users can only retrieve certain settings in the Silent Cubes Software, but cannot change them (see figure).
Group: monitor
Users from the monitor group have access to the Silent Cubes Software, but can only change their username and personal password. Compared to the normal group, the monitor group has even less information available about the settings of the Silent Cube Storage System (see figure). This group also cannot make any changes to the settings.
Group: smbonly
Users in the smbonly group do not have access to the Silent Cubes Software. This user group is suitable for share management via SMB/CIFS.
Group: scponly
Users in the scponly group do not have access to the Silent Cubes Software. This user group is suitable for accessing SCP shares.
Add User
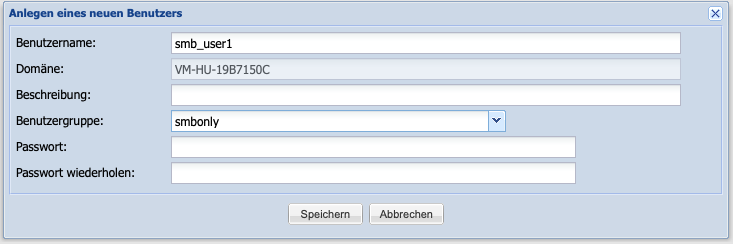
By clicking the Add User button in the User Management window, a dialog window opens for adding a new user.
A unique username must then be entered. A description can optionally assist in the assignment. A drop-down menu is available for selecting the user group (see Chapter 6.2.2). Finally, a password for the user must be entered. It should be noted that the password must consist of at least 8 characters.
After successfully saving the new user, this user will be listed in the User Management overview.
Change User Data
The values Description and Password can be changed directly in the User Management overview. By double-clicking on the username or the password, the dialog window for editing the password opens. A double-click on the description, in turn, switches to the editing mode for this value.
Delete User
To delete a user, this user must be marked in the User Management overview. By clicking on the button Delete Selected Users, the selected user can be removed. Only users in the admin group are authorized to delete users.
Note: If a user has been deleted in user management, and if there was an SMB/CIFS or SCP share, it must also be deleted in the share management. If the user had a previously authorized volume mounted at the time of deletion, they will retain access to the volume until it needs to be remounted on their client machine. It is therefore advisable to restart the client machine after a user deletion.
Notifications
To ensure smooth and secure operation of the Silent Cube Storage System, the Head Unit continuously monitors the key parameters of the overall system (Head Unit and all Storage Units). Should a problem or error occur, a message can be automatically sent to the FAST LTA Support Team, as well as to freely definable recipients, upon request. Notifications can be sent via email or HTTPS post in German and English.
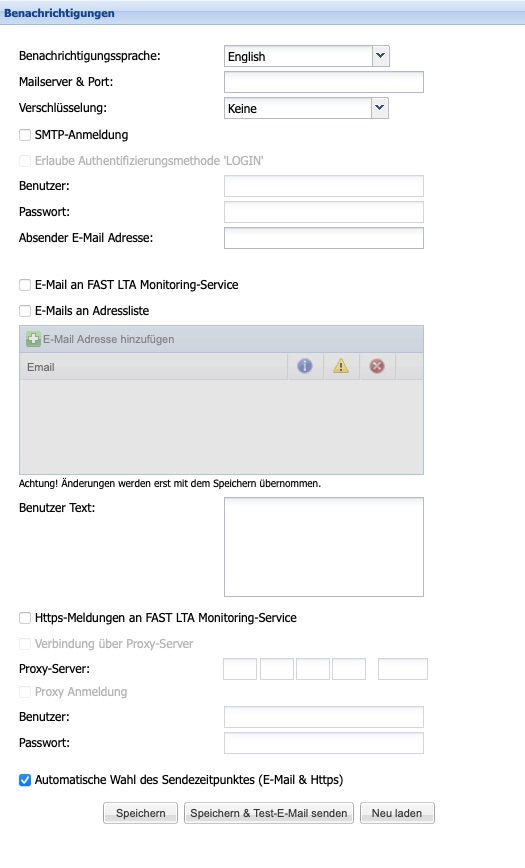
Sending a notification via email
To send a notification via email, the name of the mail server or its IP address must first be entered. Optionally, by adding a colon, a differentport can also be specified. If the chosen server is an SMTP server that requires user authentication, the corresponding option “SMTP authentication” must be activated. The associated authentication parameters can then be stored under user and password. Additionally, theauthentication method LOGIN can also be activated.
A self-definedSender address can be entered in the field with the same name. If this field is left empty, the hostname of the Head Unit will be used as the default sender address.
As long as the option to send emails to the FAST LTA Monitoring Service remains activated (default), the FAST LTA Support Team will also receive all notifications. These will be sent to the address monitor-sc@fast-lta.de. If a major problem does occur, the support team can quickly gain an overview of the system status and respond accordingly well-prepared. All transmitted information will of course be treated confidentially. In this context, it should be explicitly noted that notifications do not contain any information about stored data.
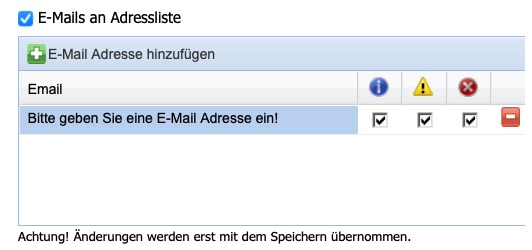
To receive notifications via email yourself, the option to send emails to the address list must be activated (default = Off). Subsequently, any number of email addresses can be entered in the table below. Additionally, it can be specified for each email address which type of information should be sent. There is a distinction between information, warnings, and error messages. To facilitate the differentiation of various systems and locations for the user or service provider, aUser text can be created, which is included in every notification.
The notification function of the Silent Cube Storage System recognizes, in addition to those already mentioned, another type of notification: the system status, which is transmitted daily (Daily Status Message). If the option for automatic selection of the sending time is activated (default), it will be sent daily around midnight. If this should occur at a different time, the option must be deactivated and a specific time set.
Note: The notification function can be tested immediately after entering all settings using the Save & Test Email button.
Sending a notification via HTTPS post
Notifications can only be sent to FAST LTA Support via HTTPS post. If a proxy server is to transmit the message, the option to connect via proxy server must be activated and the IP address of the proxy server must be entered. If the proxy server requires authentication, the entry of username and password is additionally required.
Note: The entered data can be verified using the Save & Test Email button.
Read and delete notifications
In the lower area of the Silent Cubes Software, there is the Notifications window. It lists all notifications from the Silent Cube Storage System in a table. By double-clicking on the selected notification, it will be displayed in a new window.
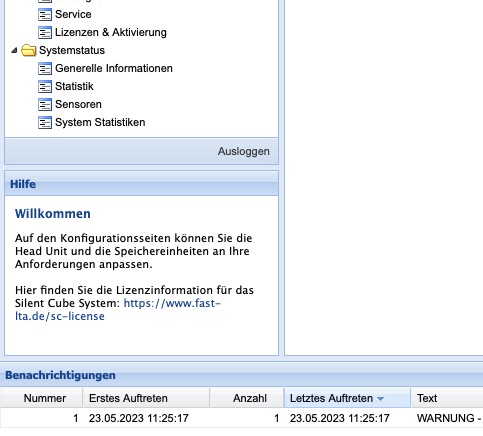
Figure: Notifications in the Silent Cubes Software
To delete one or all notifications, you must right-click on the list entry and select the corresponding entry from the context menu that appears.
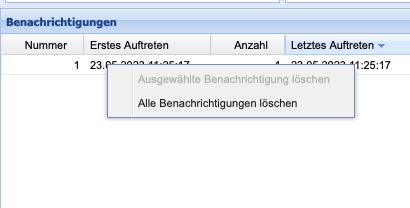
Figure: Deleting Notifications
Archiving Reports
An archiving report from the Silent Cubes Software shows which data was stored when and with which hash value, thereby providing proof of successful archiving.
In order to generate archiving reports, the option to create archiving reports must be enabled (default = Off). The file format can be chosen between CSV and PDF. If archiving reports are to be sent via email, the option to send archiving reports by email must first be enabled, and then the desired email addresses must be entered.
Note: It should be noted that the mail server must be configured in the Notifications menu for email sending to be possible. If an archiving report exceeds the size of 5 MByte, the Silent Cube Storage System will send the email without an attachment.
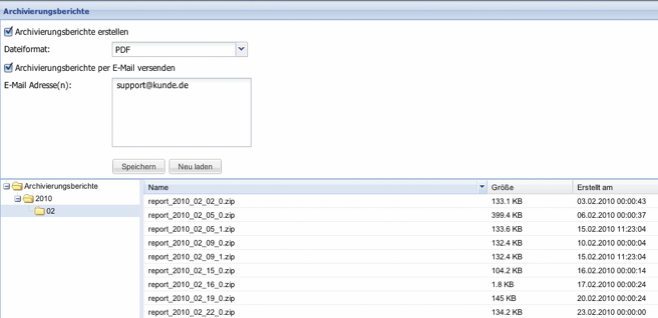
Figure: Archiving Reports
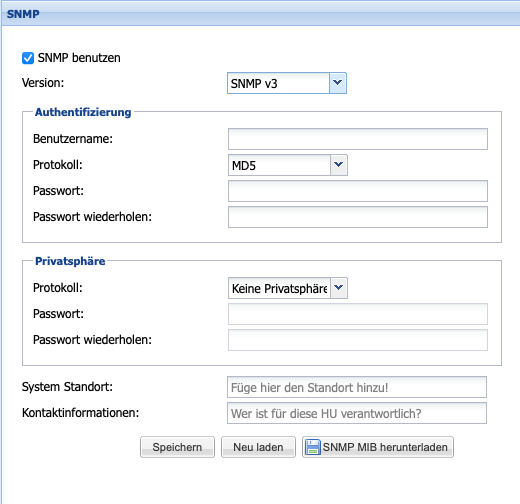
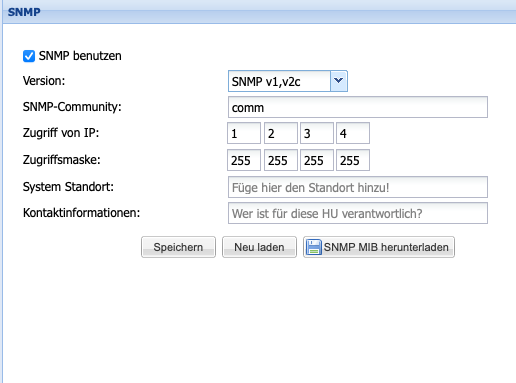
SNMP
The Simple Network Management Protocol (SNMP) is a network protocol for monitoring and error detection of network components.
The Head Unit of the Silent Cube Storage System supports this protocol in versions v1, v2c, and v3 for monitoring the Head Unit itself and for monitoring all connected Silent Cube Storage Units. The Management Information Base (MIB) file necessary for configuration can be downloaded directly from the SNMP menu.
In order to use and configure SNMP, the option to use SNMP must first be enabled (Default = Off). In the SNMP Community input field, the name of the SNMP community must then be entered. Furthermore, it is necessary to enter the IP address and the access mask of the SNMP server. The two input fields for System Location and Contact Information are optional and descriptive additional information.
Active Directory
If the connected corporate network has a Microsoft Windows domain or the Microsoft directory service Active Directory (AD), users defined there can access SMB/CIFS shares on the Silent Cube Storage System. To do this, the Silent Cube Storage System must be integrated into the Windows domain via the Active Directory menu.
The Silent Cubes Software manages access rights only at the share level, not at the user level. Therefore, user and rights management must be performed under Windows via the Active Directory configuration. The administrator account of the Microsoft AD domain only requires the Silent Cube Storage System to add the Head Unit to the domain. The login information will not be saved!
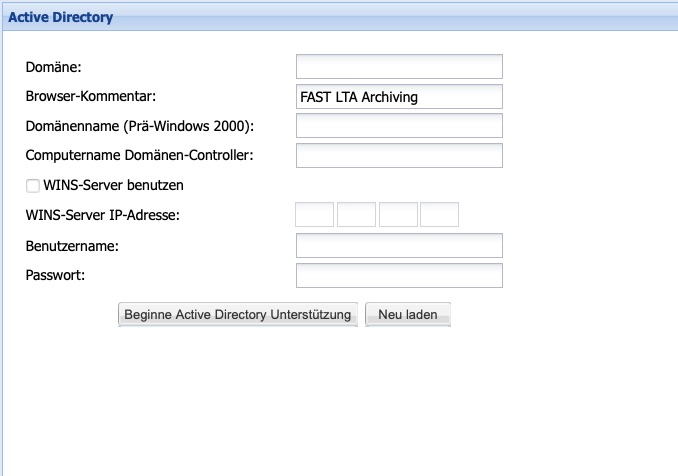
|
Setting |
Description |
|
Domain |
Long domain name of the Microsoft AD domain (e.g., your-domain.intra). For pre-Windows-2003, only use the first part, for example, your-domain |
|
Browser comment |
Comment line that describes the role of the system in the network, for example, archive, workstation, etc. |
|
Domain name (pre-Windows 2000) |
Pre-Windows 2000 domain name. (e.g., your-domain) |
|
Computer domain controller |
Long computer name of the Microsoft AD domain controller. (e.g., domaincontroller.your-domain.intra) |
|
Use WINS server |
If the domain controller and WINS server are identical, this option does not need to be activated. If they are different servers, the option must be activated and the IP address of the WINS server must be entered. |
|
WINS server IP address |
The IP address of the WINS server |
|
Users |
The administrator account of the Microsoft AD domain. This account must have the rights to create a new machine in the domain. Enter without the preceding domain. |
|
Password |
The password of the administrator account. |
Table: Active Directory Settings
Note: The Domain Name System (DNS) of the domain controller and the Head Unit (see Chapter Network) must be identical. The same applies to the Network Time Protocol (NTP).
AD and Windows Server 2008
If Windows Server 2008 is used as the domain controller, some specific settings on the domain controller must be checked and any necessary changes made.
The Computer Browser service must be enabled (disabled by default). This service is necessary for the Head Unit to be listed and displayed in the network environment.
Printer and file sharing must be enabled. This activation is necessary for the Silent Cube Storage System to query its Security Identifier (SID). This SID is required for the Silent Cube Storage System to authenticate permanently to the domain in order to verify user information.
If the domain controller is in a different subnet than the Silent Cube Storage System, a WINS server must be added to the domain controller and configured in the Silent Cubes Software. The WINS server is used to receive and respond to cross-network NetBIOS requests.
Replication Group
To protect the data archived in the Silent Cube Storage System against disaster scenarios (such as fire, water, vandalism, or theft), it is possible to create a replication group.
For this purpose, a second mirrored Silent Cubes Storage System is installed at a second location (Primary/Secondary Installation).
The mirrored Silent Cube Storage System (Secondary) must have its own Head Unit with the same software version and must match the capacity of the first Silent Cube Storage System (Primary).
A replication group can always be added later to an existing single-user installation (only Primary Installation).
In principle, there are three ways to establish a replication group:
Both instances in the same subnet
Figure: Replication cluster with virtual IP
If both instances are in the same subnet, a total of 3 IP addresses are required: one for the Primary instance, one for the Secondary instance, and an additional one as a Virtual IP, through which communication with the overall system is conducted.
Replication over different subnets
If the Primary and Secondary instances are in different subnets, there is no Virtual IP. Access is always via the IP address of the Primary instance.
If the subnets are not transparent and the IP addresses are not directly reachable from each other, routing can also be configured (see Chapter 6.1 - Network Settings). The 'Test Communication' button can be used in the configuration to check the connection to the Secondary instance.
In replication across different subnets, automatic switching in the event of a failure without manual intervention from the storing instances is not possible - even if this can be selected in the options. Generally, routes and IP addresses in the storing instances must be changed through manual intervention in order for the archiving system to be accessible again.
Replication to a cloud location
Replication at different locations behaves fundamentally similarly to replication within a cloud location. However, when replicating to a cloud location, it should be noted that port forwarding and Network Address Translation (NAT) usually need to be taken into account during setup. In simple terms, a public port and a public IP address are used for the connection, which are then forwarded to the internal IP address and the internal port of the secondary instance within the cloud location.
In replication to a cloud location, automatic failover in case of failure is not possible.
Configuration
In order to integrate a second Silent Cube Storage System into the replication cluster, its network settings must first be configured independently of the replication cluster.
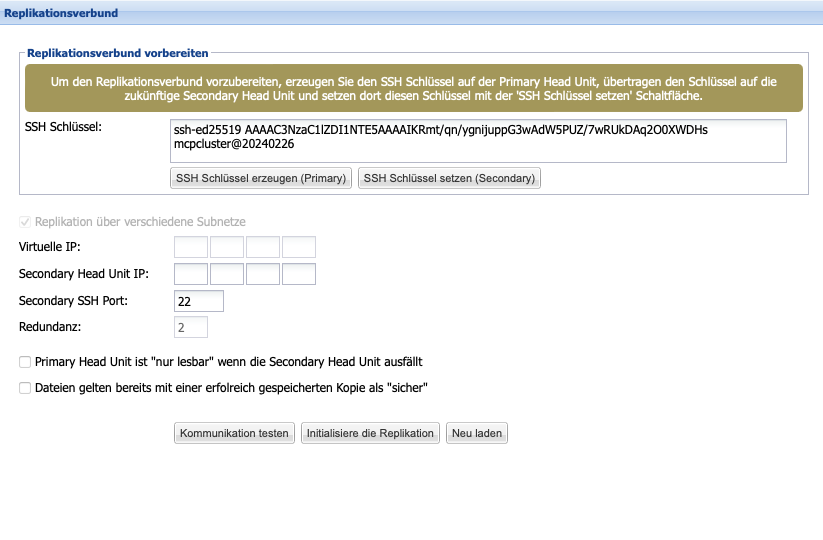
As of version 3.2, it is necessary to perform a manual key exchange. This is intended to secure the tunnel connection between both systems later on. To perform the key exchange, first create an SSH key on the primary system by clicking the SSH key generate (Primary) button in the replication cluster menu.
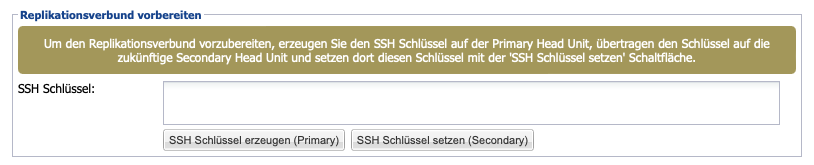
The generated SSH key will be displayed in the text field above and can thus be copied. Then paste the copied key into the SSH key field on the target machine and save it by clicking the Set SSH Key (Secondary) button. Thus, the key exchange has been successfully completed.
Subsequently, in the primary instance, in theReplication menu, the optional virtual IP address as well as the mandatory IP address of the secondary instance can be entered.TheoptionaleThe field Secondary SSH Port is available in conjunction with Compliance Option Cloud and allows the entry of a different external port for establishing the tunnel connection. The field Redundancy provides information about the multiplier of the redundancy level achieved through the creation of the replication association. The multiplier 2 also means that files only receive the status 'safe' by default once they have been archived on both the Primary and Secondary instances. To change this default setting, it can be configured via the button at the end of the dialog that filesthat have already been successfully saved are considered safe.
If the Primary Head Unit fails, the Secondary Head Unit will start its approvals in Read-Only mode. By default, no further data can be stored until either a manual or automatic switch to the Secondary Head Unit is performed, or until the Primary Head Unit is reachable again. The automatic switch can be determined using the option Automatic Switching After Downtime. This can occur immediately or after a user-defined downtime. By default, automatic switching is discouraged, and it is recommended instead to perform a manual switch when the Primary Head Unit is demonstrably unreachable for the medium to long term.
If the Secondary Head Unit or the connection between Primary and Secondary fails, write access to the Primary Head Unit may be restricted to prevent a so-called 'split-brain situation.' The option 'Primary is 'read-only' when Secondary fails' serves this purpose.
Note: The replication cluster must not be wired through the CUBES interfaces! Communication must occur over the LAN interfaces.
Miscellaneous
SMB Options
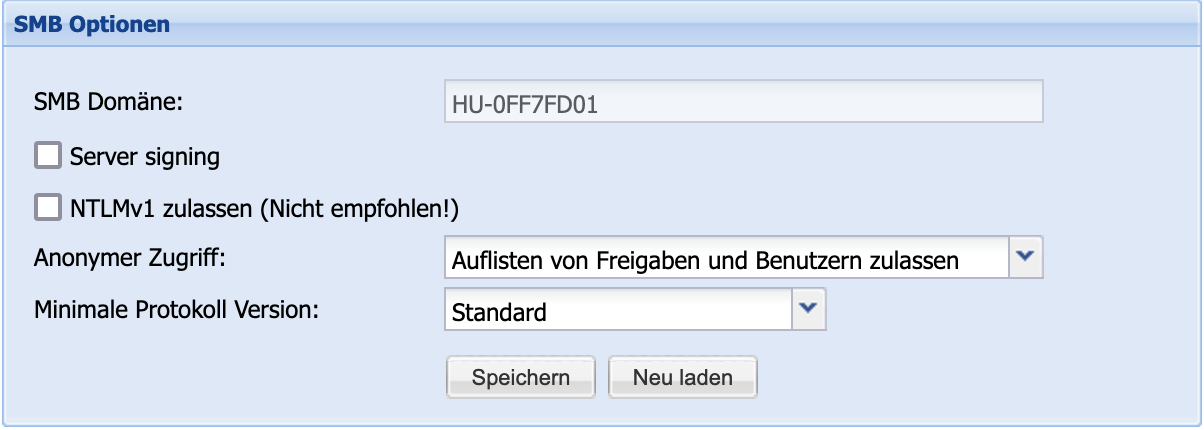
For further fine-tuning of the SMB service, the Miscellaneous section provides the SMB Options area. Here, the option can be setSMB Server Signing to enhance the security of the communication. Additionally, for exceptional cases, the authentication optionNTLMv1can be enabled. Please note that this significantly reduces the security of the SMB connection.
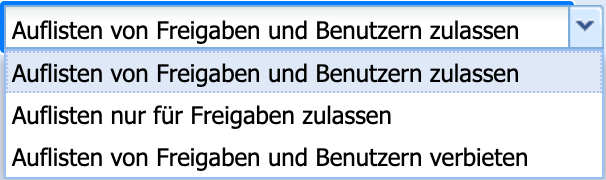
Another setting for adjusting security can be found under the itemAnonymous Access. Here, it can be determined which lists may be queried anonymously over the SMB connection.
Finally, the areaMinimum Protocol Version allows you to specify which protocol version the accessing Samba service must support at a minimum, in order to enhance security here as well.
SCP Options

For security reasons, access options for SCP connections are also regularly updated, and outdated encryption and login procedures are disabled. Through the buttonSupport for old SSH clientsbackward compatibility can be activated if necessary. Please note that this may come at the expense of system security.
Number of Cubes for parallel writing

When multiple Silent Cube Storage Systems are used, they are filled linearly by default, that is, in sequence. Optionally, by writing in parallel to up to four Silent Cube Storage Systems, the internal data throughput and thus performance can be increased. Using the Number of Cubes option and a drop-down menu, the desired number can be set.
Schedule
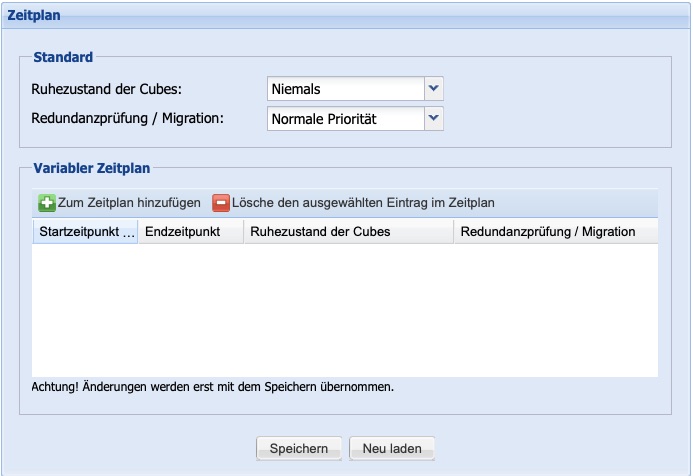
To save energy, the Silent Cube Storage System can enter a sleep mode. In this mode, a single storage unit requires only a few watts. Of course, the Silent Cube Storage System remains accessible and 'wakes up' as soon as a read or write access occurs. Using the sleep mode option for the CUBES (default = never) and a drop-down menu, it can be set after how many minutes or hours of inactivity the sleep mode should be initiated.
Redundancy checking (synchronization of the two instances) and migration (moving data to a storage unit or Head Unit) are tasks that may consume system resources and thus affect overall performance. Therefore, the priority can be set for this.
Normal priority corresponds to the previous default setting and weighs the normal processes against the necessary redundancy check and a possible. background-running migration.
Low priority allows a redundancy check or migration during normal operation only when no other processes are active (system idle).
Not allowed stops the redundancy check and migration.
In addition to the default setting, an arbitrary number of schedules can be created, for which both the idle state setting of the Silent Cubes and the priority of the redundancy check and migration can be defined for specified periods. In the specified schedules, the default setting is thus overwritten. For example, it is possible to never put the Silent Cubes into sleep mode during business hours and to prohibit redundancy checks or migrations, thus shifting them to times when there is no access to the Silent Cubes.
All normal processes, especially replication to a slave system, are not affected by these settings!
Service
In the Service menu, maintenance tasks can primarily be performed.
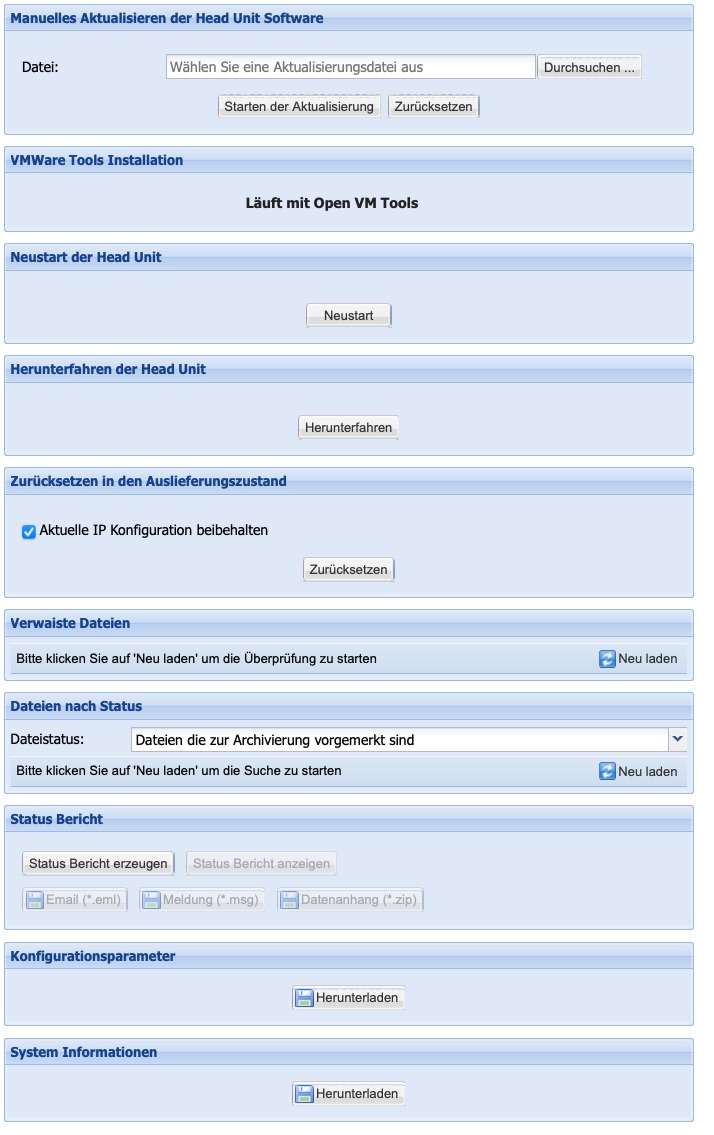
Manual update of the Head Unit software
The software of the Silent Cube Storage System is continuously being developed and brings additional or improved features with each release. Software updates are made available, among other things, as file downloads for registered customers through the service area of the FAST LTA website (www.fast-lta.de).
Note: Before a software update is performed, it must be ensured that the value in the Pending column of the Volume overview (Management menu) is 0, and thus no files remain for archiving in the Cache of the Head Unit — otherwise, there is a risk of data loss.
After a file download has been completed, a software update is installed via the Manual Update function of the Head Unit software. To do this, the file must first be selected using the Browse... button. By clicking the Start Update button, the update process begins. This update process takes approximately 15 minutes, and the Silent Cube Storage System is not operational during this time!
In a replication cluster (see Chapter 6.7), both Head Units must be updated individually.
It is essential to ensure that the Head Unit of the Primary and the Secondary always have an identical software version, as otherwise malfunctions may occur!
After completing a software update, the Head Unit is usually restarted, and a new login is required.
VMware Tools Installation
If the Head Unit is operated in a VMware environment, the so-called VMware Tools must be installed after the initial installation or for the purpose of a software update. The VMware Tools are a driver package that is necessary for the error-free operation of the Head Unit. The required VMware Tools are provided by the FAST LTA Support Team.
Restart of the Head Unit
The Head Unit of the Silent Cube Storage System is designed for continuous operation and only requires a restart in rare cases. If this should become necessary, the process can be initiated using the Restart button. It should be noted that the Silent Cube Storage System is not operational for several minutes.
To force a restart, the power plug of the Head Unit must never be pulled and reinserted without the explicit instruction of the FAST LTA Support Team!
Shutting Down the Head Unit
In order for the operating system of the Head Unit to be shut down in an orderly manner and for all running processes to be correctly terminated, the Head Unit should be turned off using the Shut Down button.
Reset to factory settings
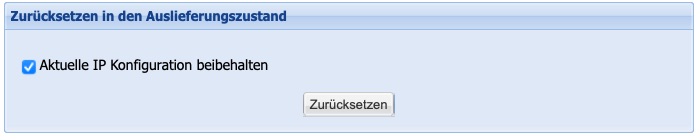
For service cases, the system provides the option to perform a reset to factory settings. In this case, it can be decided whether the entire configuration should be reset or whether the IP address should be retained for easier connection configuration.
The reset only affects the Silent Cubes Software, not the contents of the Silent Cubes. These cannot be reset due to the equipment with a hardware WORM controller.
After the reset, a time-consuming restoration of data from the connected Silent Cubes may be necessary. Therefore, use this function only in urgent service cases that have been coordinated with support.
Orphaned files

Through the area of orphaned files, it is possible to uncover filesystem entries that could not be correctly written due to network errors. Thus, erroneous data deliveries can be easily and efficiently corrected.
Files by Status

This function allows for the identification of outstanding files. After selecting the file status, clicking on Reload will display the corresponding list, which can then also be saved locally.
Status Report, Configuration Parameters & System
Information
The status report and a summary of all configuration parameters primarily serve the FAST LTA Support Team for assistance and analysis and do not contain any information about the already archived data. This 'offline' option is necessary when the Silent Cube Storage System is located in a completely isolated network, thus preventing any notifications from being sent to the FAST LTA Monitoring Service.
To save a status report, it must first be created using the 'Generate Status Report' button. It can then be viewed directly or saved locally on the administrator's computer in the format *.eml, *.msg, or *.zip.
The configuration parameters are available in XML format and are stored in the same manner. The stored configuration parameters can also be used, for example, for installation documentation purposes.
Additionally, a file with system description can be generated in the System Information section, which can be requested from the service if needed.
Licenses & Activation
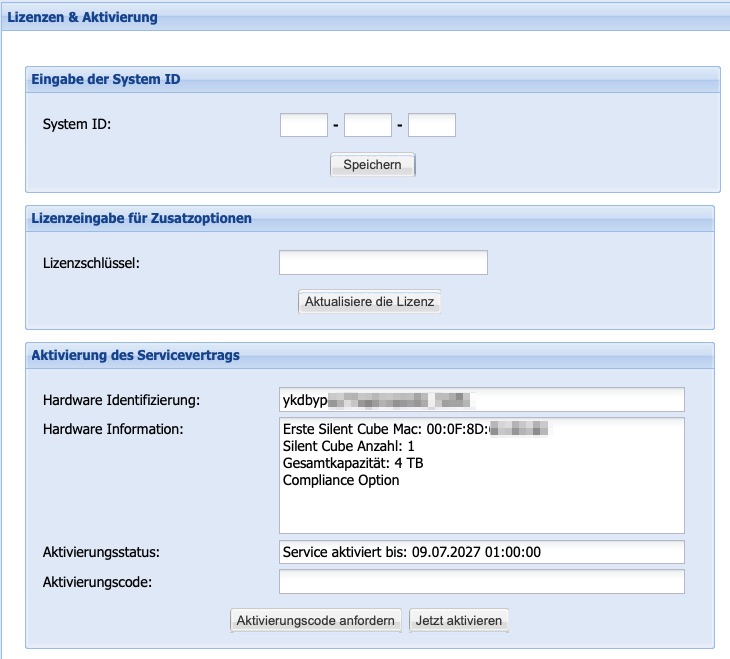
All Silent Cube Storage Systems are initially delivered with a 90-day valid license (without license options). During this time, the standard functionality of the Silent Cube Storage System can be utilized and configured according to the respective archiving requirements.
Of course, data archived on the Silent Cube Storage System will not be lost after the expiration of the 90-day license. However, no new data can be archived.
With the purchase of a Silent Cube Storage System, you receive aSystem ID,which can be entered as a unique identifier in the corresponding section. Furthermore, a service contract is concluded for a defined period. For this period, FAST LTA GmbH provides its customers with an appropriate license. This license code will be sent to the registered administrator via email.
After the expiration of the concluded service contract, a new service contract must be concluded with FAST LTA GmbH, and the registered administrator will then receive a new license code.
Note: After the expiration of the service contract, the Silent Cubes Storage System can still be used with full functionality!
In the menu for activating the service contract, the license code must be entered in the Activation Code field. Using the button Activate Now, the license code will be evaluated and saved. In the Activation Status field, information about the completed service contract can be read. Above that, there is information about the used Silent Cube Storage System.
The activation code for any purchased Compliance Option is entered in the License Key field in the Additional Options License Entry window. Using the button Update License, the functions of the Compliance Option will be permanently activated after verification of the activation code.
In the header of the Silent Cubes Software, activated licenses and options as well as the duration of the service contract can be read.

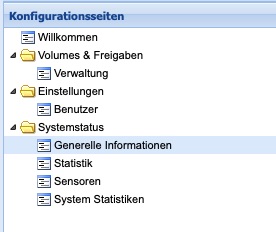
System Status
In the System Status menu, information about all components of the Silent Cube Storage System (including replication group) can primarily be viewed. Furthermore, this menu also integrates the functions to relocate the Head Unit, migrate Storage Units, and remove a Storage Unit.
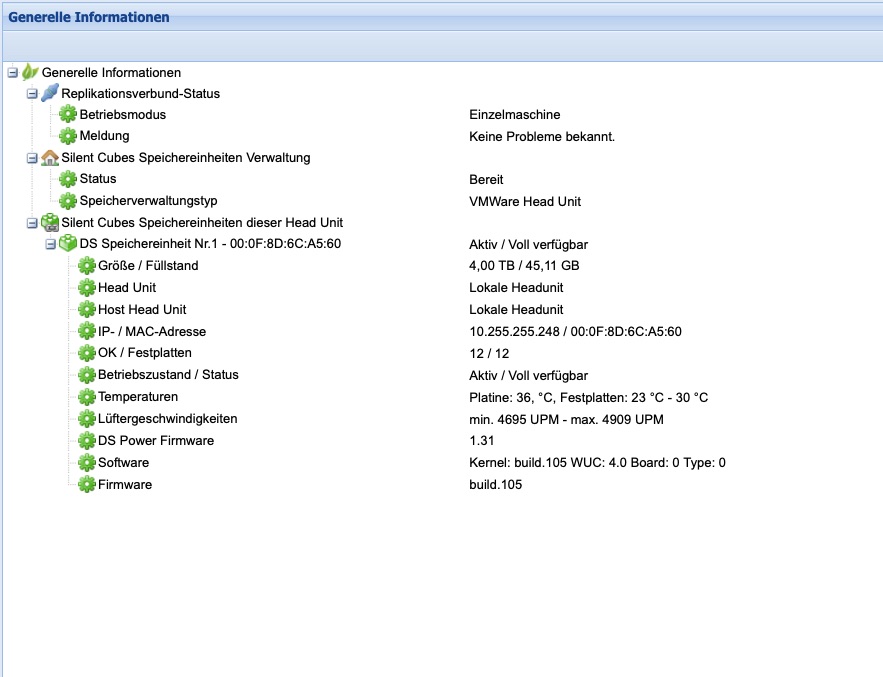
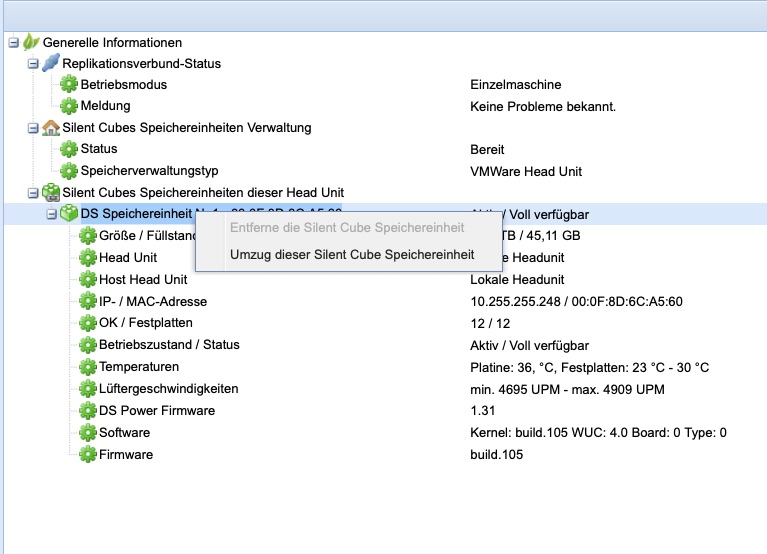
General Information
The General Information menu provides an overview of all components of the Silent Cube Storage System (see figure). Each entry is marked with a green, yellow, or red icon depending on its status and additionally displays a brief description.
Relocate Head Unit
For technical reasons, it may be necessary to transfer the storage content of an existing Head Unit to a new one. A context menu that appears after a right-click on the entry Silent Cubes Storage Management enables this functionality. This process is carried out by FAST LTA Support and is therefore not relevant in regular operations.
Relocation of a Storage Unit
Depending on the already completed operating time and the amount of data already archived, it may be economically and technically sensible to transfer several Silent Cube Storage Units into larger Storage Units in the future. FAST LTA recommends replacing the Storage Units after about 5, at the latest after 10 years.
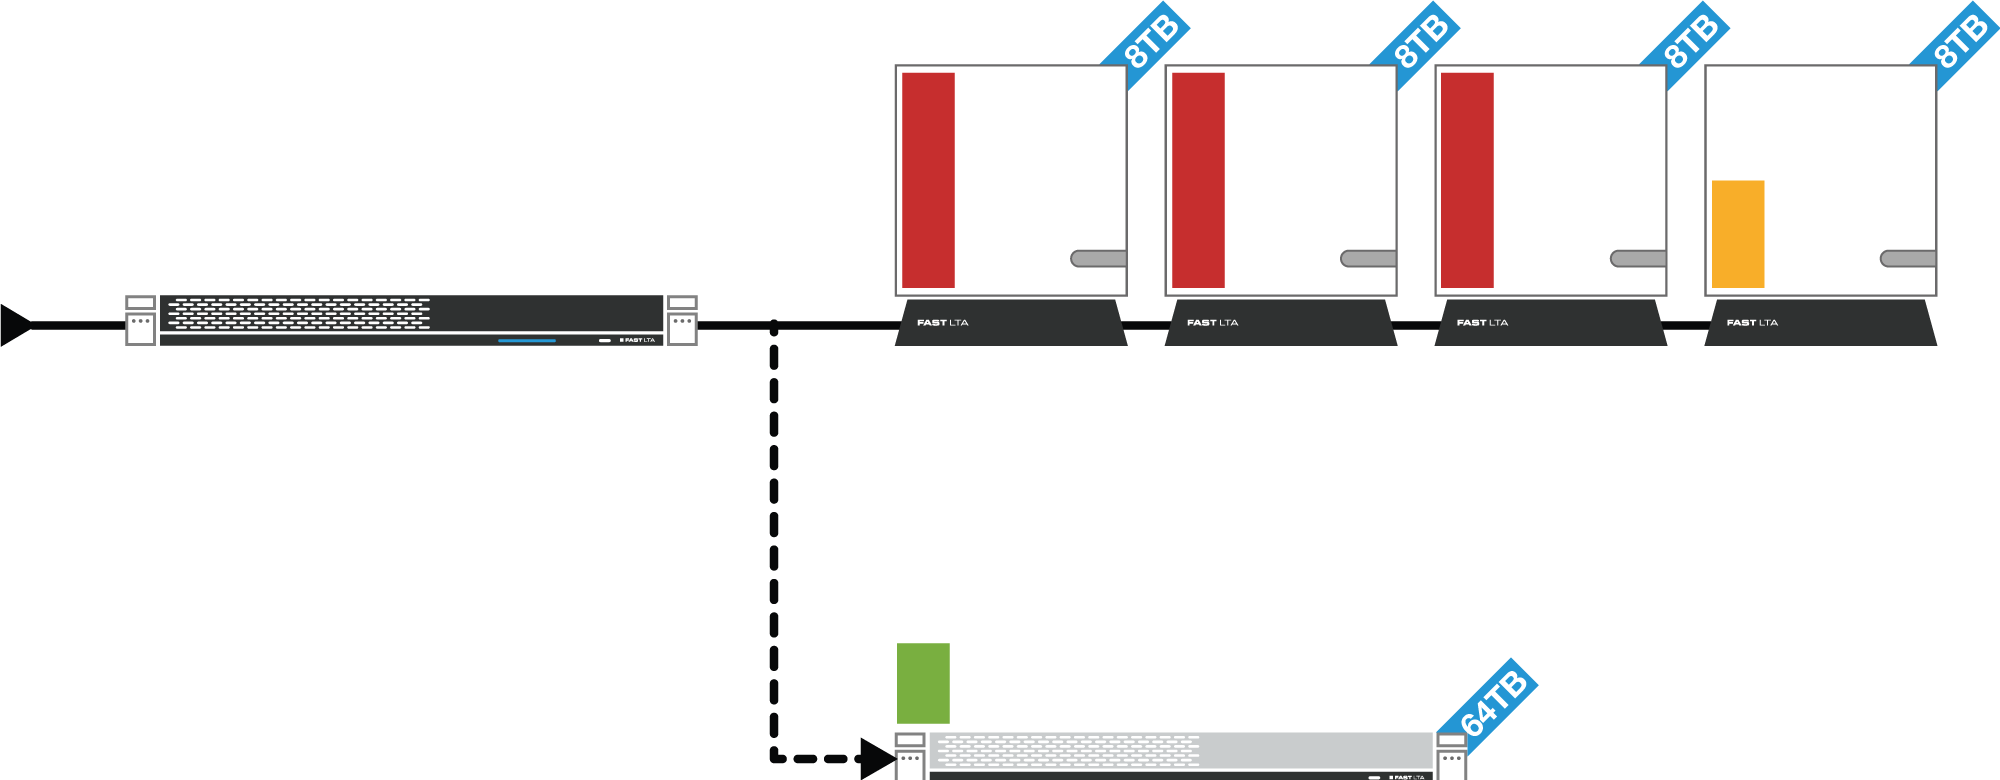
To do this, the new storage unit is first connected in parallel to the existing one. By right-clicking on the entry Storage Unit No. x, the context menu appears with the entry to migrate a storage unit (see Figure). The new storage unit must then be selected. A background process ensures that all data from the previous storage unit is completely transferred to the new one. The bitwise verification using 512-bit SHA-2 hash guarantees data integrity.
The Silent Cube Storage System no longer archives new data to a storage unit released for migration, but instead archives it directly to the new storage unit. After a renewed and complete verification of the data, the old storage unit can be removed from the system via the Silent Cubes Software (see Chapter 7.1.3) and subsequently powered down. The ongoing operation is not affected by this.
Files that have been 'deleted' from the system still occupy storage space on the Silent Cubes due to the WORM principle.
Using the option to permanently remove deleted data, these files will be disregarded during the migration of a Silent Cube and will then be missing on the new Silent Cube. Thus, after migration, the storage space previously occupied by actually deleted files becomes available.
After starting the migration prompt, a new view opens: Migration of Data. Here, it is selected which Silent Cubes will be included in the migration with the permanent deletion of data.
After clicking on Start Calculation, the system determines the amount of data that will be freed up. Subsequently, the migration can be initiated.
Removing a Storage Unit
The Silent Cube Storage Unit can be removed from the Silent Cube Storage System using the context menu option Remove the Silent Cube Storage Unit. Storage Units that have been migrated, accidentally connected, or on which no data has yet been archived can be removed. By right-clicking on the entry Storage Unit No. x, the context menu appears with the option to remove a Storage Unit (see Figure - Migrate / Remove Silent Cube Storage Unit).
Statistics
In the Statistics menu, the Silent Cubes Software displays statistics on completed archiving operations over time. The charts provide insights into when which amount of data and how many files were archived. The statistics can be narrowed down to a specific Volume or displayed for all created Volumes. Each of the five diagrams represents a time span, each with an individual sampling interval.
|
Diagram Number |
Time Span |
Sampling Interval |
|
1 |
2.4 hours |
1 minute |
|
2 |
24 hours |
10 minutes |
|
3 |
1 week |
1 hour |
|
4 |
1 month |
6 hours |
|
5 |
4 months |
1 day |
Table: Statistical Diagrams with Parameters
Sensors
The Sensors menu displays the current measurement values of all sensors within the Silent Cube Storage System (see illustration).
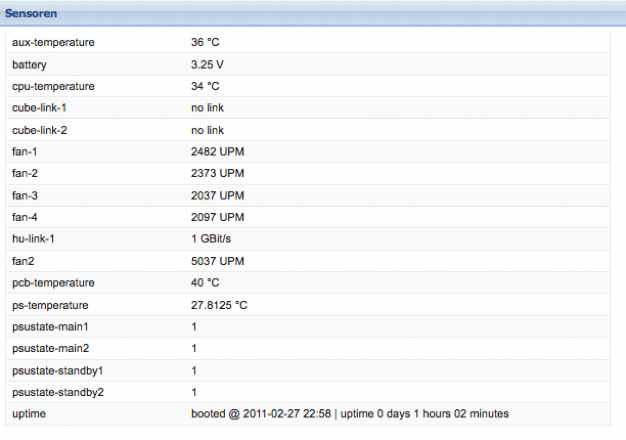
Figure: Sensors
System Statistics
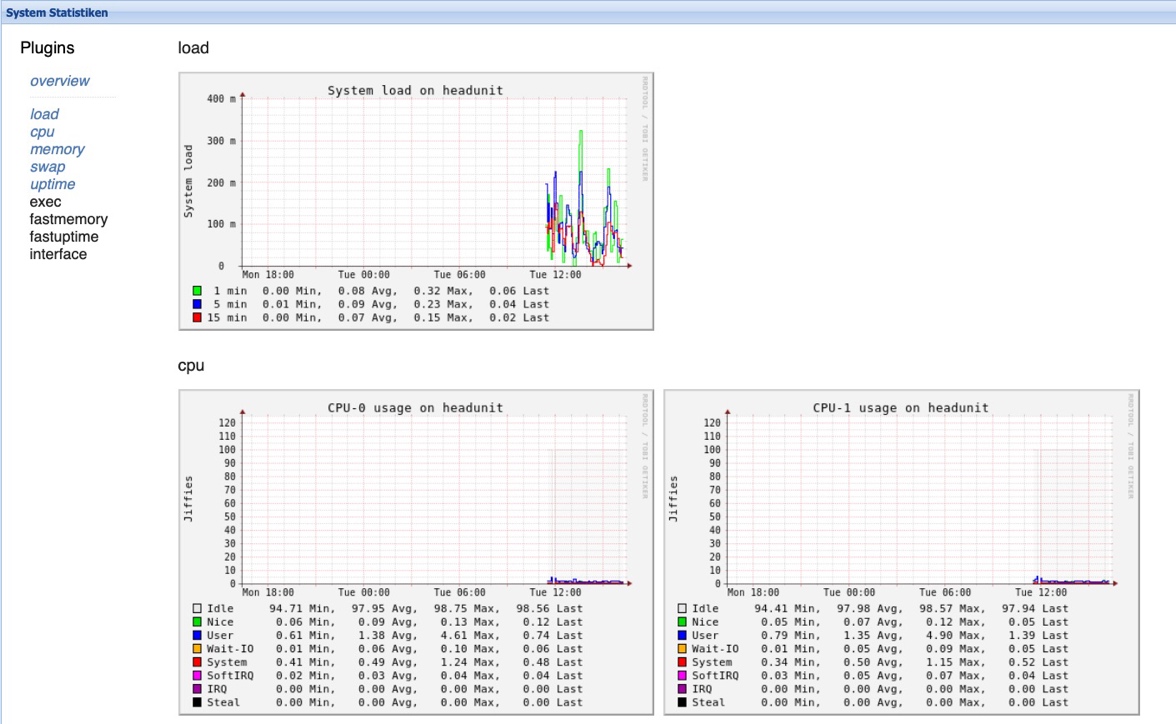
The System Statistics area serves the analysis of system load. Here, among other things, historical statistics on load, CPU usage, and network load can be viewed. This area thus supports analysis by the service department if needed.I