
The components of the long-term storage system
-
Silent Cube (DS / DS Pro) storage unit(s)
-
Head Unit (Pro)
-
Optional: replication to a second site
-
Optional: Compliance Option
-
Maintenance contract
Four components make the Silent Cubes long-term storage system a particularly effective and highly redundant disk-based storage solution. The storage unit and the Head Unit naturally serve as the fundamental hardware building blocks. Together with the third component, the maintenance contract, you ensure that your storage system is continuously monitored and serviced quickly in the event of a problem.
The fourth component is the Compliance Option, which is ideal precisely when your company is obligated to use audit-proof storage. In this case, it must be possible to prove at any time that only authorized persons have access to the stored data and that the data has not been manipulated. In addition, this must happen continuously and automatically ensure data security, availability, and data protection. The Silent Cubes long-term storage system is ideally equipped for this task and meets all relevant legal audit requirements.
Silent Cube DS (Pro) storage unit

Every Silent Cubes long-term storage system is based on at least one storage unit, the Silent Cube DS (4 or 8 TB net) or Silent Cube DS Pro. These act as permanent, disk-based storage.
-
Capacity 4/6, 8/12, 16/24, 32/48, 64/96 or 128/192 TB (net/gross)
-
12 hard disks (4 each from three different production batches), quadruple redundancy through Erasure Resilient Coding
-
WORM sealing against deletion and modification at the lowest hardware level
-
Second power supply unit for redundant power supply
-
Power consumption approx. 5 watts in standby mode
-
Connection to the Head Unit via Gigabit Ethernet (Silent Cube DS: 1G, Silent Cube DS Pro: 10G)
-
19-inch format, 1 RU, full length
-
Includes rack mount kit
FCC Declaration of Conformity
This device complies with Part 15 of the FCC Rules. Operation is subject to the following two conditions: (1) this device may not cause harmful interference, and (2) this device must accept any interference received, including interference that may cause undesired operation.
Head Unit (Pro)

Figure: The Head Unit is the control center of the long-term storage system, manages up to 128 storage systems via DHCP, and connects to the corporate network via Gigabit Ethernet.
The Head Unit is the control center of the Silent Cube storage system and serves as a cache for incoming and outgoing data. Via an Ethernet connection, the Head Unit acts as a bridgehead to your network, where it is integrated as a NAS (Network Attached Storage). Within the Silent Cube storage system, the Head Unit operates as a dedicated server and assigns an IP address to each connected Silent Cube via DHCP.
-
Network storage (NAS) with 1 terabyte of internal cache
-
Management of the connected storage units with configurable virtual volumes and access rights
-
Connection via SMB/CIFS (with Active Directory support), NFS share, SCP client
-
Includes functions for asynchronous replication and secure data transfer to new hardware
-
Replication mode for local replication
-
Full recovery from the data on the connected storage units
-
Connection to the network via Gigabit Ethernet (Head Unit: 1G, Head Unit Pro: 10G)
-
19-inch format, 1 RU, half length
-
Includes rack mount kit
FCC Declaration of Conformity
This device complies with Part 15 of the FCC Rules. Operation is subject to the following two conditions: (1) this device may not cause harmful interference, and (2) this device must accept any interference received, including interference that may cause undesired operation.
Compliance Option
In addition to the Head Unit and the storage systems, the Compliance Option provides you with a further expansion stage for the Silent Cubes long-term storage system. With the Compliance Option, you enable audit-proof archiving of data on the Silent Cubes long-term storage system that meets all relevant compliance requirements.
-
Software to support audit-proof storage (e.g., in accordance with GDPdU, GoBS, RöV, and many others) in Germany, Austria, and Switzerland
-
Proof of identity via access to the 512-bit SHA-2 hash values
-
Adjustable retention periods that cannot be changed afterward
Service
Warning: Under no circumstances attempt to repair the long-term storage system yourself, and do not remove the seals on the Head Unit and storage unit, as this will void the manufacturer's warranty. All maintenance work on these components is carried out by the FAST LTA Support team as part of your maintenance contract.
The comprehensive service provided by FAST LTA guarantees smooth operation of the Silent Cubes long-term storage system.
-
A fixed component of every installation
-
Local monitoring of all components and configurable e-mail reporting available
-
On-site service with hardware replacement while fully preserving the data stored on the storage units
-
Software updates included
-
All spare parts (hard disks, etc.) included
-
Standard term of 5 or 10 years (extendable)
-
Includes personnel and travel costs
-
Optional: availability 24 hours / 7 days
Unpacking and checking the scope of delivery
Before installing the Silent Cube and the Silent Cube Head Unit, please check that the scope of delivery for both devices is complete. The packaging contains the following components:
Silent Cube DS
Risk of crushing from falling loads
There is a risk of crushing your extremities if you drop the Silent Cube DS.
The storage unit weighs approx. 20 kg, so be careful when lifting it out of the packaging.
-
Silent Cube DS
-
Power cable (Schuko plug, two 3-pin IEC inlet connectors)
-
Ethernet cable (Cat 5e cable for connection to a 1 Gbit network)
-
2-piece mounting kit for installation in a 19" rack
Silent Cube DS Pro
Risk of crushing from falling loads
There is a risk of crushing your extremities if you drop the Silent Cube DS Pro.
The storage unit weighs approx. 20 kg, so be careful when lifting it out of the packaging.
-
Silent Cube DS Pro
-
Power cable (Schuko plug, two 3-pin IEC inlet connectors)
-
Ethernet cable (Cat 5e cable for connection to a 1 Gbit network)
-
2x SFP+ modules for connection to a 10 Gbit network via RJ45
-
2x SFP+ modules for connection to a 10 Gbit network via fiber optic
-
2-piece mounting kit for installation in a 19" rack
Head Unit
Risk of crushing from falling loads
There is a risk of crushing your extremities if you drop the Head Unit.
-
Head Unit
-
Power cable (Schuko plug, 3-pin IEC inlet connector)
-
Ethernet cable (Cat 5e cable for connection to a 1 Gbit network)
-
2-piece mounting kit for installing the Head Unit in a 19"-rack
Head Unit Pro
Risk of crushing from falling loads
There is a risk of crushing your extremities if you drop the Head Unit Pro.
-
Head Unit Pro
-
Power cable (Schuko plug, 3-pin IEC inlet connector)
-
Ethernet cable (Cat 5e cable for connection to a 1 Gbit network)
-
2 x SFP+ modules for connection to a 1 Gigabit Ethernet network via RJ45
-
4 x SFP+ modules for connection to a 10 Gbit network via RJ45
-
4 x SFP+ modules for connection to a 10 Gbit network via fiber optic
-
2-piece mounting kit for installing the Silent Cube Head Unit in a 19"-rack
Installation in the rack
Risk of injury from electrostatic discharge
During operation, the device can develop electrostatic charges that may cause minor electric shocks on contact. Always use an antistatic wristband with a grounding connection or an antistatic mat with a grounding cable when working on the Silent Cube system.
Risk of property damage from improper handling
The components of the Silent Cube system can be damaged if handled improperly. Only trained specialist personnel may handle the components of the Silent Cube system.
Installing the Head Unit (Pro)
Preparing the rack rails
The rail set for mounting the Head Unit consists of the rail sets for the left and right sides, as well as the corresponding screws.
The rails on each side in turn consist of an inner slide rail, which is attached to the device, and an outer rail for installation in the rack. To prepare, the outer and inner rails must be separated:
Pull the rails apart until the release lever appears
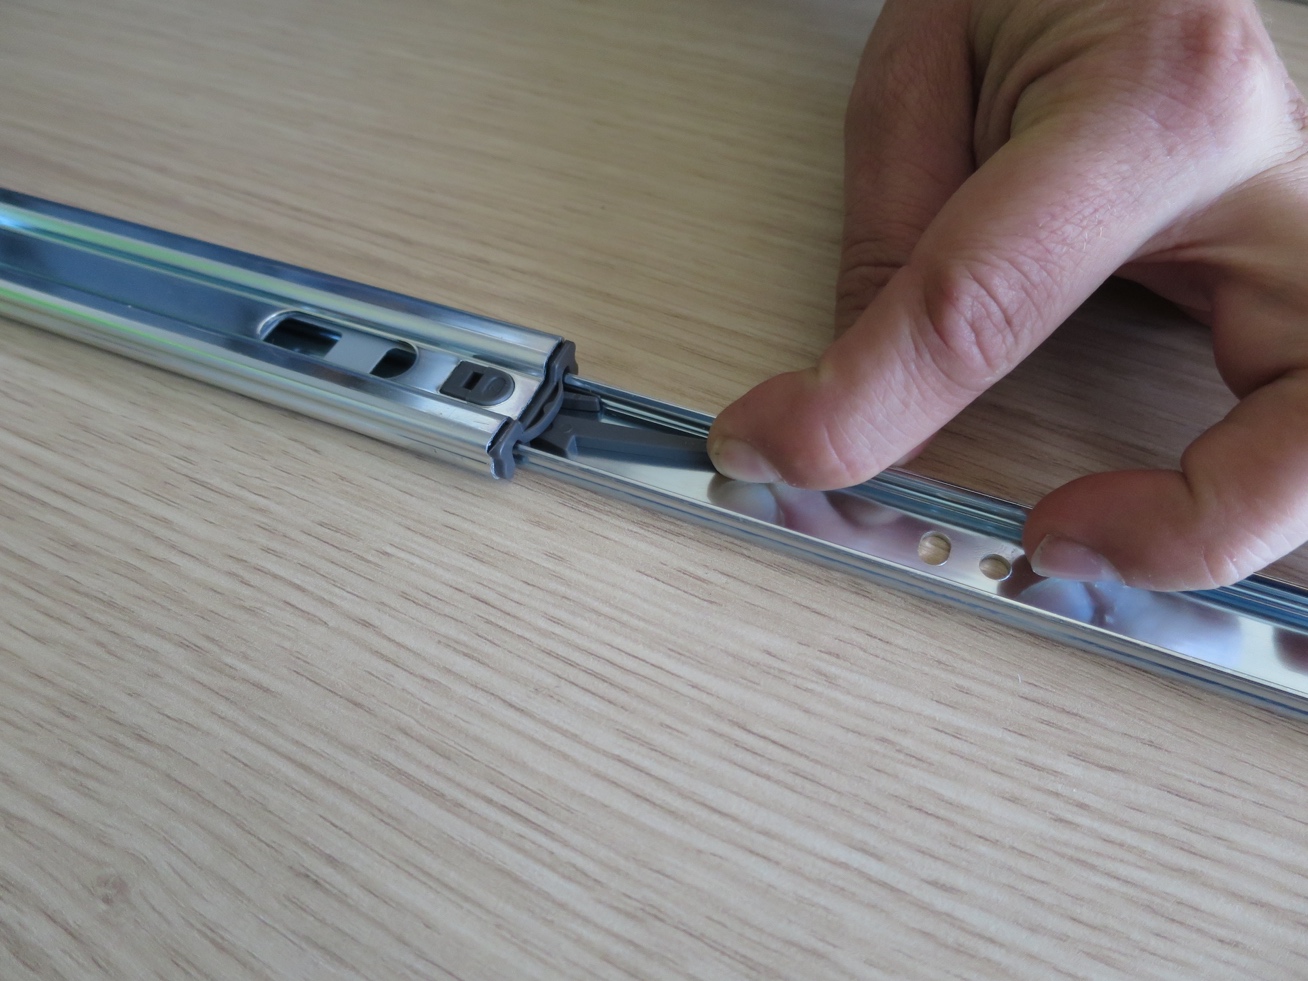
Now actuate the release lever and pull the inner rail completely out of the outer rail.
Mounting the rack rails on the Head Unit
After the inner rails have been successfully separated from the rail set in the previous step, they can be attached to both sides of the Head Unit. Use the enclosed M4x4 screws for this.
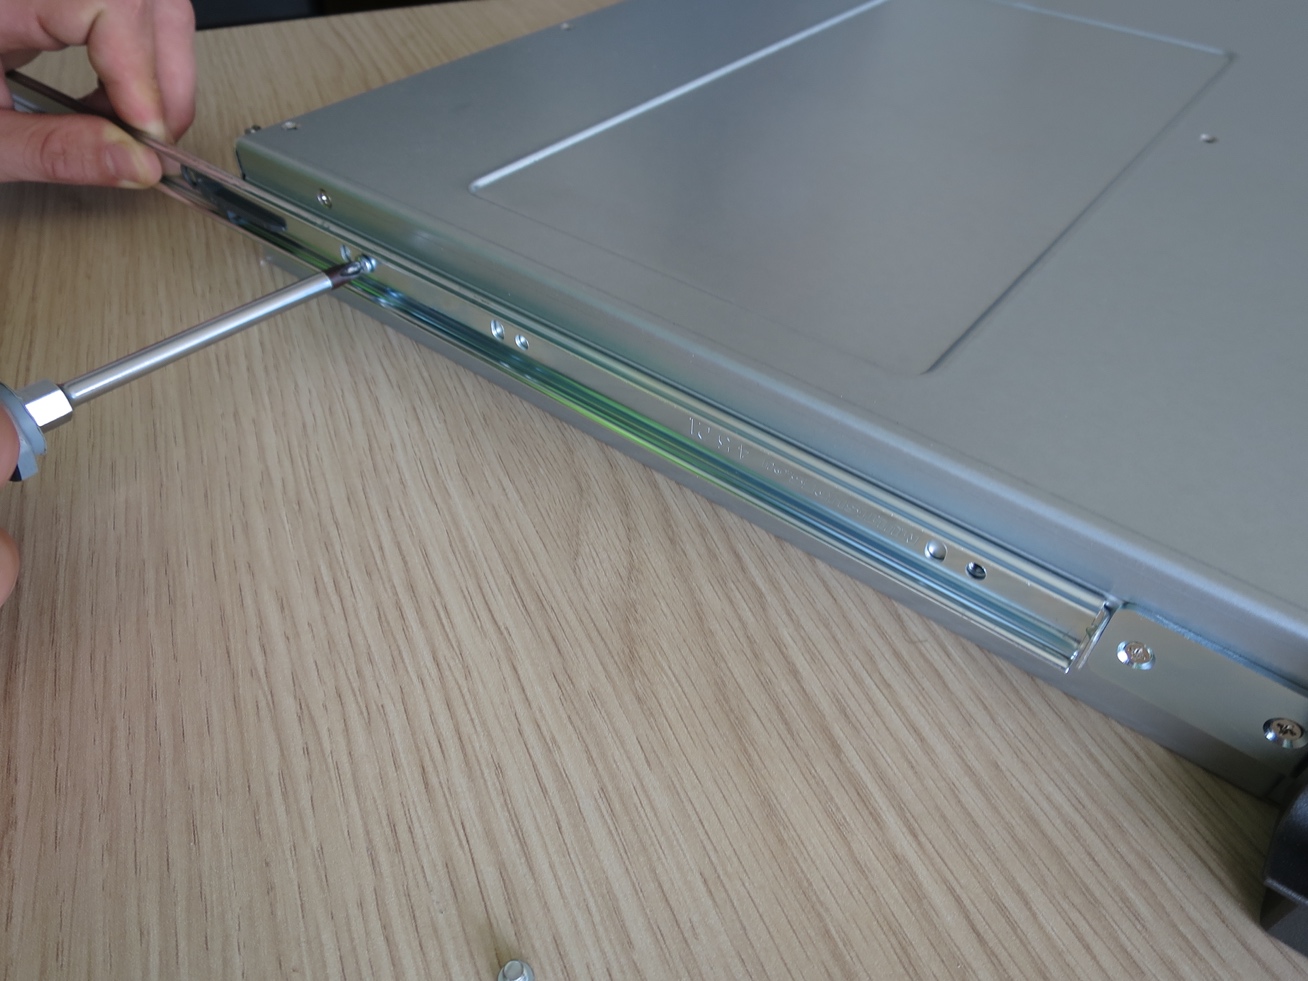
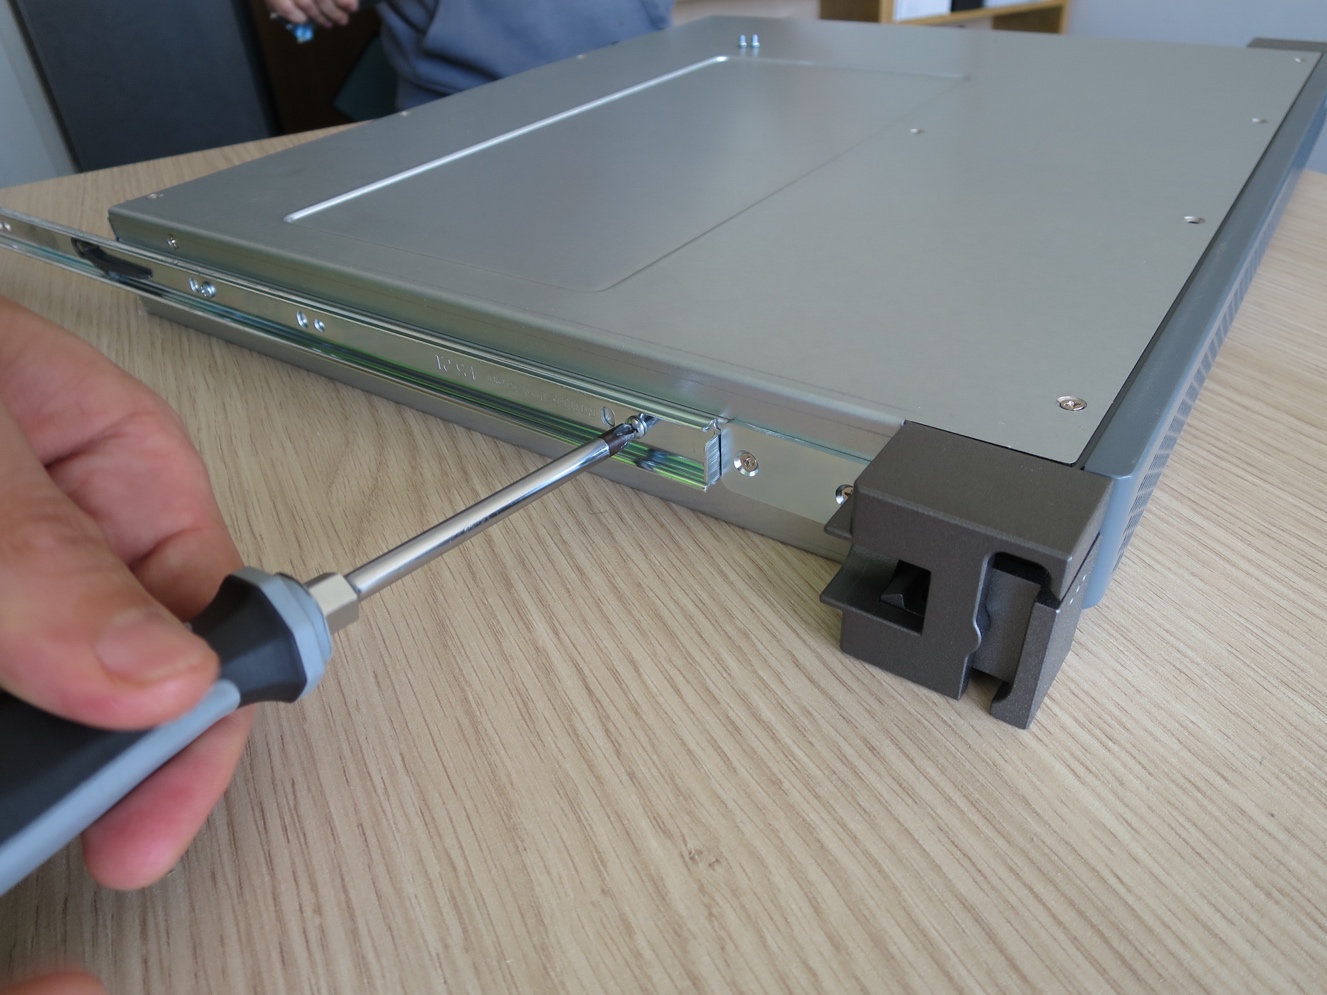
Note:
The inner rails are attached with 2 screws on each side.
Mounting the rack rails in the rack
For installation in the rack, you need the outer rack rails, the two long screws, and the two locking pins.
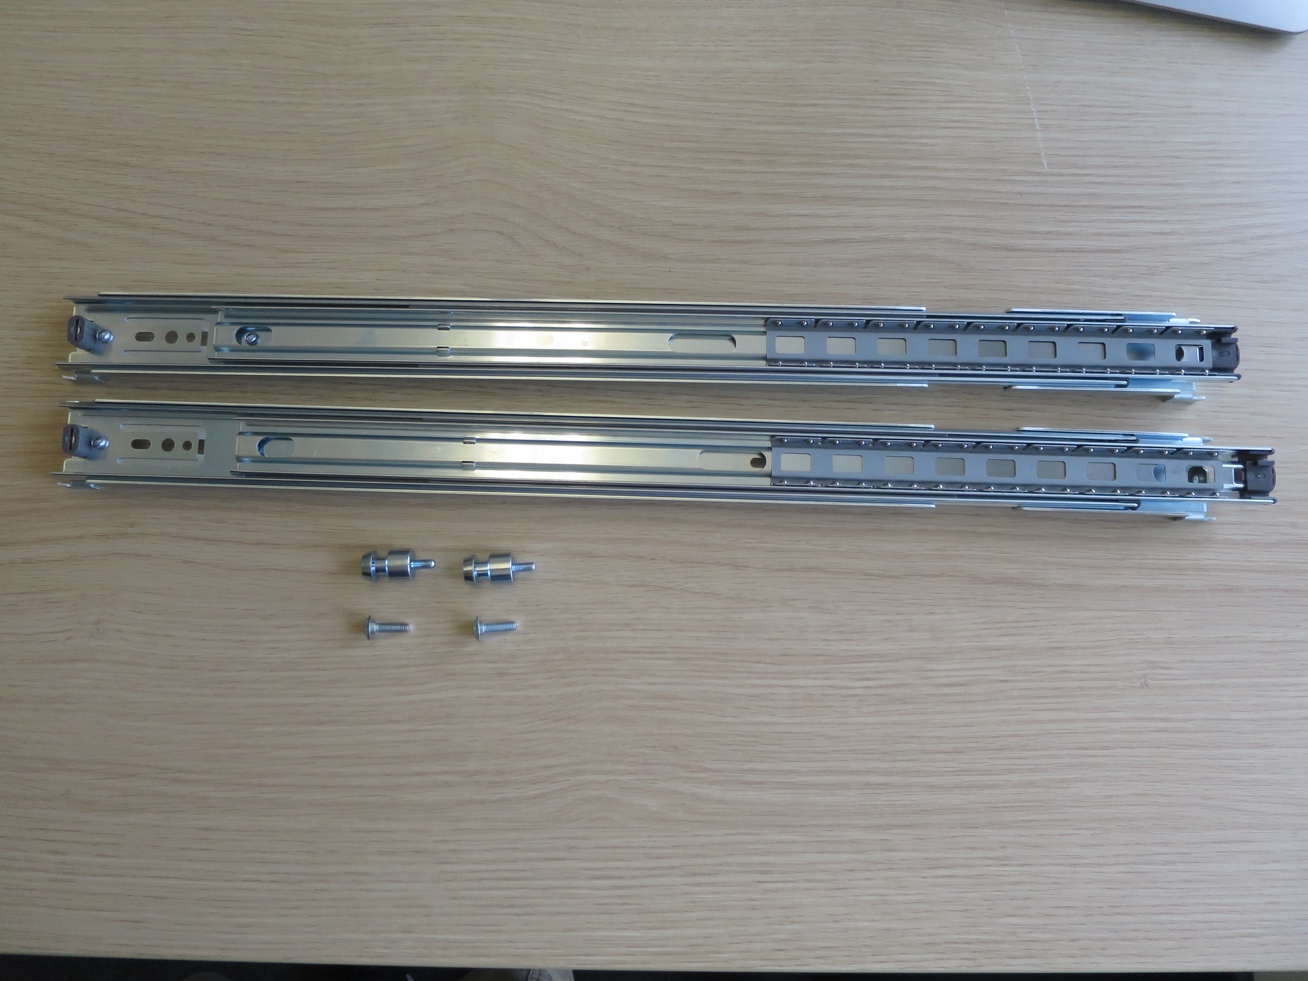
Begin the installation on both sides at the front of the rack. Secure the outer rail using the pins, and then screw it in place using the enclosed locking pin.
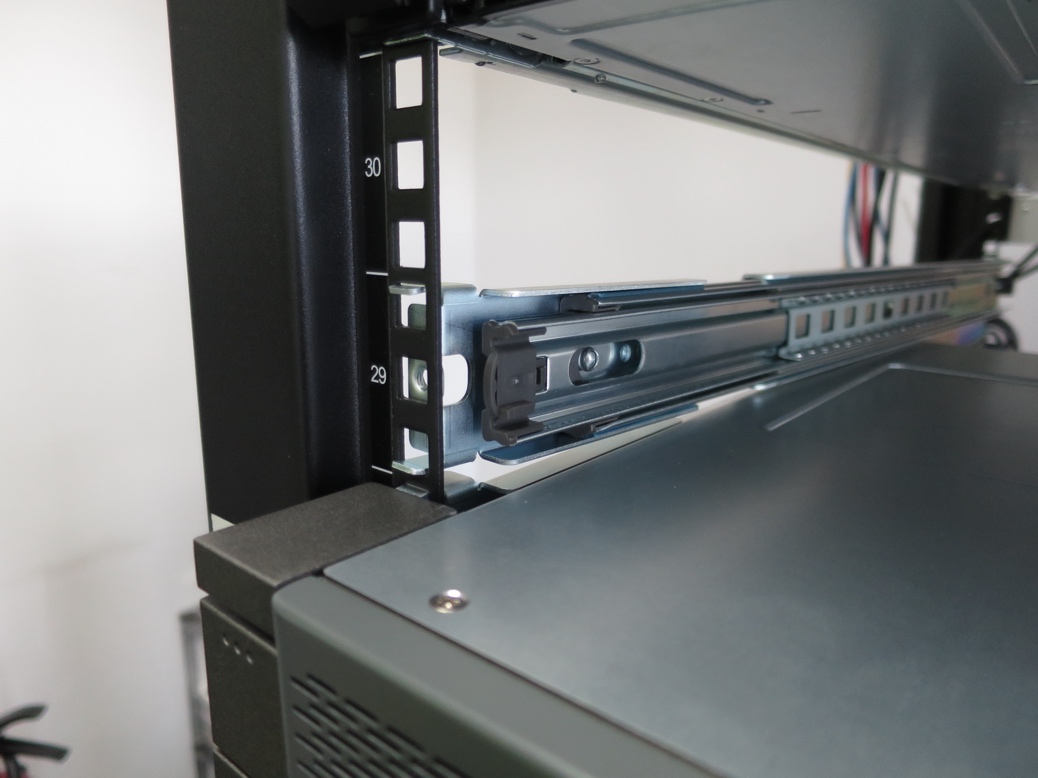
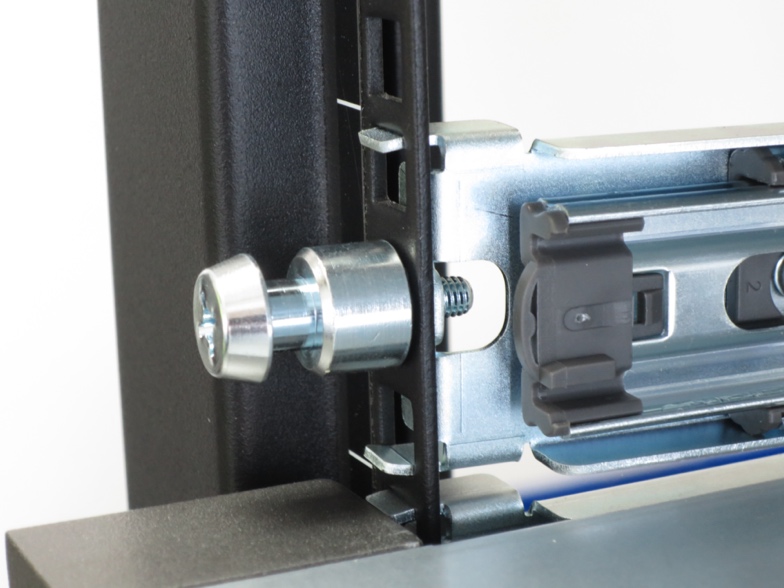
Now continue with the rear, and screw the rail in place at the same height using the corresponding screws.
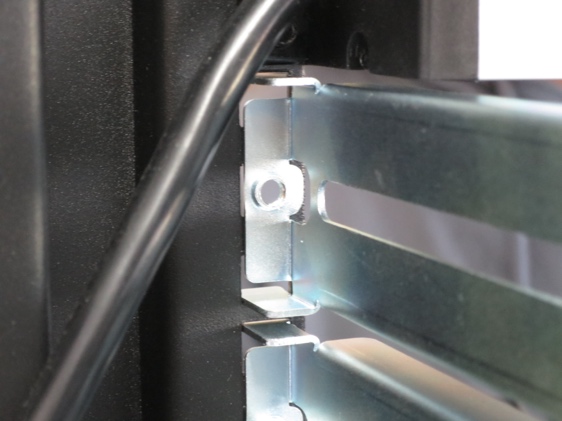
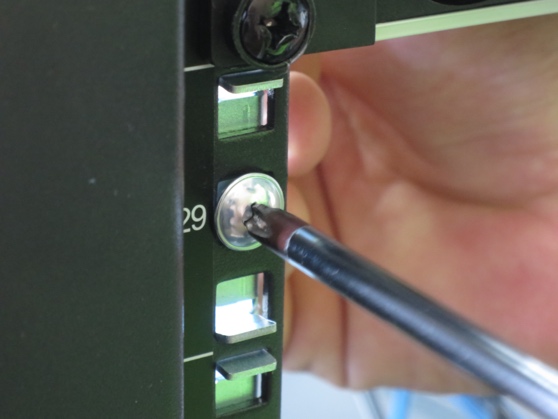
Inserting the Head Unit into the rack
Note: Two people are required for this step to ensure that the device is correctly seated in the rail set on both sides and to rule out the risk of property damage or personal injury during insertion.
Once all rail parts have been correctly screwed in place, the system can be slid into the rack. To do this, pull the sliding part of both outer rails out of the rack as far as it will go.
Then hold the outer rail firmly with one hand while simultaneously guiding the inner rails, which are mounted on the device, into the guides of the extended rails. Make sure that the inner rails move cleanly in the guide of the outer rails as you push them backward, until the latch and the Head Unit are firmly seated in the outer rail. The Head Unit can then be pushed completely into the rack until the retaining mechanism engages on the locking pin.
Installing the Silent Cube DS (Pro)
Preparing the rack rails
The rail set for mounting the Silent Cube DS consists of the rail sets for the left and right sides, as well as the corresponding screws.
The rails on each side in turn consist of an inner slide rail, which is attached to the device, and an outer rail for installation in the rack. To prepare, the outer and inner rails must be separated:
Pull the rails apart until the release lever (32) appears.
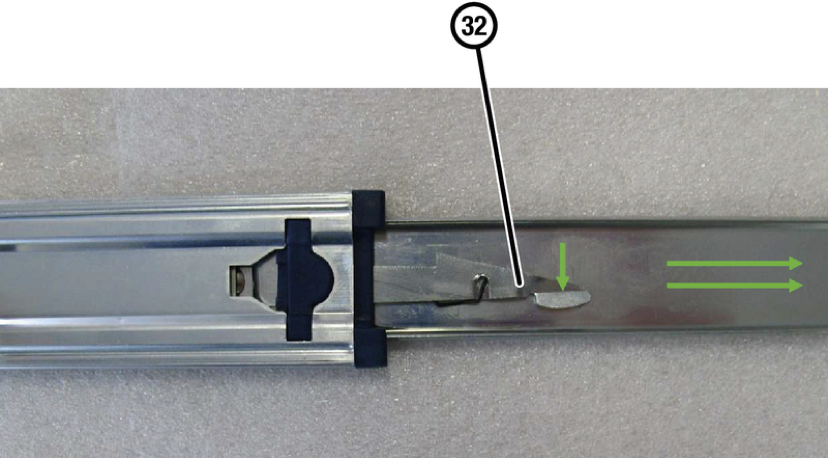
Now actuate the release lever and pull the inner rail completely out of the outer rail.
Mounting the rack rails on the Silent Cube DS
After the inner rail has been successfully separated from the rail set in the previous step, it can now be attached to the Silent Cube DS. Use the enclosed screws for this.
The inner rails are attached with 2 screws on each side.
Mounting the rack rails in the rack
For installation in the rack, you need the outer rack rails, the two long screws, and the two locking pins.
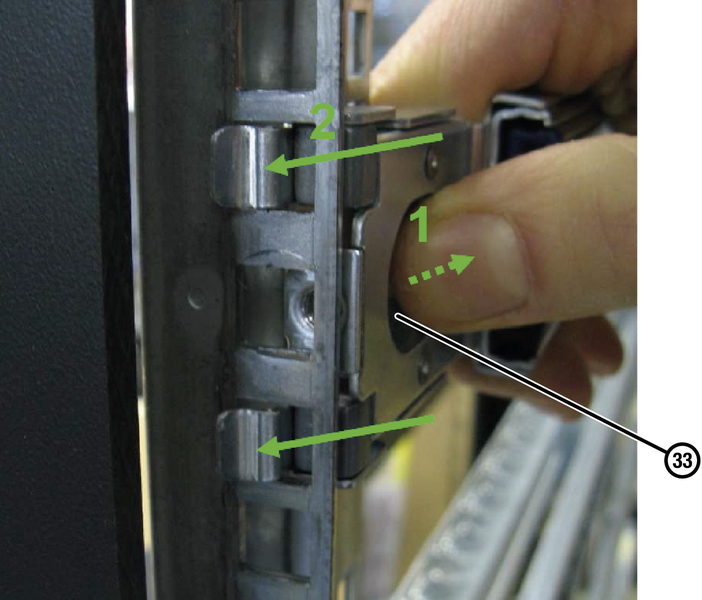
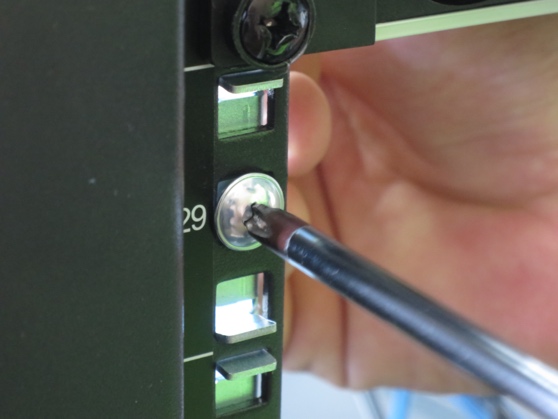
Begin the installation on both sides at the front of the rack. Secure the outer rail by pulling back the safety mechanism (33) and hanging the rail in the rack using the hooks. Then screw it in place using the locking pin.
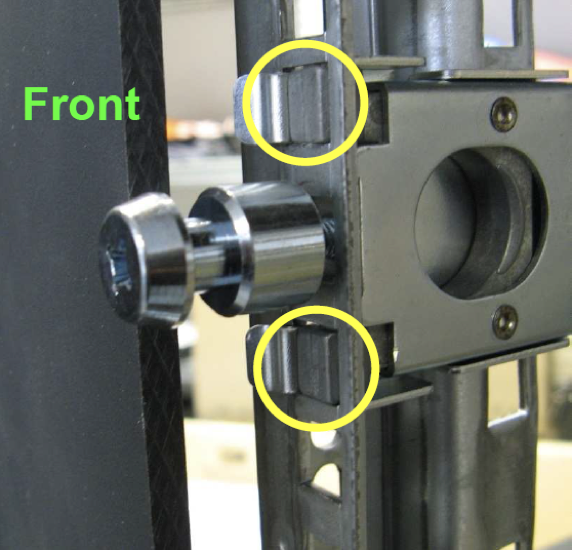
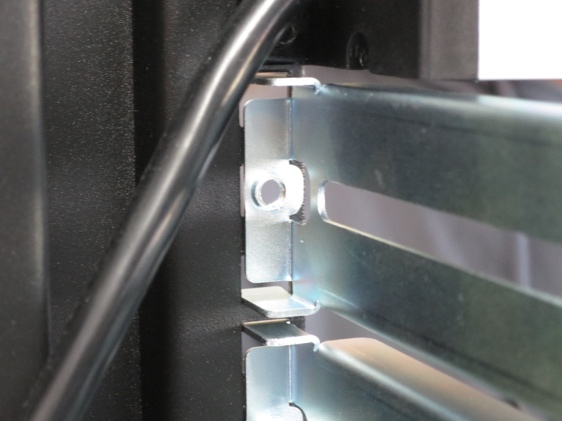
Now continue with the rear, and screw the rail in place at the same height using the corresponding screws.
Inserting the Silent Cube DS into the rack
Two people are required for this step to ensure that the device is correctly seated in the rail set on both sides and to rule out the risk of property damage or personal injury during insertion.
Once all rail parts have been correctly screwed in place, the system can be slid into the rack. To do this, pull the sliding part of both outer rails out of the rack as far as it will go, until they lock into place.
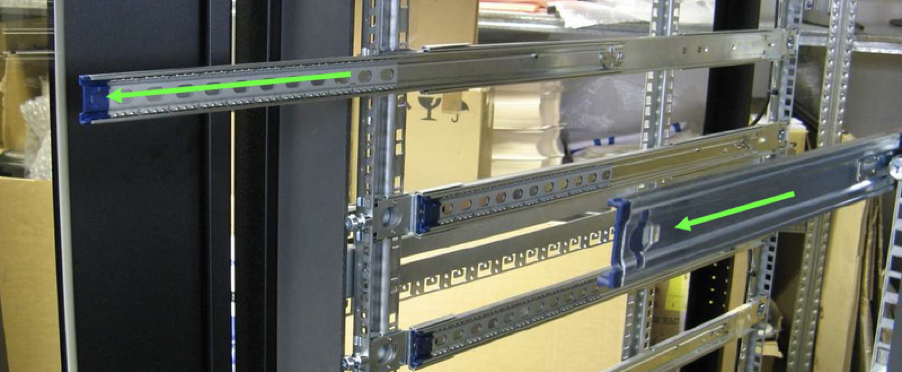
Then guide the inner rails, which are mounted on the device, into the guide of the extended rails on both sides. Make sure that the inner rails move cleanly in the guide of the outer rails as you push them backward. Push the device into the outer rails until the latch engages.
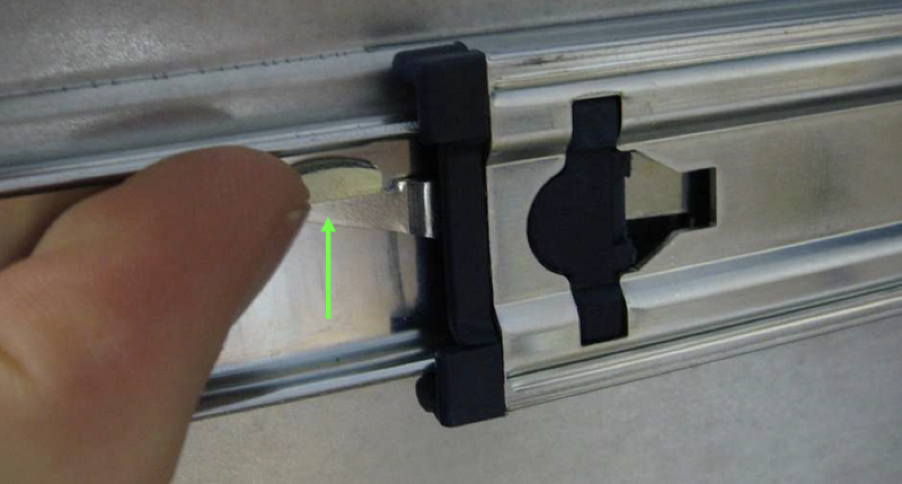
To push the device completely into the rack, actuate the release lever and push it into the rack until the device's retaining mechanism engages on the locking pin.
Cabling
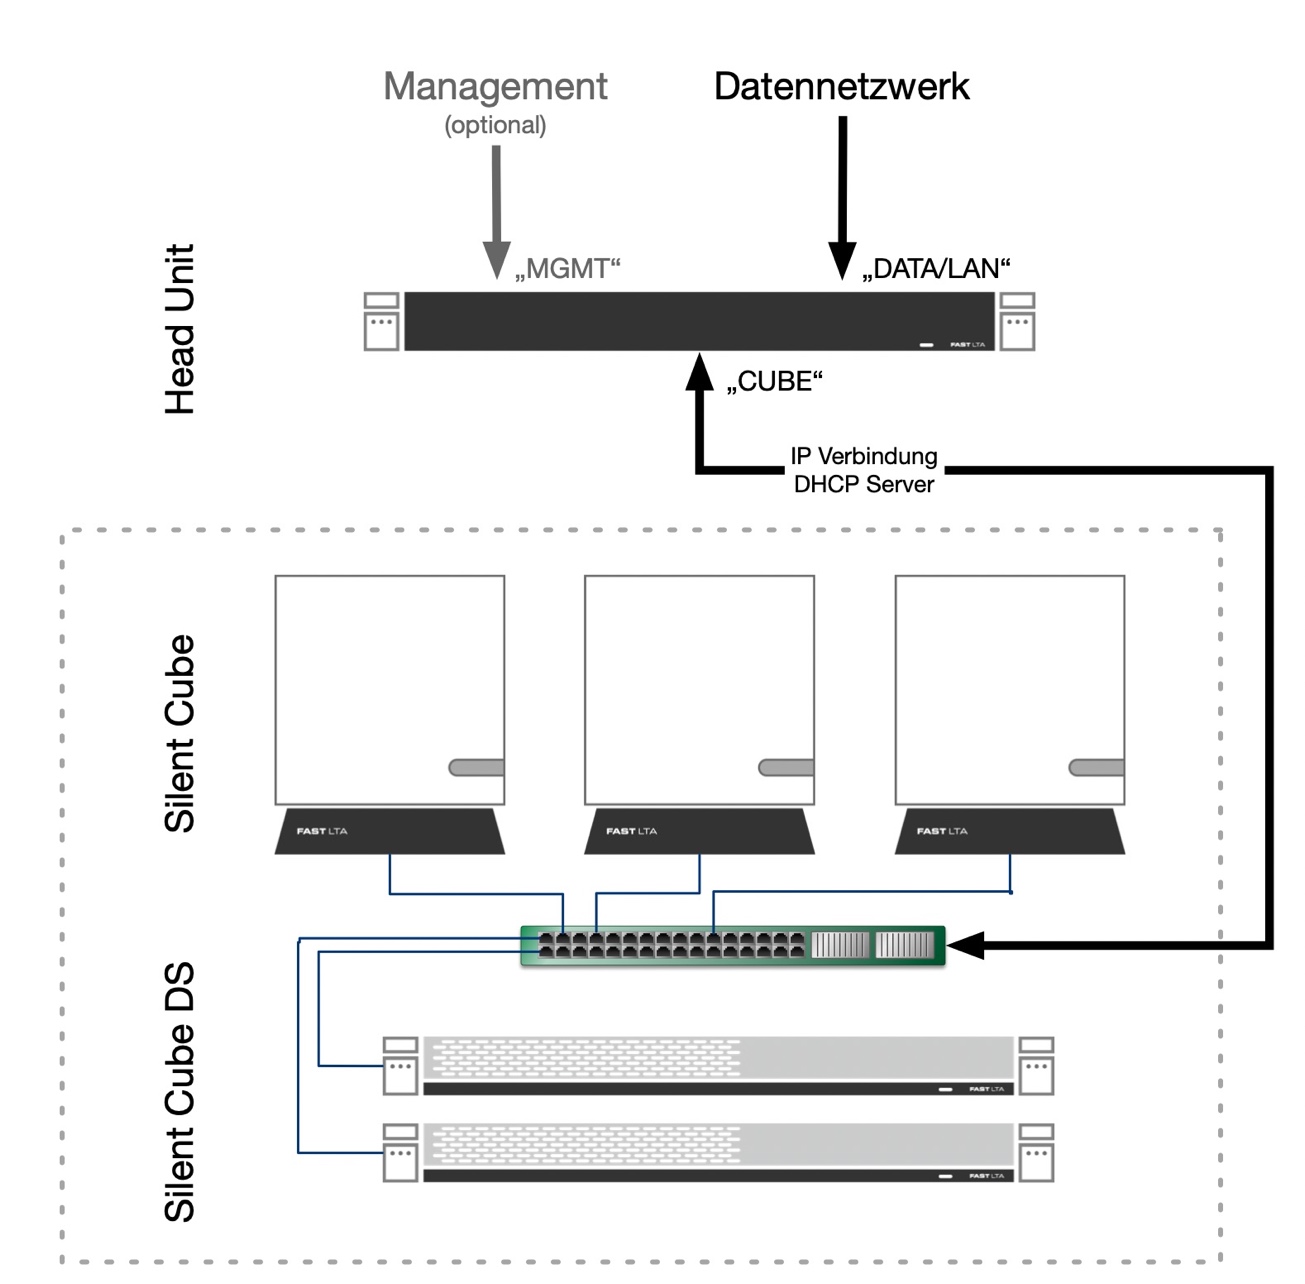
Both the Head Unit and the Silent Cube are already pre-installed and only need to be cabled together. Make sure not to confuse the network ports for the Silent Cube and the corporate network. Otherwise, the Head Unit will act as a DHCP server on the corporate network.
Connections Head Unit (Pro)
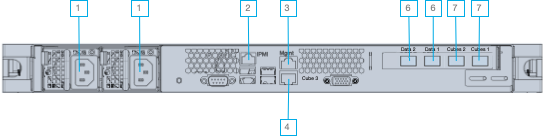
Figure 1: Head Unit Pro
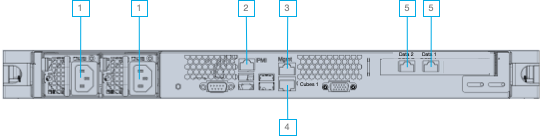
Figure 2: Head Unit
|
# |
Name |
Details |
|
1 |
Power supply unit |
Power supply |
|
2 |
IPMI port |
1 GB Ethernet RJ45, independent web interface for hardware monitoring |
|
3 |
Network port, management network |
1 Gbit Ethernet RJ45 |
|
4 |
Network port, CUBES 1Gb |
1 Gbit Ethernet RJ45 |
|
5 |
Network port, DATA 1Gb |
1 Gbit Ethernet RJ45 |
|
6 |
Network port, DATA 10Gb |
10 Gbit Ethernet SFP+ |
|
7 |
Network port, CUBES 10Gb |
10 Gbit Ethernet SFP+ |
Connections Silent Cube DS (Pro)
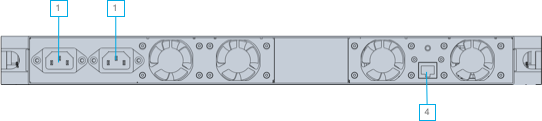
Figure 1: Silent Cube DS
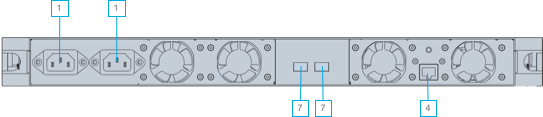
Figure 3: Silent Cube DS Pro
|
# |
Name |
Details |
|
1 |
Power supply unit |
Power supply |
|
4 |
Network port, CUBES 1Gb |
1 Gbit Ethernet RJ45 |
|
7 |
Network port, CUBES 10Gb |
10 Gbit Ethernet SFP+ |
Direct connection between Head Unit (Pro) and Silent Cube DS (Pro)
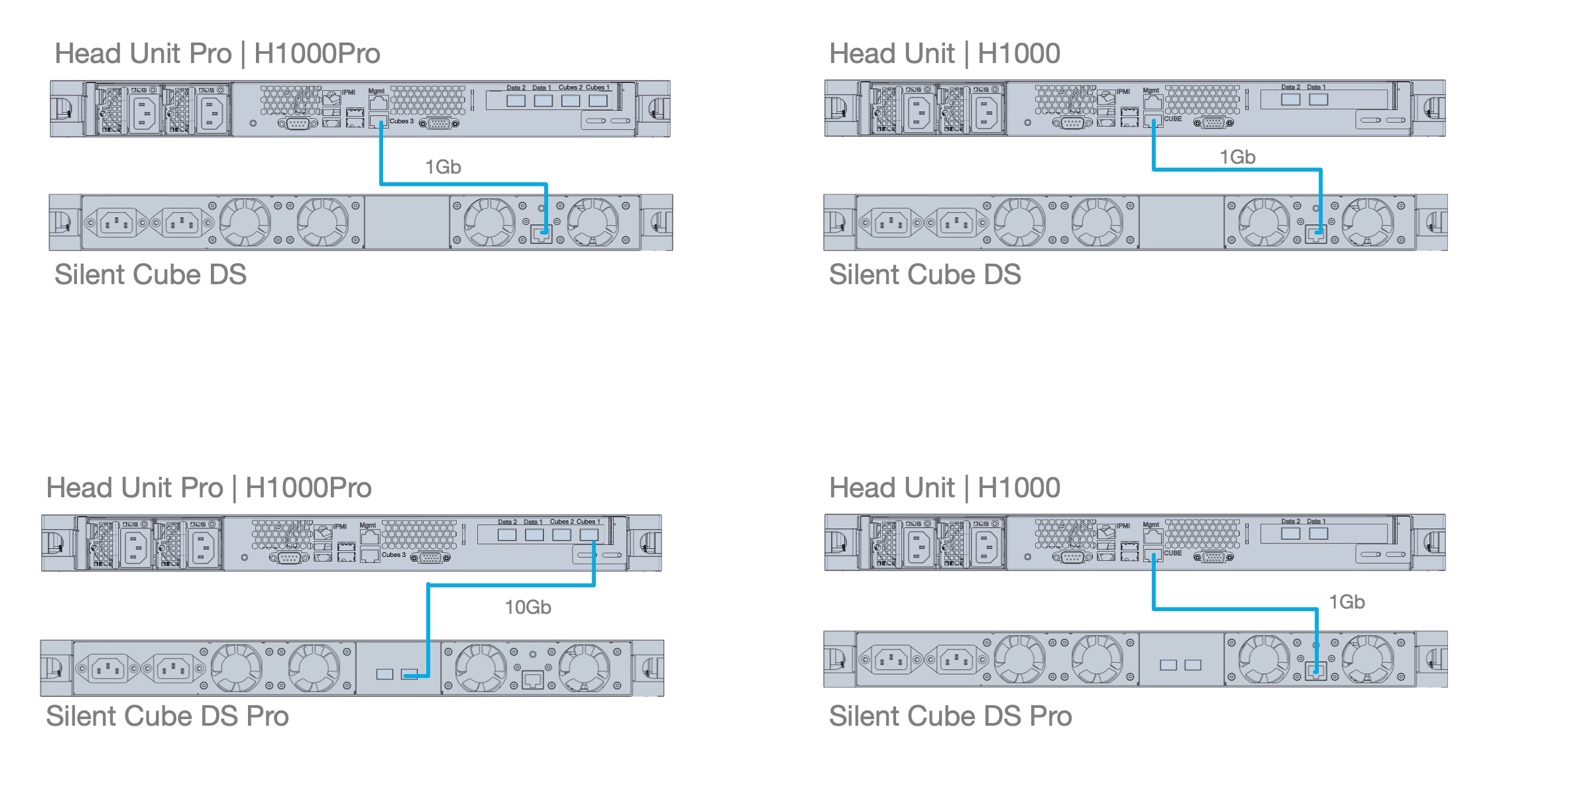
Proceed as follows for the correct configuration:
Place the Head Unit (Pro) and Silent Cube DS (Pro) in the locations of your choice. First connect the Head Unit to the Silent Cube storage unit. The connection is made via the ports labeled CUBES. Note that cabling via the 10Gb SFP+ interface is only supported for connecting two Pro models. Then connect the Head Unit (Pro) to the corporate network via the network port labeled LAN.
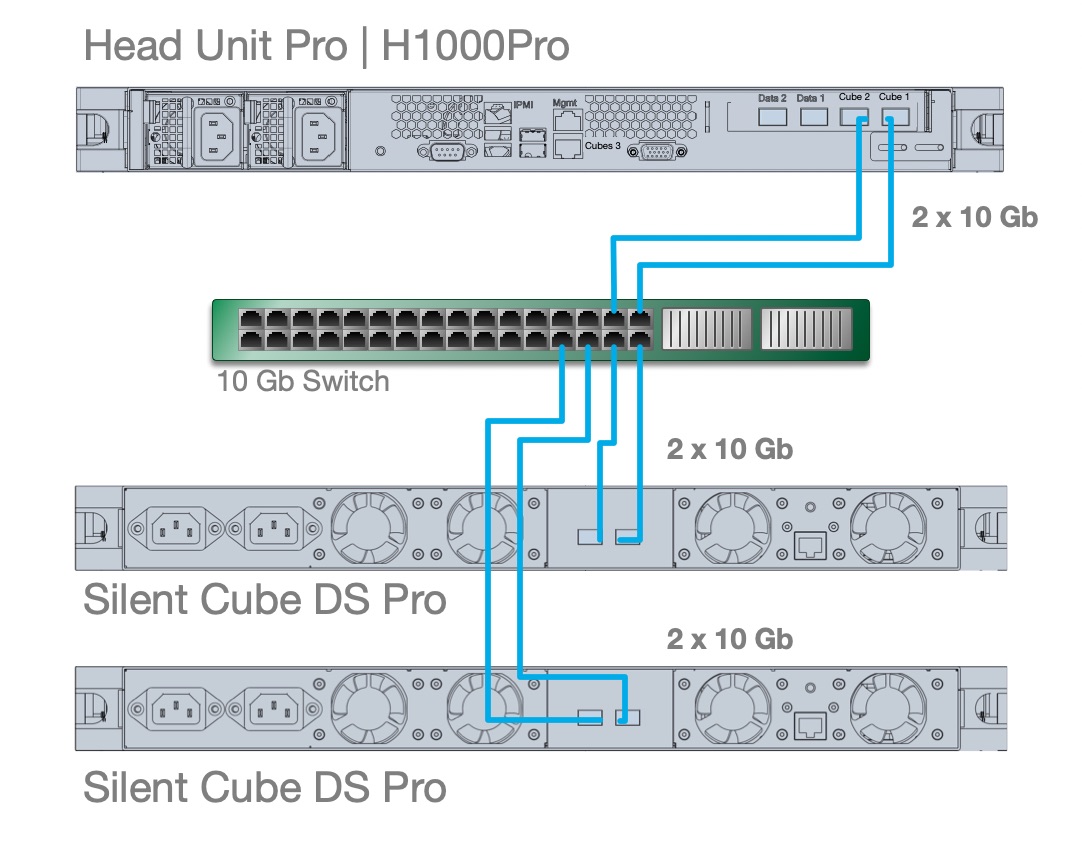
Caution: A network switch or a dedicated VLAN is mandatory for connecting multiple Silent Cubes to one Head Unit. See chapter 1.3.2.
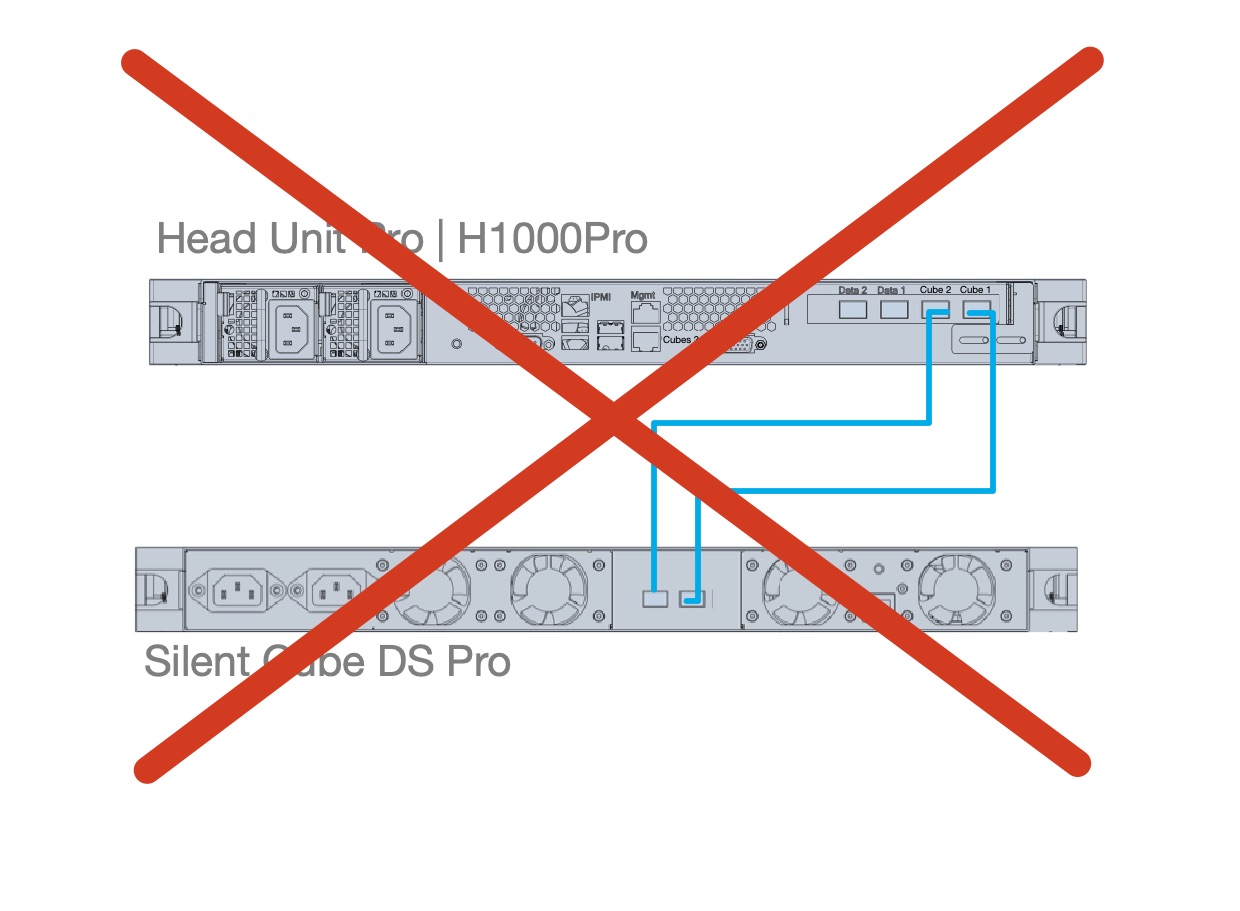
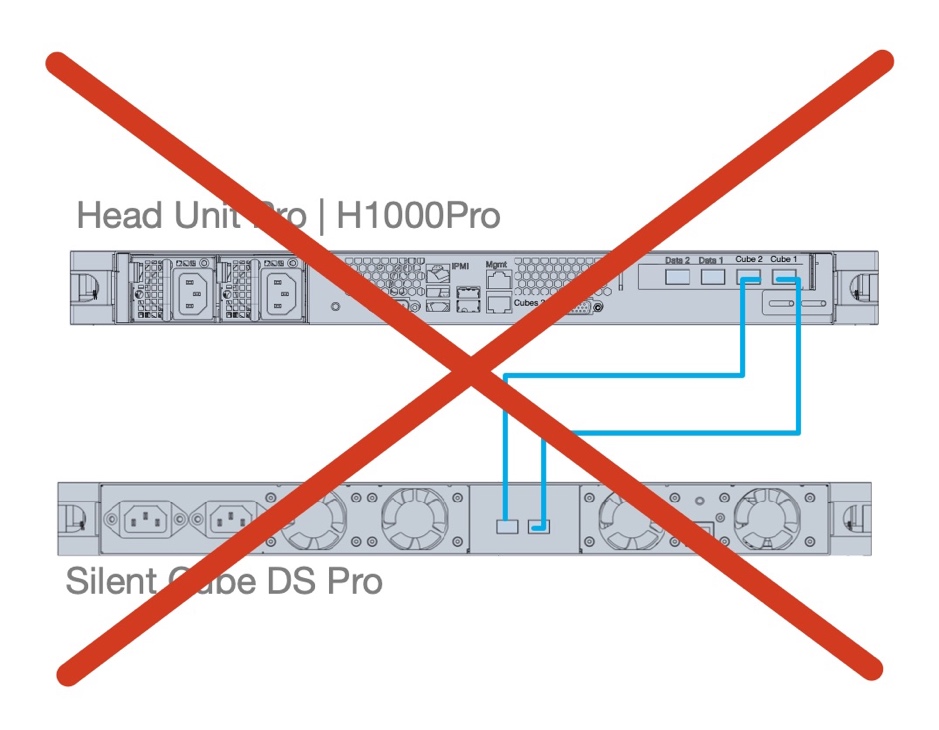
Caution: Redundant cabling of both 10 Gbit ports (Pro) is not permitted without an intermediate switch.
Once all devices are properly cabled, connect the Head Unit and Silent Cube to the power supply using the enclosed power plugs.
For proper operation of the Silent Cube storage unit, you must connect both IEC connectors to the Cube. The storage unit then starts automatically.
The Head Unit now switches on and starts the Silent Cubes software automatically.
Connecting multiple Silent Cube DS (Pro) storage units to one Head Unit (Pro)
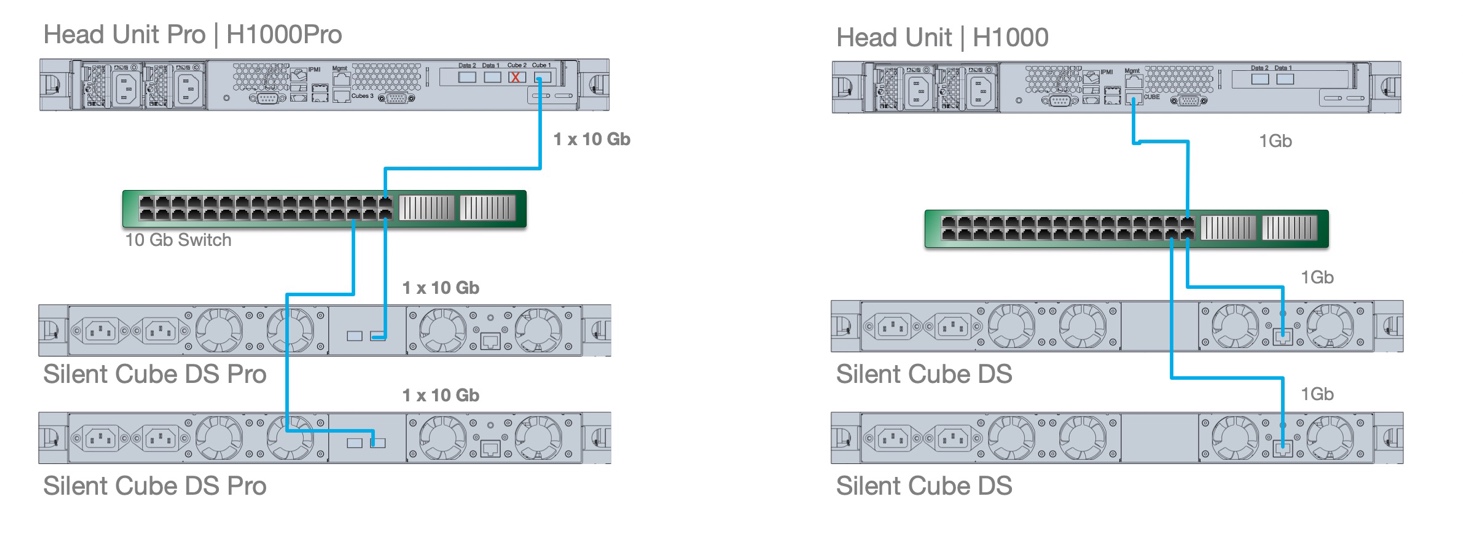
If multiple Silent Cube storage units are to be operated on one Head Unit, a dedicated switch or a separate VLAN is mandatory.
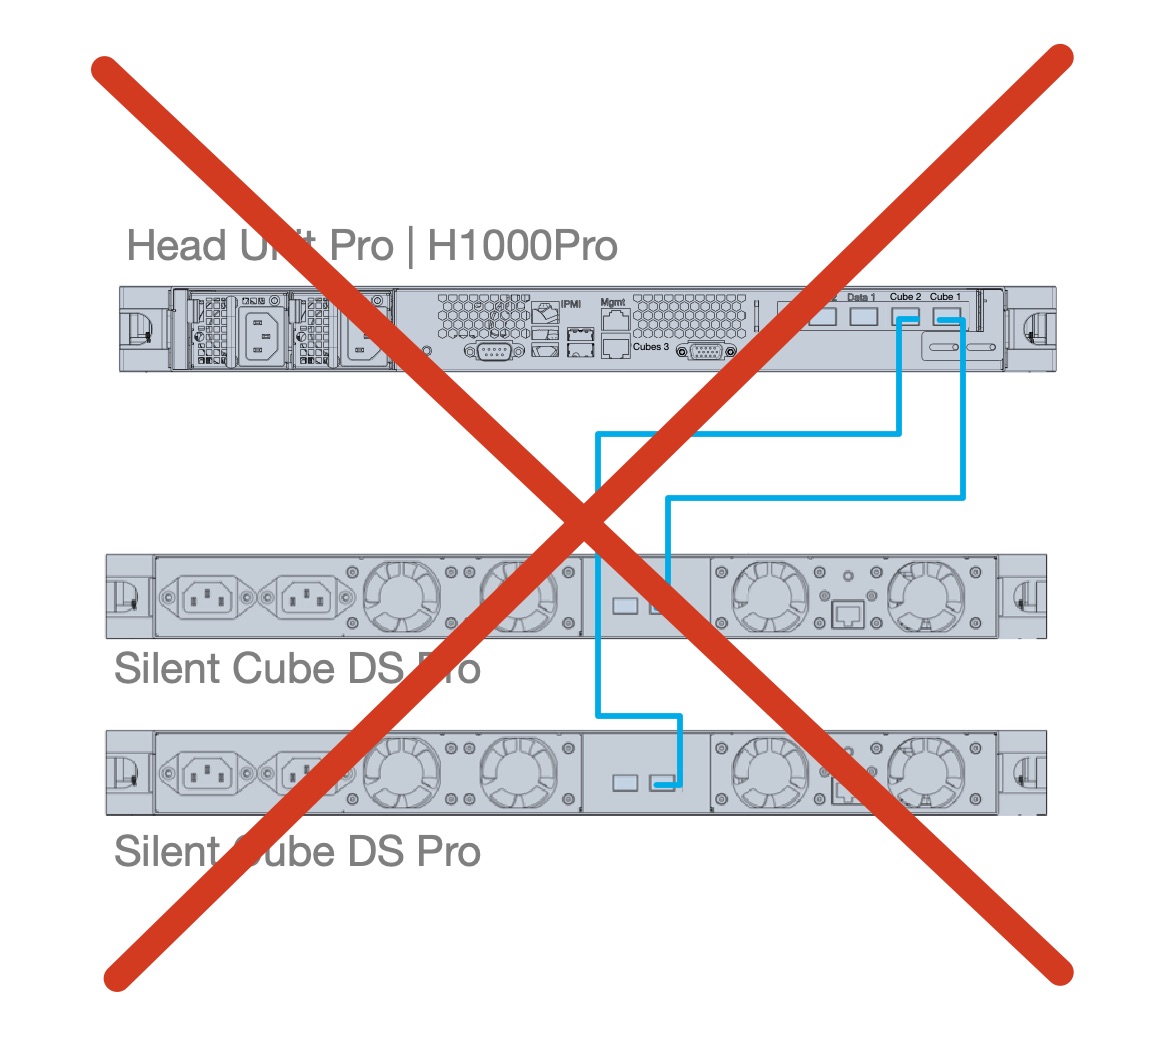
Using the individual CUBES ports to connect different storage units is not permitted.
Proceed as follows for the correct configuration:
Place the Head Unit (Pro) and all Silent Cube DS (Pro) units in the locations of your choice. First connect the Head Unit to the separate switch/VLAN. The connection is made via a port labeled CUBES, depending on the model and speed.
Note that the Head Unit Pro has both a 10 Gbit port (for the Silent Cube DS Pro) and a 1 Gbit port (for the Silent Cube DS).
A network switch or a dedicated VLAN is mandatory for connecting multiple Silent Cubes to one Head Unit.
Connect the Head Unit (Pro) to the corporate network via the network port labeled LAN.
-
Now also connect the Silent Cube storage units to the separate switch/VLAN. The connection is made via a port labeled CUBES.
-
Once all devices are properly cabled, connect the Head Unit and Silent Cube(s) to the power supply using the enclosed power plugs.
For proper operation of the Silent Cube storage unit, you must connect both IEC connectors to the Cube. The storage unit then starts automatically.
The Head Unit now switches on and starts the Silent Cubes software automatically.
Redundant cabling of the Silent Cube DS Pro storage units with a Head Unit Pro
The Pro line of the Silent Cube system offers redundant CUBES ports to increase fault tolerance when cabled correctly. Here too, however, a switch is mandatory. Direct cabling is not permitted.
Network setup
Silent Cube and Head Unit together form a self-contained system. In it, the Head Unit takes on the role of a dedicated server and acts as the connection between the Silent Cubes long-term storage system and the corporate network.
Network with a DHCP server
As soon as you have connected and started up the Silent Cubes and Head Unit, the Head Unit is automatically assigned its own IP address via DHCP after being switched on. This is displayed on an optionally connected monitor. Using this IP address, you can now access the Silent Cubes software via a web browser and configure the storage system in detail.
To do this, open the IP address via https in your web browser and log in with the following default credentials:
Username: admin
Password: adminadmin
Note: Always access the Silent Cubes software via an https connection. When you do so, your browser will warn that the certificate is not trustworthy. This cannot be resolved differently for technical reasons, since the Head Unit is located on the local network.

Network without a DHCP server
In a network without a DHCP server, the Head Unit is assigned the default IP address 192.168.0.1 on the LAN interface after being switched on. To integrate the long-term storage system into your network, you must therefore set the IP address manually. The simplest procedure is as follows:
-
Connect a computer directly to the CUBES interface of the Head Unit. This computer is assigned an IP address by the Head Unit via DHCP. You then use this computer to access the Head Unit's web interface and configure the network settings there.
-
Wait briefly until the Head Unit's DHCP server has assigned an IP address to your computer, placing it in the same subnet.
-
Access the Head Unit's web interface via a web browser using an https connection. Use the Head Unit's default IP address on the CUBES interface. The command is therefore
When you do so, your browser will warn that the certificate is not trustworthy. This cannot be resolved differently for technical reasons, since the Head Unit is located on the local network.
Log in to the Silent Cubes software with your username and password via the login dialog. If you are logging in to the Silent Cubes software for the first time, use the following default username and password:
Username: admin
Password: adminadmin
In the left navigation bar, under Settings, open the Network menu item and configure the Head Unit's network settings.
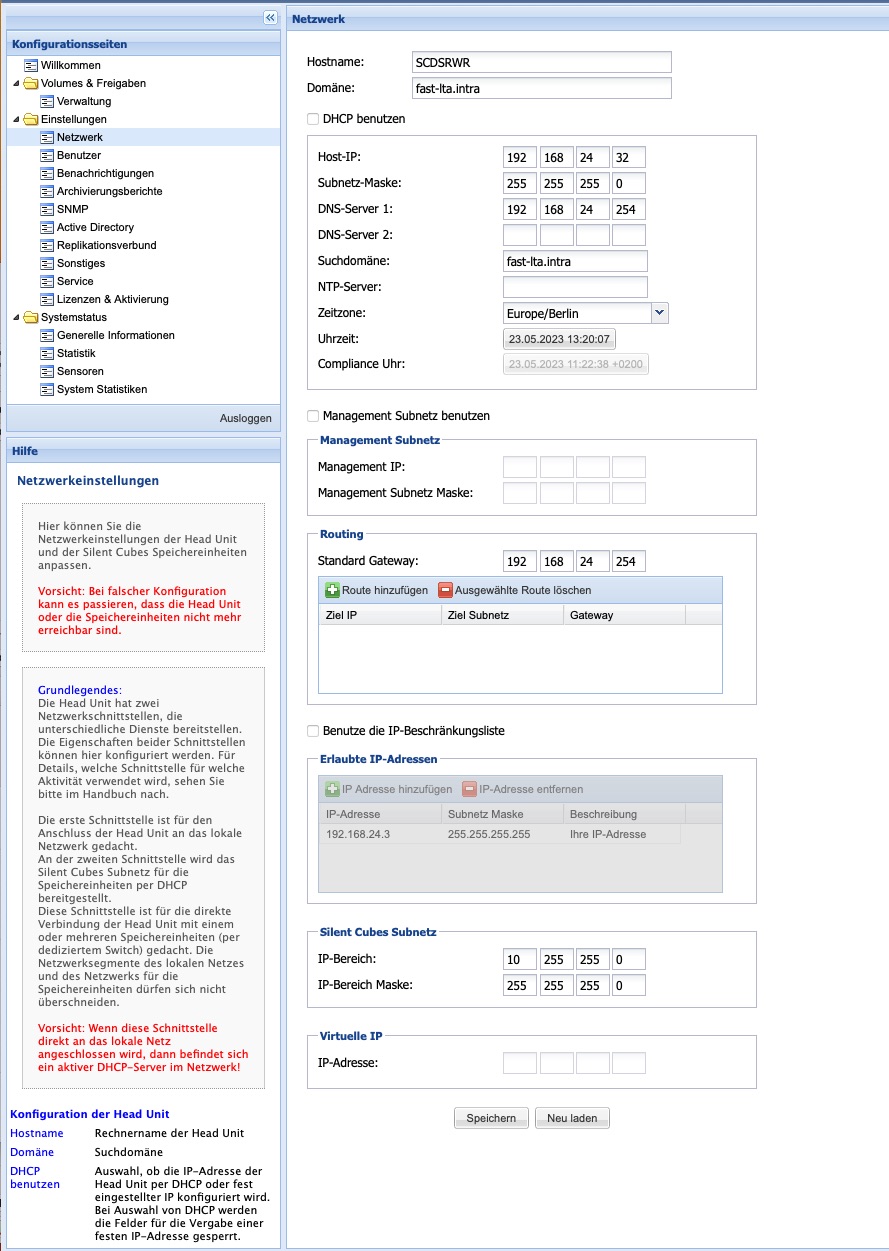
Figure: In the Silent Cubes software, you define the network settings for the Head Unit.
Once all details are complete, apply them by clicking the Save button. Then log out of the Silent Cubes software using the Log out button. Remove the computer from the Head Unit's CUBES interface and restore the original network cabling.
Setting up replication

Figure: Replicated system
In its basic configuration, the Silent Cube system works with a single Head Unit and one or more storage units connected to it. This already extremely secure installation can be operated in replication mode, further increasing the availability of the archived data. Replication connects two Head Units, typically at different locations, and ensures that data from location 1 is automatically also stored on the system at location 2. The audit-proof scope is not left in the process. The primary Head Unit serves as the control center (Primary) of the replication cluster, while the other acts as the replication target (Secondary).
Chapter 1.4 of manual Part C: Configuration shows you in detail how to set up a replication cluster.