In the 'Volumes' section, you can manage the NAS units and their access permissions. Additionally, you can view the statistics of the NAS units.
The selection of the appropriate settings depends on the specific software to be integrated.
Add Volume
Volumes are fundamentally categorized into two different types:
-
SNAS ERC
-
Secure NAS for archiving without WORM protection
-
Linear storage
-
4 redundancies
-
Structural integrity
-
Storage space is released upon deletion be released
-
Encryption
-
Internal and external replication
-
Manual snapshots are possible
-
Continuous snapshots occur automatically due to linearity
-
-
SNAS
-
Secure NAS for backup and storage
-
2 or 3 redundancies selectable
-
Storage space is immediately released upon deletion
-
Internal and external replication
-
Manual snapshots are possible
-
Continuous snapshots can be activated
-
To add a new NAS unit, please proceed as follows:
Add SNAS ERC Volume
-
➤ Click on the “List” tab.
-
➤ Click the “Add” button.
-
➤ The “Add Volume” window will be displayed.
-
➤ Select the Volume type 'SNAS ERC'.
-
➤ Check “Encrypt Volume” to secure the Volume with a password.
-
The installation wizard will then proceed to the step “Add Bricks”.
Add SNAS Volume
-
➤ Click on the “List” tab.
-
➤ Click the “Add” button.
-
➤ The “Add Volume” window will be displayed.
-
➤ Select the Volume type "SNAS".
-
➤ Check “Encrypt Volume” to secure the Volume with a password.
-
➤ Select the desired number of redundancies.
For using the Silent Brick Max (Air), 3 redundancies must be selected!
For using the Fast Clone Support, 3 redundancies must be selected!
-
➤ Disable 'Compression' if necessary.
-
➤ Due to its high efficiency, we recommend keeping compression enabled.
-
➤ We recommend disabling it if already compressed data is to be stored.
-
-
➤ Disable the 'Case Sensitive' option if necessary.
-
➤ Usually, case sensitivity does not cause any issues.
-
➤ In specific cases, it may be necessary to disable this option.
-
-
➤ When working with large files (e.g., backup), enable the 'Optimize for Large Files' option.
-
➤ This option only affects new files.
-
-
➤ Enable the 'Fast Clone Support' option to activate Fast Clone and Reflink support when using VEEAM backup software.
-
➤ By enabling Fast Clone Support, you can utilize the advantages of the Fast Clone technology provided by Veeam Backup & Replication. This technology allows for faster Synthetic Full Backups and Forever Incremental chains, reducing both the required time and storage space.
-
➤ Please note that the Large File Optimization setting will be ignored as a result.
-
-
➤ The installation wizard will then proceed to the “Add Bricks” step.
Adjust Volume Settings
-
➤ Select the desired Volume
-
➤ Navigate to the "General" tab
-
➤ Use the "Edit" button to adjust the corresponding settings:
|
Description |
Function |
|
Volume Name, Description, and Type |
Here you can modify the name and description |
|
Audit Interval |
The audit interval specifies the frequency at which the entire dataset is verified. If data is stored in the Volume for only a few weeks or months (e.g., backup), the audit interval can be disabled. |
|
Volume Fill Level Notifications (SNAS only) |
Here, you configure whether a fill level notification should be sent. This can be disabled for Volumes that regularly reach a high fill level due to storage logic. |
Add Bricks to Volume
Different Brick types such as "Silent Brick", "Silent Brick FLASH", "Silent Brick Plus", "Silent Brick Max (Air)", and "Silent Brick Pro" cannot be mixed within a single Volume.
|
Silent Brick Typ |
Limit per Volume |
|
Silent Brick Air |
9 |
|
Silent Brick FLASH |
9 |
|
Silent Brick Plus |
9 |
|
Silent Brick Max (Air) |
4 |
|
Silent Brick Pro |
9 |
A Volume can consist of multiple Bricks. The Bricks behave as a shared memory area and cannot be distinguished within the file system.
To add Bricks to a Volume, proceed as follows:
-
➤ Click on the “Bricks” tab.
-
➤ Click the “Add Bricks” button.
-
➤ The “Add Bricks to Volume” window will appear.
-
➤ Select one or more Bricks while holding the “CTRL” key.
-
➤ To confirm the selection, press the “Add” button.
-
➤ To cancel the operation, press the “Cancel” button.
Start Force Audit
A Volume can consist of multiple Bricks. The Bricks behave as a shared memory area and cannot be distinguished within the file system.
The Force Audit is used to verify all data of a Brick. It is always recommended to select all Bricks in this context.
To start the Force Audit, proceed as follows:
-
➤ Click on the “Bricks” tab.
-
➤ Right-click on the Bricks
-
➤ Select "Force Audit"
The Force Audit will now start and can be monitored through the status display in the same window.
Adding shares to the Volume
A Volume can provide multiple shares. Mixing different types of shares is not recommended due to different permission mechanisms.
Possible share protocols are:
-
SMB
-
NFS
Add SMB share
SMB shares are based on the Server Message Block protocol, which is widely used in Windows environments. Permissions are set on a user basis.
Supported versions of the SMB protocol are:
-
SMB v2
-
SMB v3
To add an SMB Share to a Volume, proceed as follows:
-
➤ Click the “Shares” tab.
-
➤ Click the “Add SMB Share” button.
-
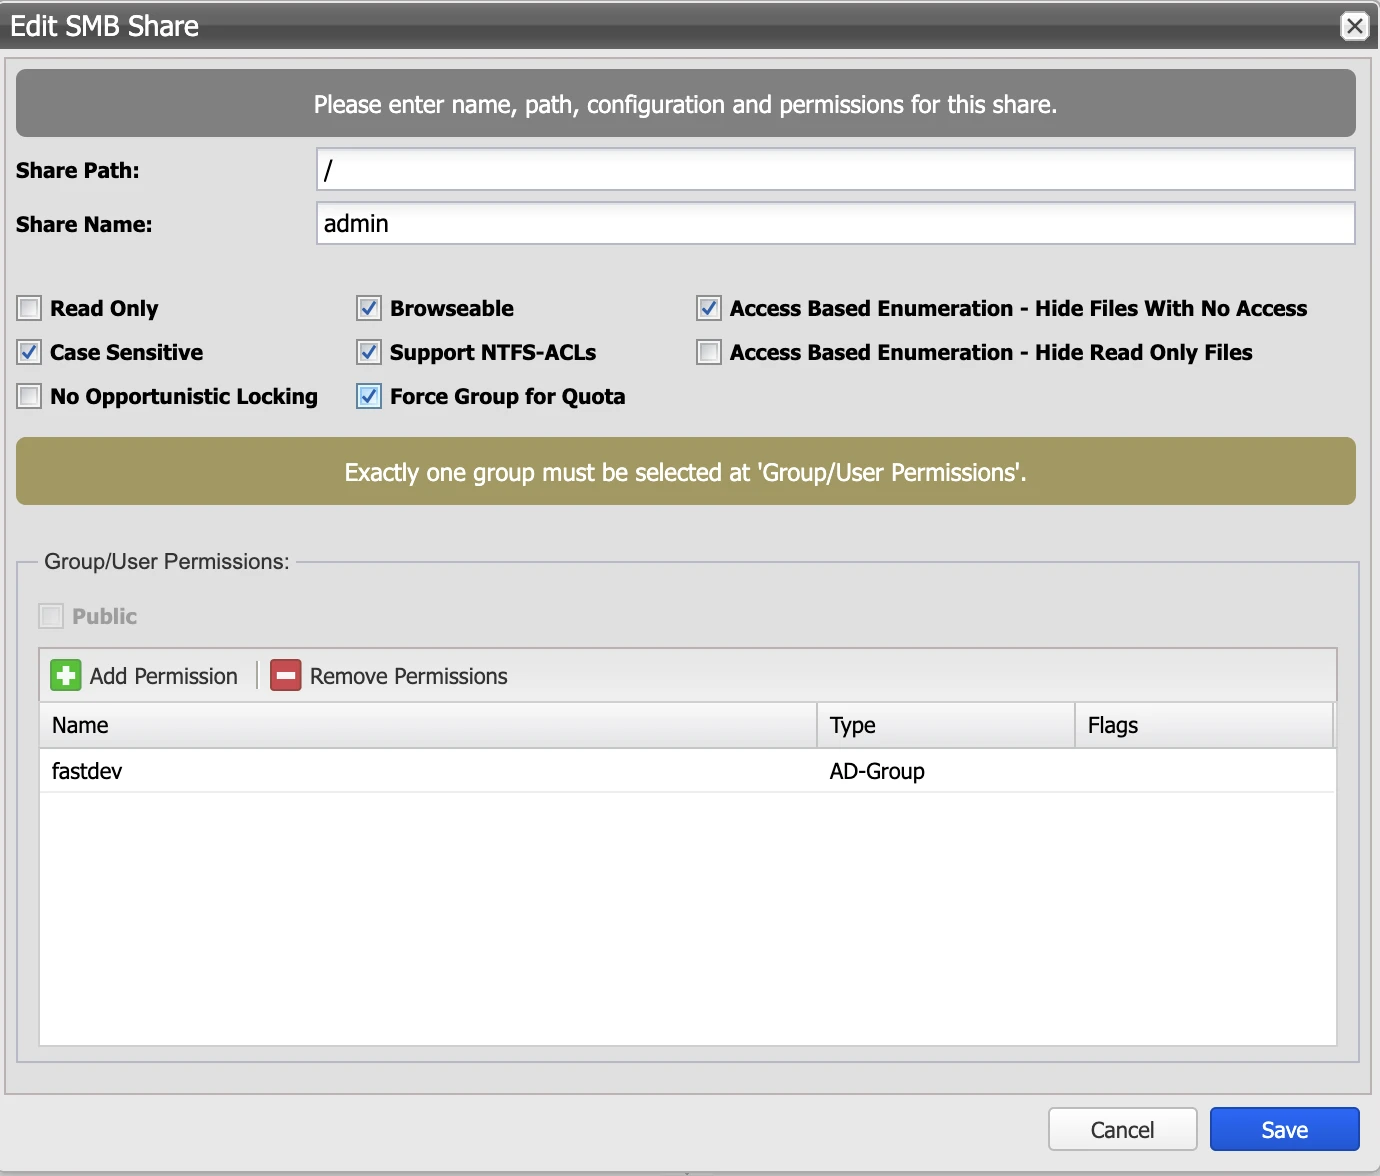
➤ The “Add SMB Share” window will open.
-
➤ Specify the Share Path in the “Share Path” input field.
-
➤ “/” shares the entire Volume at the root level.
-
➤ “/Folder/” shares a subfolder named “Folder” within the Volume.
-
-
➤ Enter a unique share name in the “Share Name” input field.
-
➤ Select “Read Only” to deny write access.
-
➤ Select “Browseable” to make the Share visible in Explorer.
-
➤ Select “Case Sensitive” to enable case sensitivity.
-
➤ Select “Support NTFS-ACLs” to enable permissions at the file system level.
-
➤ Control permissions for files to which the user has no rights via the “Access Based Enumerations” option.
-
➤ Enable or disable the opportunistic locking function via the “No Opportunistic Locking” option. (See also: O'Reilly - Samba settings )
-
➤ Deselect “Public” to restrict access for certain users or groups.
-
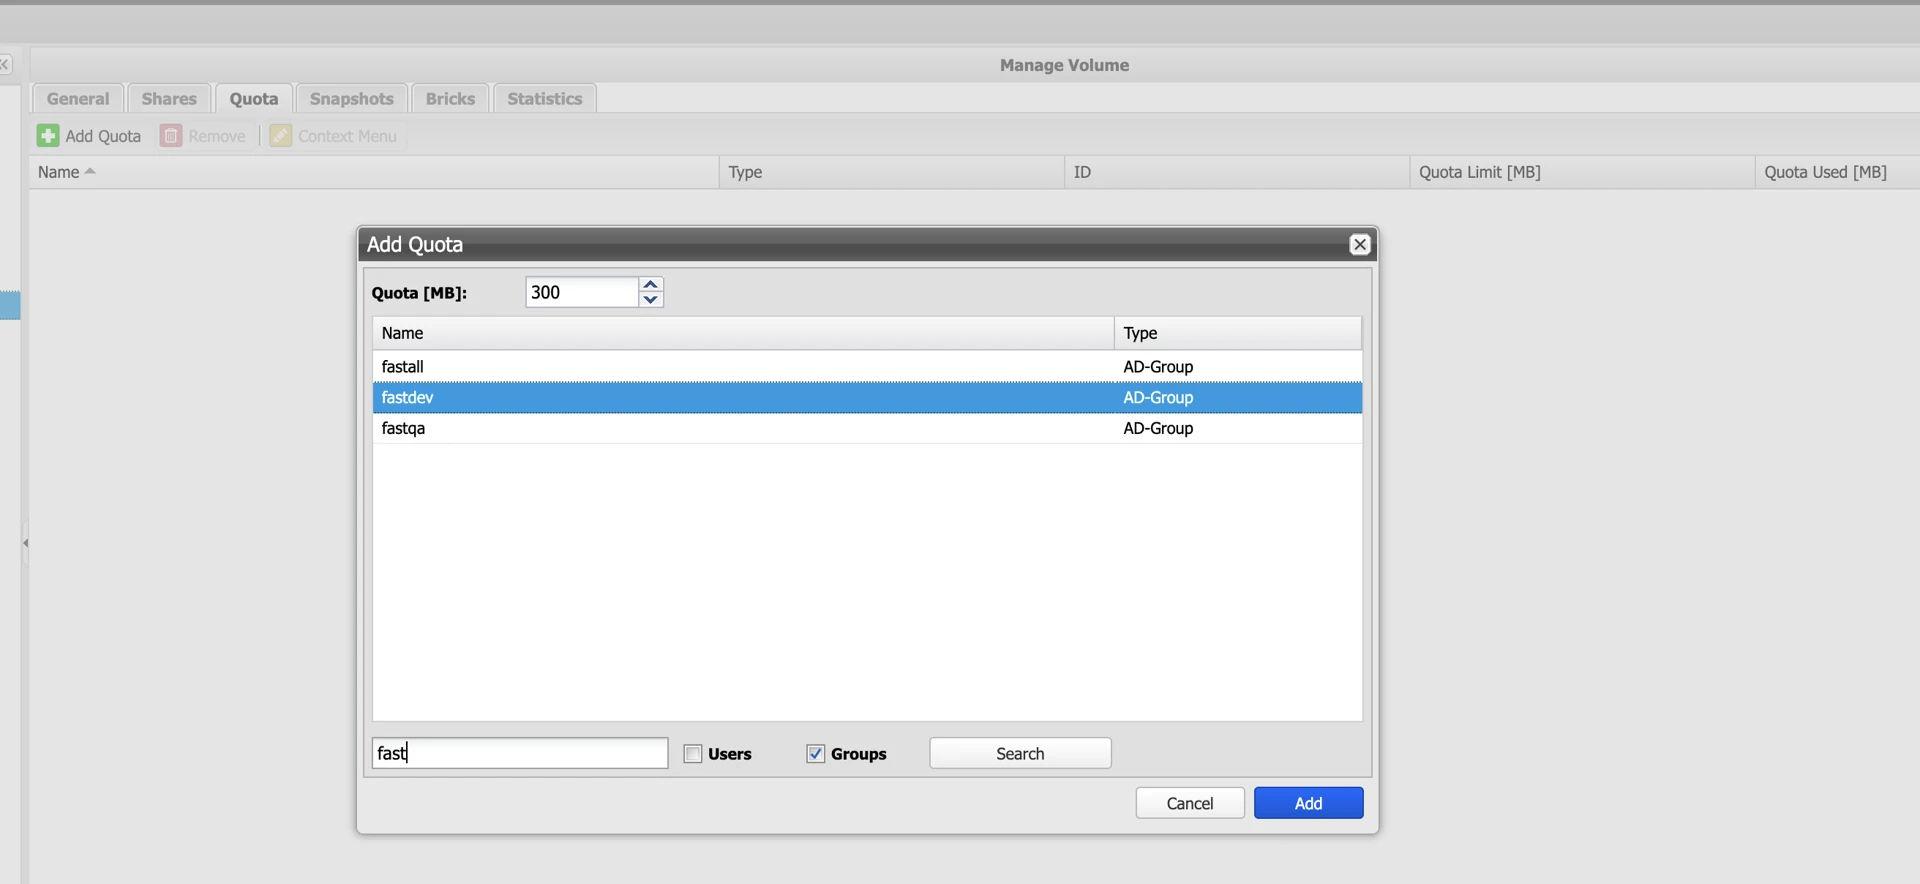
➤ Activate the “Force Group for Quota” button to ensure that new files belong to the selected group, which has an associated group quota setting.
After activating the “Force Group for Quota” button, only one group may be added to the corresponding share.
-
➤ Use the search window to search for users and groups
-
➤ Enable the checkbox "Add Selected User With Admin Rights" to grant this user administrative rights on all folders within this share
-
➤ Define a quota for the respective user or group, if necessary
-
See also section Adjust SMB Settings
Add NFS share
NFS shares are based on the Network File System protocol, which is widely used in Unix and Linux environments. Permission settings are applied on a host basis.
Supported versions of the NFS protocol include:
-
NFS v3
To add an NFS Share to a Volume, proceed as follows:
-
➤ Click the “Shares” tab.
-
➤ Click the “Add NFS Share” button.
-
➤ The “Add NFS Share” window opens.
-
➤ Specify the Share Path in the “Share Path” input field.
-
➤ “/” shares the entire Volume at the root level.
-
➤ “/Folder/” shares a subfolder named “Folder” within the Volume.
-
-
➤ Select “Enforce NFS3” to enforce protocol version 3.
-
➤ Click “Add Client” to open the permissions configuration assistant.
Add S3 Share
S3-compatible Shares allow access to an SNAS Volume (NOT SNAS ERC) via the S3 Object Store interface. Permissions are configured based on Access Key and Secret Key.
To add an S3 Share to a Volume, proceed as follows:
-
➤ Click the “Shares” tab.
-
➤ Click the “Add S3 Share” button.
-
➤ The “Add S3 Share” window will open.
-
➤ Enter the share name in the “Share Name” input field.
-
➤ Enter the access key in the “Access Key” input field.
-
➤ Enter the password in the “Secret Key” input field.
-
➤ Confirm the password in the “Retype Secret Key” input field.
-
➤ Edit the service point DNS name for access in “virtual-host-style” if necessary. Ensure that this name can be resolved through your DNS server.
-
➤ Edit the port number if necessary.
-
➤ The port number is unique per share.
-
➤ The port number is automatically incremented.
-
-
➤ Click “Save” to save the share.
Creating and deleting S3 buckets
Buckets are essentially root folders within an S3 share. Buckets can be created either via an S3 client or through the user interface.
-
➤ To create or delete a bucket via the user interface, open the context menu of the share by right-clicking the corresponding S3 share and select "Manage Buckets":
-
➤ To create a new bucket, select either "Create new Bucket" or "Create new Bucket with Object Locking" (if enabled in the previous step).
-
➤ Assign a unique name.
-
-
➤ To delete a bucket, select the empty bucket and choose "Delete Bucket":
Delete volumes including their contents
Please note that all releases must be removed from a Volume before the Volume can be deleted.
Risk of data loss due to unintentional deletion Data may be unintentionally deleted if a Brick is deleted. Ensure that the data to be deleted is no longer needed.
To delete a Volume, proceed as follows:
-
➤ Click on the respective Volume.
-
➤ Click on the “General” tab.
-
➤ Click the “Delete with all Data” button.
-
➤ The “Delete Volume with all Data” window will appear.
-
➤ Confirm the deletion by entering “Yes” again.
-
➤ To delete the Volume, click “Delete”.
Delete the content of the Volume
Risk of data loss due to unintentional deletion Data may be unintentionally deleted if a Brick is deleted. Ensure that the data to be deleted is no longer needed.
To delete the content of a Volume, proceed as follows:
-
➤ Click on the respective Volume.
-
➤ Click on the “General” tab.
-
➤ Click the “Erase all Data” button.
-
➤ The “Erase all Data of Volume” window is displayed.
-
➤ Confirm the deletion by entering “Yes” again.
-
➤ To delete the Volume, click “Erase.”
Local Volume replication
To create a local replication of a Volume, proceed as follows:
-
➤ Click on the respective Volume.
-
➤ Click on the “General” tab.
-
➤ Click the “Replicate” button.
-
➤ The “Replicate” window opens.
-
➤ Select a name for the replica.
-
➤ Select “Encrypt Volume” to encrypt the Replica (SNAS ERC only).
-
➤ Select “Compression” to compress the Replica (SNAS only).
-
➤ Select the number of parities (SNAS only).
-
➤ Click the “Add” button to create the replica.
-
➤ The “Add Bricks to Volume” window opens.
-
➤ Add a sufficient number of Bricks to your replication volume.
-
➤ Verify the replication status using the Volume overview.
Remote Volume replication
Establish remote connection
To create a remote replication of a Volume, first establish a connection between both systems. Follow the instructions. Create remote connection.
Creating the replication
-
➤ Click on the respective Volume.
-
➤ Click on the “General” tab.
-
➤ Click the “Replicate” button.
-
➤ The “Replicate” window opens.
-
➤ Select a name for the replica.
-
➤ Select “Encrypt Volume” to encrypt the Replica (SNAS ERC only).
-
➤ Select “Compression” to compress the Replica (SNAS only).
-
➤ Select the number of parities (SNAS only).
-
➤ Enable the "Remote Replication" button and select a remote connection.
-
➤ Click the “Add” button to create the replica.
-
➤ Open the target system.
-
➤ Add a sufficient number of Bricks to your replication volume.
-
➤ Verify the replication status using the Volume overview.
Resolve Volume Replication
To resolve the replication of a Volume, proceed as follows:
-
➤ Click on the corresponding target Volume.
-
➤ Click on the “General” tab.
-
➤ Click the “Convert” button.
Converting the Volume terminates the replication and establishes the target Volume as an independent Volume with the current data set.
Manage Volume Snapshots
Create Manual Snapshot
A manual snapshot can be created as follows:
-
➤ Open the desired Volume.
-
➤ Switch to the “Snapshots” tab.
-
➤ Click the “Add” button.
-
➤ Select between the options in the “Snapshot” menu.
-
➤ “From Now”: Creates a snapshot from the current time.
-
➤ “By Date / Time”: Creates a snapshot from a Continuous Snapshot (if available).
-
-
➤ Assign a name to the snapshot
-
➤ Assign a description to the snapshot
-
➤ By selecting "Provide Snapshot as Volume," the snapshot is started immediately and mounted as a virtual volume (see: "Start Volume Snapshot")
Create automatic snapshots (Immutability)
|
INFO |
To select a lifetime exceeding 30 days, up to 90 days, an interval of 8 hours or more must be configured. |
This feature is referred to as "Continuous Snapshots" in the Silent Brick System.
For the volume type "SNAS ERC," the Continuous Snapshot feature is fixed due to the linear writing method and cannot be disabled or configured.
For the volume type "SNAS," the Continuous Snapshot feature can be manually enabled and configured. Proceed as follows:
-
➤ Open the desired Volume.
-
➤ Switch to the “Snapshots” tab.
-
➤ Click the “Continuous Snapshots” button (SNAS only)
-
➤ Select the checkbox "Enabled:" to activate this function for the Volume.
-
➤ The "Snapshot Interval" specifies the time intervals at which snapshots are created.
-
➤ The "Lifetime" defines the duration after which old snapshots are automatically deleted and the storage space is freed.
-
➤ "Minimum Number of Snapshots to Keep" specifies the minimal number of snapshots to retain.
Convert automatic snapshots into fixed snapshots.
Please follow the instructions in "Create Manual Snapshot" for this process.
Start Volume Snapshots in read-only mode.
Both manually created snapshots and continuous snapshots can be started in a readable mode alongside the original Volume. This generates an additional Volume that provides access to the corresponding files in read-only mode.
To display a snapshot of a Volume, proceed as follows:
-
➤ Click on the respective Volume.
-
➤ Click on the “General” tab.
-
➤ Click the “Provide Snapshot as Volume” button.
-
➤ The “Provide Snapshot as Volume” window will appear.
-
➤ Select between the options in the “Snapshot” menu.
-
➤ “From Now”: Start a snapshot from the current time.
-
➤ “By Date / Time”: Start a snapshot from a different time.
-
➤ "Snapshot Name": Start a manually created snapshot.
-
-
➤ Select a name for the snapshot.
-
➤ Click the “Create” button to create the snapshot.
Start writable Volume snapshots
To use a Volume snapshot in writable mode, the snapshot state must be transferred to an empty Silent Brick using the cloning functionality.
Follow the steps under "Clone Volume" for this purpose.
Clone Volume
When cloning a Volume, the entire content is mirrored onto a second Brick. A clone can also be used to copy a snapshot into a writable Volume.
To create a clone of a Volume, proceed as follows:
-
➤ Click on the respective Volume.
-
➤ Click on the “General” tab.
-
➤ Click the “Clone” button.
-
➤ The “Create Volume Clone” window will open.
-
➤ Select between the options in the “Snapshot” menu.
-
➤ “From Now”: Start a snapshot from the current time.
-
➤ “By Date / Time”: Start a snapshot from a different time.
-
➤ "Snapshot Name": Start a manually created snapshot.
-
-
➤ Select a name for the clone.
-
➤ If necessary, provide a description for the clone.
-
➤ Choose the desired Protection. Please note that these settings are not automatically inherited from the source Volume. If the Protection settings are to match those of the source Volume, you must configure them accordingly.
-
➤ In the “Action on Finish Clone” section, you also have the option to execute a follow-up action after the cloning process has completed:
-
➤ Click the “Create” button to create the clone volume. Please note that no Silent Brick has yet been assigned to the clone volume.
-
➤ Finally, add a sufficient number of Silent Bricks to your clone volume. For a local clone, the configuration assistant will assist you in this process.
Deactivate volumes
The offline mode is intended for maintenance, energy saving, and removal of the Silent Brick. To set a volume to offline mode, proceed as follows:
-
➤ Click on the “List” tab.
-
➤ Click on a volume to select it.
-
➤ Click the “Set Offline” button.
-
➤ The volume is now deactivated.
Activate volumes
To set a deactivated or newly detected volume to online mode, proceed as follows:
-
➤ Click on the “List” tab.
-
➤ Click on a deactivated Volume to select it.
-
➤ Click the “Set Online” button.
-
➤ The Volume is now being imported.
-
➤ When the status changes from “Importing” to “Online,” the activation is complete.
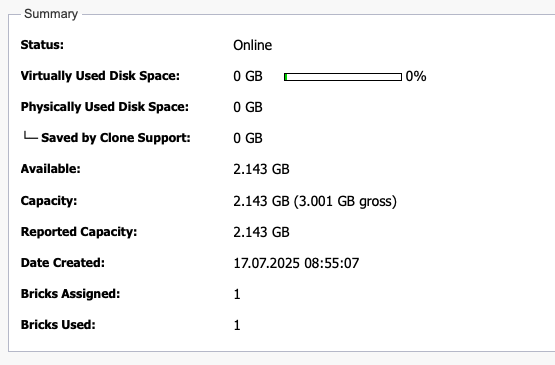
Monitor the Volume fill level
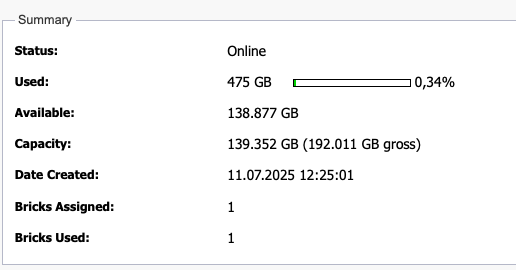
The fill level is monitored via the display in the “General” tab of the corresponding Volume.
-
➤ Click on the corresponding Volume.
-
➤ Click the “General” tab.
-
➤ Depending on the Volume settings, one of the following displays will appear:
|
Value |
Description |
|---|---|
|
Used |
Actually consumed storage space |
|
Used by Snapshots |
Storage space consumed by Snapshots and Continuous Snapshots |
|
Available |
Available remaining storage space |
|
Capacity |
Net capacity of the entire Volume |
|
Virtually Used Disk Space |
Theoretical consumed storage space based on stored data |
|
Physically Used Disk Space |
Actual consumed storage space after deduction of savings provided by Fast Clone Support |
|
Saved by Clone Support |
Storage space savings through the use of Fast Clone Support |
Manage Compliant Archive
The Compliant Archive constitutes the audit-proof long-term storage of the Silent Brick System and consists of two components:
-
➤ Stage Area
-
➤ WORM Area
During storage, the Stage Area, which is by definition rewritable, serves as the data intake area. Additionally, the Stage Area allows for automatic retention of frequently accessed data.
The WORM Area, by contrast, is intended for the final and secure long-term archiving of files and therefore may only be used with specially equipped WORM Bricks.
The Stage and WORM areas share a common namespace. The transfer of files from the Stage Area to the WORM area is executed according to the configured Volume type by the following logic:
-
➤ After the expiration of the time following the last modification
-
➤ By setting the Read Only flag on the respective file