
Network
A Head Unit of the Silent Cube storage system has network interfaces for management (user interface), for data transfer from the network, and for data transfer to connected Silent Cubes. The properties of the interfaces can be configured in the Network menu.
Note: Depending on the Head Unit, network interfaces differ and are in some cases designed with redundancy. Refer to the respective Quick Start Manual for the assignment of the individual interfaces.
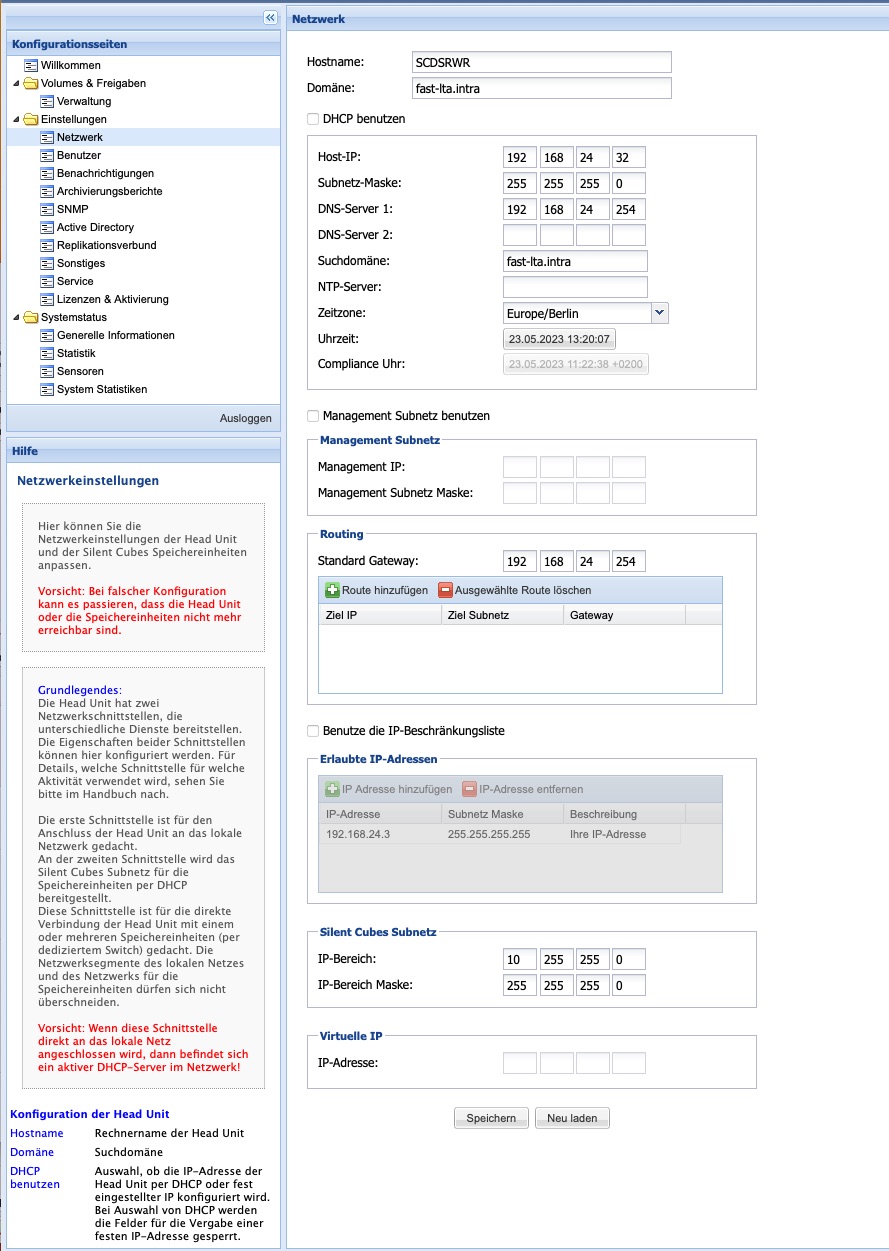
The LAN network interface (labeled LAN) is used to connect the Head Unit to the local corporate network. The Silent Cubes subnet is provided via DHCP on the Cubes network interface (labeled CUBES). The Silent Cubes installation is managed via the optional Management network interface (labeled MGMT).
Note: If more than one Silent Cube storage unit is to be connected to the Head Unit, the CUBES network interface must be connected to a dedicated switch, to which in turn all Silent Cubes storage units are connected.
Always ensure that the LAN network interface and the CUBES network interface(s) are not swapped, as otherwise the Head Unit will act as a DHCP server on the corporate network.
Configuration of the LAN network interface
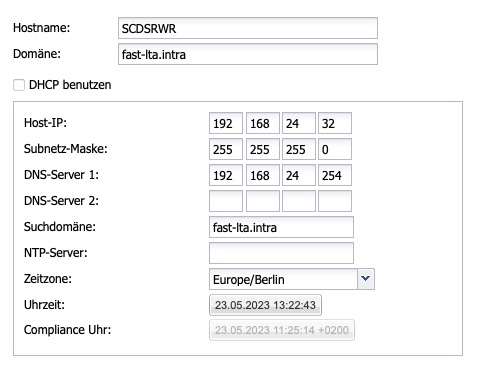
|
Option |
Description |
|
Hostname |
Computer name of the Head Unit |
|
Domain |
Search domain |
|
Use DHCP |
Selection of whether the IP address, along with its options, is configured via DHCP or a fixed IP address. If DHCP is selected, the fields for manually assigning a fixed IP address are locked. |
|
Host IP |
IP address of the Head Unit |
|
Subnet mask |
Netmask of the subnet in which the Head Unit is located |
|
DNS server #1 |
DNS server in the LAN subnet |
|
DNS server #2 |
DNS server in the LAN subnet |
|
Search domain |
Name suffix used in the network (your-domain.intra) |
|
NTP server |
Server for time synchronization |
|
Time zone |
The time zone in which the Silent Cube storage system is located |
|
Time |
Current date and time |
|
Compliance clock |
The current compliance time (time of the first Silent Cube storage unit) |
Table: Network settings - LAN
Configuration of the MANAGEMENT network interface
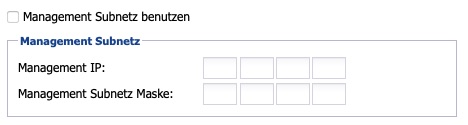
If separation between the data and management network is desired, the management network can be enabled and configured here.
|
Option |
Description |
|
Management IP |
IP address of the management network. Once activated, the user interface of the Silent Cubes software can be reached via this address. |
|
Management subnet mask |
Netmask of the management network |
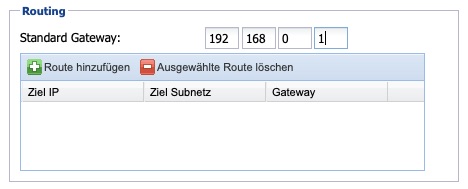
Routing
Note that the Silent Cube system supports only one default route. Especially in the case of separated networks (data and management), the routing settings must therefore be planned carefully. If necessary, consult the responsible network engineer.
|
Option |
Description |
|
Default gateway |
This gateway is set as the default system-wide. |
|
Routes |
The "Add route" and "Delete selected route" buttons can be used to define additional routes for destination IPs or destination networks. |
Configuration of the IP restriction list
To increase network security, a list can be maintained to restrict access from specific IP addresses/networks. Note that this setting also affects the management interface, and enabling this option may lock you out of the system.
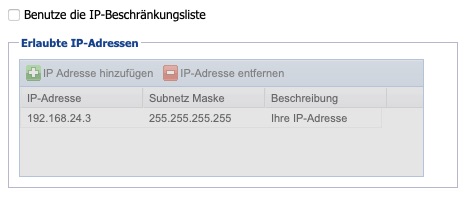
Configuration of the CUBES network interface
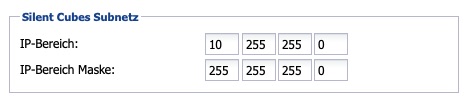
|
Option |
Description |
|
IP range |
IP range of the DHCP subnet on the CUBES network interface of the Head Unit |
|
IP range mask |
Netmask of the Silent Cubes network |
Table: Network settings - CUBES
Further network settings
If the Head Unit is part of a replication pair, the corresponding configured IP address is displayed under Virtual IP. The virtual IP address is configured in the Replication pair menu (see Chapter 6.7).
Separate networks for data and administration
Users
The Users menu is used to create user accounts that can be used both for managing access to the Silent Cubes software and for SMB/CIFS shares, if Active Directory is not configured. The predefined user groups from user management cannot be used for SMB/CIFS shares.
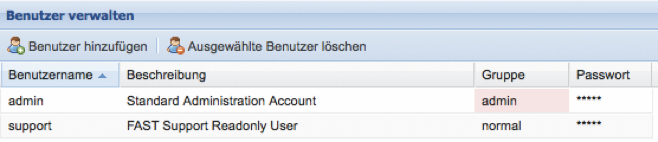
Predefined users
The preconfigured admin user cannot be deleted. It is therefore recommended to change the default password (adminadmin) of this user.
In addition, a preconfigured support user already exists. This user has read-only rights and can be deleted at any time. It is used by FAST LTA customer support to obtain access to the system status for maintenance purposes without being able to make changes to the Silent Cube storage system itself. It is recommended not to delete this user.
User groups
The Silent Cubes software distinguishes between five user groups, which have different access rights.
Group: admin
Only users in the admin group have full access to all settings of the Silent Cubes software and can also change them. In addition, only users in this group are able to add new users.
Group: normal
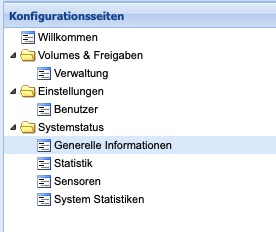
Users in the normal group are granted access to the Silent Cubes software, but there they can only change their own username and personal password. Furthermore, these users can only view certain settings in the Silent Cubes software, but cannot change them (see figure).
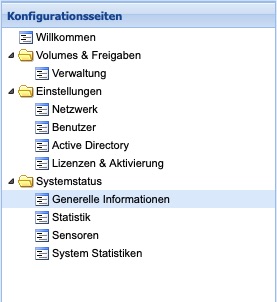
Group: monitor
Users in the monitor group are granted access to the Silent Cubes software, but there they can only change their own username and personal password. Compared to the normal group, the monitor group has access to even less information about the settings of the Silent Cube storage system (see figure). This group is likewise unable to make any changes to the settings.
Group: smbonly
Users in the smbonly group have no access to the Silent Cubes software. This user group is suited for managing shares via SMB/CIFS.
Group: scponly
Users in the scponly group have no access to the Silent Cubes software. This user group is suited for accessing SCP shares.
Add user
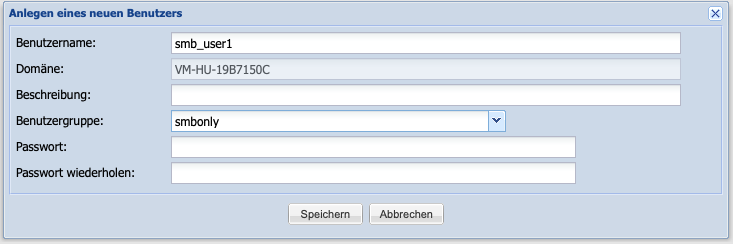
Clicking the Add user button in the Manage users window opens the dialog box for adding a new user.
A unique username must then be entered. A description can optionally help with identification. A drop-down menu is available for selecting the user group (see Chapter 6.2.2). Finally, a password must be entered for the user. Note that the password must consist of at least 8 characters.
Once the new user has been saved, it is listed in the Manage users overview.
Changing user data
The description and password values can be changed directly in the Manage users overview. Double-clicking the username or the password opens the dialog box for editing the password. Double-clicking the description, in turn, switches to edit mode for that value.
Deleting a user
To delete a user, the user must be selected in the Manage users overview. Clicking the Delete selected users button removes the selected user. Only users in the admin group are authorized to delete users.
Note: If a user has been deleted in user management and an SMB/CIFS or SCP share also existed for that user, the user must also be removed in share management. If, at the time of deletion, the user had a previously authorized volume mounted, that user retains access to the volume until it has to be remounted on their client computer. It is therefore advisable to restart the client computer after deleting a user.
Notifications
To ensure smooth and secure operation of the Silent Cube storage system, the Head Unit continuously monitors the most important parameters of the overall system (Head Unit and all storage units). Should a problem or error occur, a message can, if desired, be sent automatically to the FAST LTA support team as well as to freely definable recipients. Notifications can be sent via email or HTTPS POST in German and English.
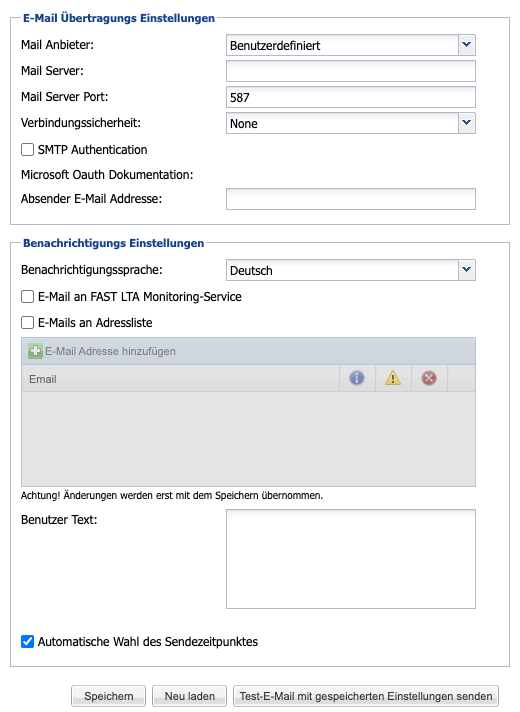
Sending a notification via email
To be able to send a notification via email, a suitable mail provider must first be selected. The following are available:
-
Microsoft OAuth
This is used to send emails via Microsoft's OAuth interface -
Custom
This is used for manual configuration of the mail provider
Microsoft OAuth
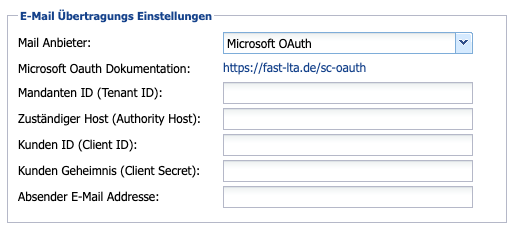
To configure the Microsoft OAuth mail provider, the following fields must be filled in:
-
Under "Tenant ID", enter the unique identifier for your organization within the Microsoft cloud environment. Example:
a1b2c3d4-e5f6-7890-1234-567890abcdef -
Enter as the "Authority Host" the authentication server for your Microsoft sign-in. Example:
login.microsoftonline.com -
Under "Client ID"and "Client Secret", enter your credentials for authentication with the OAuth service.
-
In the "Sender Email Address", you also have the option of entering the sender's address.
Custom
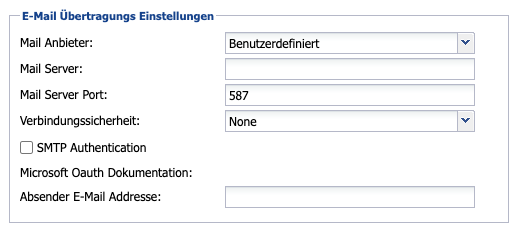
If the custom mail provider is selected, the name of the mail server or its IP address must first be entered. Optionally, a different Portcan be specified. If the selected server is an SMTP server that requires user authentication, the corresponding option „SMTP login“ must be enabled. The corresponding authentication parameters can then be entered under User and Password. Optionally, the LOGIN authentication methodcan also be enabled.
A self-defined sender addresscan be entered in the input field of the same name. If this field is left blank, the hostname of the Head Unit is used as the sender address by default.
General settings
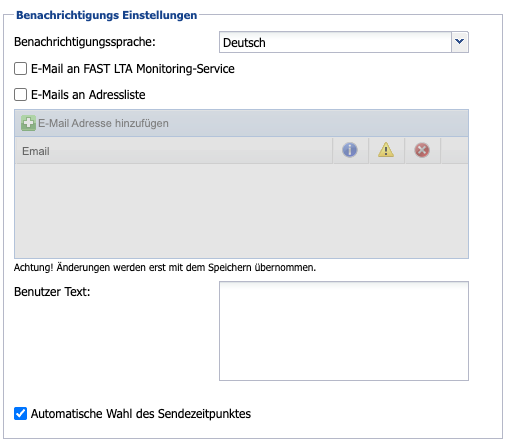
As long as the Email to FAST LTA Monitoring Service option remains enabled (default), the FAST LTA support team also receives all notifications. These are sent to the address monitor-sc@fast-lta.de . If an actual major problem occurs, support can quickly gain an overview of the system status and respond in a well-prepared manner. All transmitted information is of course treated confidentially. In this context, it should be explicitly noted that notifications do not contain any information about archived data.
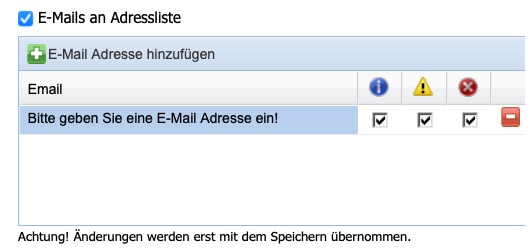
To be able to receive notifications via email yourself, the Emails to address list option must be enabled (default = off). Any number of email addresses can then be entered in the table below. In addition, the type of information to be sent can be defined per email address. A distinction is made between information, warnings, and error messages. To make it easier for the user or service provider to distinguish between different systems and locations, a User Text can also be created, which is included in every notification.
In addition to those already mentioned, the notification function of the Silent Cube storage system knows one further notification type: the system status, which is transmitted daily (Daily Status Message). If the Automatic selection of send time option is enabled (default), this is sent daily around midnight. If this is to occur at a different time, the option must be disabled and a time set.
Note: The notification function can be tested immediately after entering all settings by using the Save & send test email button.
Reading and deleting notifications
The Notifications window is located in the lower area of the Silent Cubes software. All notifications from the Silent Cube storage system are listed there in a table. Double-clicking the selected notification displays it in a new window.
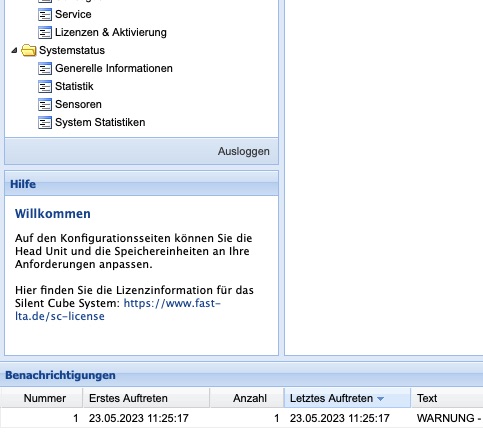
Figure: Notifications in the Silent Cubes software
To delete one or all notifications, right-click the list entry and select the corresponding entry from the context menu that then appears.
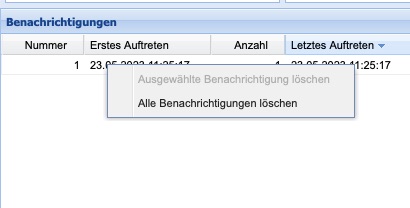
Figure: Deleting notifications
Archiving reports
An archiving report from the Silent Cubes software shows which data was archived, when, and with which hash value, thereby providing evidence that archiving has taken place.
For archiving reports to be generated, the Create archiving reports option must be enabled (default = off). The file format can be selected between CSV and PDF. If archiving reports are to be sent via email, the Send archiving reports by email option must first be enabled and the desired email addresses then entered.
Note: Please note that the mail server must be configured in the Notifications menu for emails to be sent. If an archiving report exceeds a size of 5 MB, the Silent Cube storage system sends the email without a file attachment.
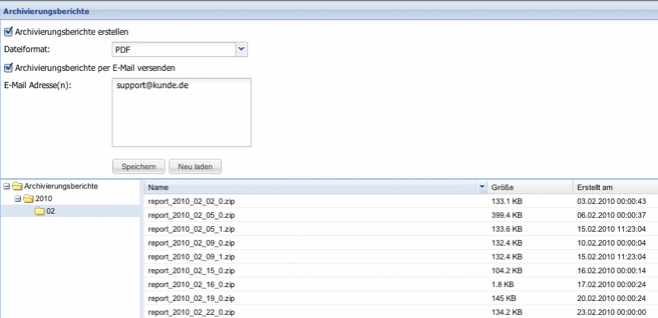
Figure: Archiving reports
SNMP
The Simple Network Management Protocol (SNMP) is a network protocol for monitoring and detecting errors in network components.
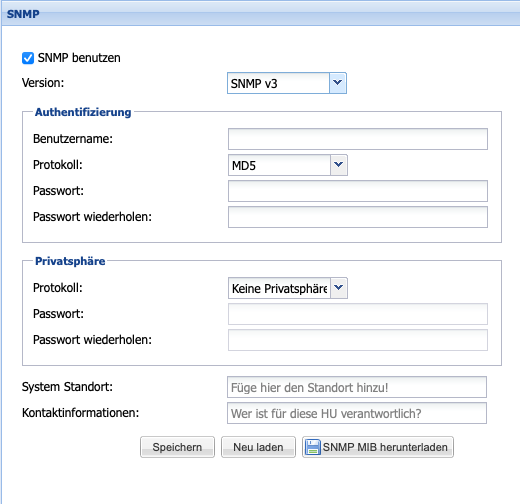
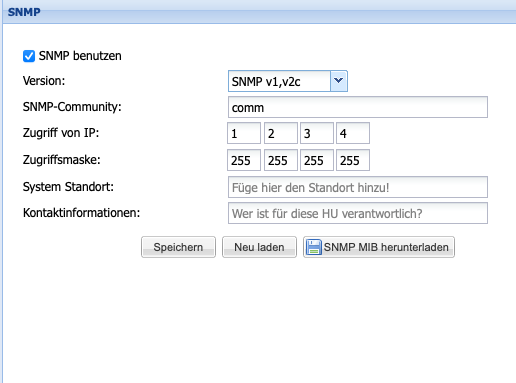
The Head Unit of the Silent Cube storage system supports this protocol in versions v1, v2c, and v3 for monitoring the Head Unit itself and all Silent Cube storage units connected to it. The Management Information Base (MIB) file required for configuration can be downloaded directly in the SNMP menu.
To be able to use and configure SNMP, the Use SNMP option must first be enabled (default = off). The name of the SNMP community must then be entered in the SNMP community input field. In addition, the IP address and the access mask of the SNMP server must be entered. The two input fields System location and Contact information are optional, descriptive additional information.
Active Directory
If the connected corporate network has a Microsoft Windows domain or the Microsoft directory service Active Directory (AD), the users defined there can be granted SMB/CIFS shares on the Silent Cube storage system. To do this, the Silent Cube storage system must be joined to the Windows domain via the Active Directory menu.
The Silent Cubes software manages access rights only at the share level, not at the user level. User and permission management must therefore be carried out under Windows via the Active Directory configuration. The Silent Cube storage system only needs the administrator account of the Microsoft AD domain to join the Head Unit to the domain. The login credentials are not stored!
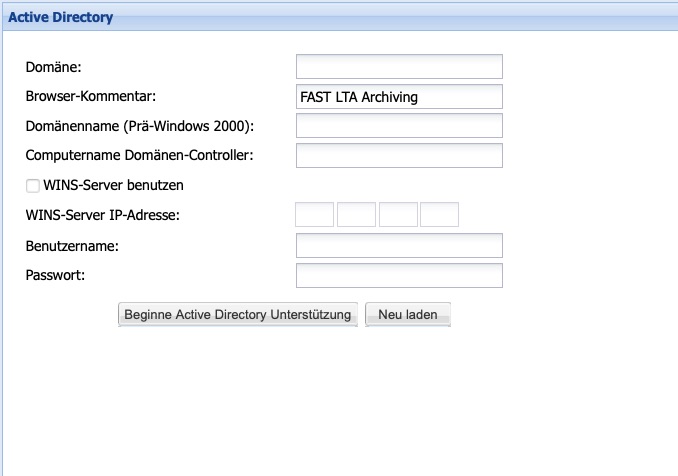
|
Setting |
Description |
|
Domain |
Long domain name of the Microsoft AD domain (e.g. your-domain.intra). For pre-Windows 2003, use only the first part, i.e. for example your-domain |
|
Browser comment |
Comment line describing the role of the system in the network, for example archive, workstation, etc. |
|
Domain name (pre-Windows 2000) |
Pre-Windows 2000 domain name. (e.g. your-domain) |
|
Computer domain controller |
Long computer name of the Microsoft AD domain controller. (e.g. domaincontroller.your-domain.intra) |
|
Use WINS server |
If the domain controller and WINS server are identical, this option does not need to be enabled. If, on the other hand, they are different servers, the option must be enabled and the IP address of the WINS server entered. |
|
WINS server IP address |
The IP address of the WINS server |
|
User |
The administrator account of the Microsoft AD domain. This account must have the rights to create a new machine in the domain. Enter without a preceding domain. |
|
Password |
The password of the administrator account. |
Table: Active Directory settings
Note: The Domain Name System (DNS) of the domain controller and of the Head Unit (see the Network chapter) must be identical. The same applies to the Network Time Protocol (NTP).
AD and Windows Server 2008
If Windows Server 2008 is used as the domain controller, several specific settings on the domain controller must be checked and any necessary changes made.
For example, the Computer Browser service must be enabled (disabled by default). This service is required for the Head Unit to be listed and displayed in the network environment.
File and printer sharing must be enabled. This is necessary to allow the Silent Cube storage system to query its Security Identifier (SID). This SID is required so that the Silent Cube storage system can permanently authenticate with the domain in order to verify user information there.
If the domain controller is located in a different subnet than the Silent Cube storage system, a WINS server must be added to the domain controller and configured in the Silent Cubes software. The WINS server serves to receive and answer cross-network NetBIOS requests.
Replication pair
To protect the data archived in the Silent Cube storage system against disaster scenarios (such as fire, water, vandalism, or theft), it is possible to create a replication pair.
For this purpose, a second, mirrored Silent Cubes storage system is installed at a second location (primary/secondary installation).
The mirrored Silent Cube storage system (secondary) must have its own Head Unit with the same software version and must correspond in capacity to the first Silent Cube storage system (primary).
A replication pair can always be added retroactively to an already existing single-site installation (primary installation only).
There are basically three ways to set up a replication pair:
Both instances in the same subnet

Figure: Replication pair with virtual IP
If both instances are in the same subnet, a total of 3 IP addresses are required: one each for the primary and secondary instances, plus another as the virtual IP, via which communication with the overall system is then handled.
Replication across different subnets
If the primary and secondary instances are located in different subnets, there is no virtual IP. Access always takes place via the IP address of the primary instance.
If the subnets are not transparent to each other and the IP addresses are not directly reachable from one another, routing can also be configured (see Chapter 6.1 - Network settings). The connection to the secondary instance can be checked in the configuration using the Test communication button.
When replicating across different subnets, automatic failover in the event of a failure, without manual intervention on the part of the archiving instances, is not possible - even though this can be selected in the options. As a rule, routes and IP addresses on the archiving instances must be changed manually so that the archive system becomes reachable again.
Replication to a cloud location
Replication across different locations behaves, in principle, similarly to replication within a cloud location. However, when replicating to a cloud location, it must be noted that port forwarding and Network Address Translation (NAT) generally need to be taken into account during setup. Put simply, a public port and a public IP address are used for the connection, which are then forwarded to the internal IP address and internal port of the secondary instance within the cloud location.
When replicating to a cloud location, automatic failover in the event of a failure is not possible.
Configuration
To be able to integrate a second Silent Cube storage system into the replication pair, its network settings must first be configured independently of the replication pair.
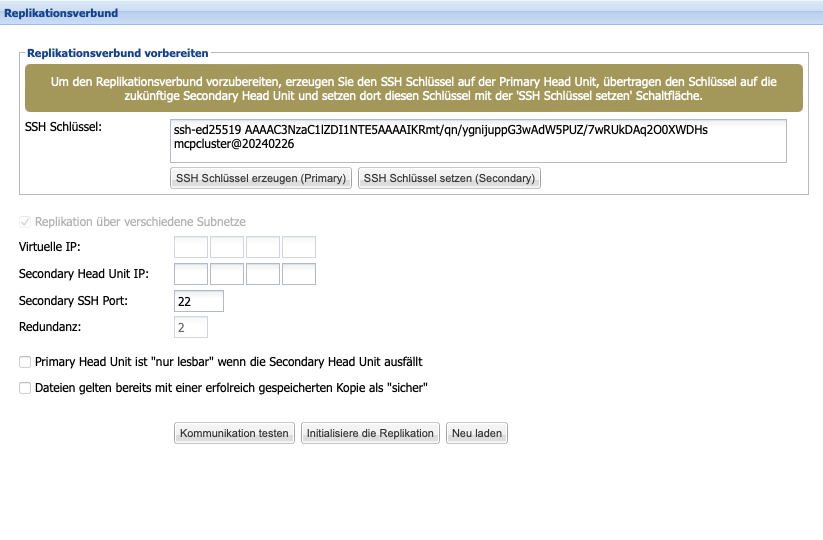
From version 3.2 onward, it is subsequently necessary to perform a manual key exchange. This serves to later secure the tunnel connection between the two systems. To carry out the key exchange, first create an SSH key on the primary system by clicking the Generate SSH key (Primary) button in the Replication pair menu.
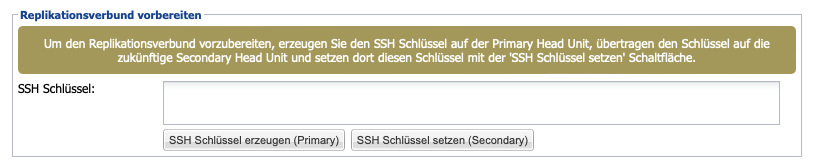
The generated SSH key is displayed in the text field above and can then be copied. Then paste the copied key into the SSH key field on the target machine and save it by clicking the Set SSH key (Secondary) button. This completes the key exchange successfully.
Following this, in the primary instance, in the Replication pair menu, the optional virtual IP address as well as the mandatory IP address of the secondary instance can be entered. The optional Secondary SSH Port field is available in conjunction with the Compliance Option Cloud, and allows a different external port to be entered for establishing the tunnel connection. The Redundancy field indicates the multiplier of the degree of redundancy achieved by creating the replication pair. A multiplier of 2 also means that files are, by default, only given the status "safe" once they have been archived on both the primary and secondary instances. To change this default setting, the button at the end of the dialog can be used to set that files already with a single successfully saved copy are considered secure.
If the primary Head Unit fails, the secondary Head Unit starts its shares in read-only mode. By default, no further data can be archived until either a manual or automatic failover to the secondary Head Unit is performed, or until the primary Head Unit is reachable again. Automatic failover can be defined using the Automatic failover after downtime option. This can occur immediately or after a self-definable downtime period. By default, automatic failover is not recommended; instead, it is recommended to perform a failover manually if the primary Head Unit demonstrably remains unreachable in the medium to long term.
If the secondary Head Unit or the connection between primary and secondary fails, write access to the primary Head Unit can be restricted to prevent a so-called "split-brain situation". The Primary is "read-only" if secondary fails option serves this purpose.
Note: The replication pair must not be cabled via the CUBES interfaces! Communication must run via the LAN interfaces.
Miscellaneous
SMB options
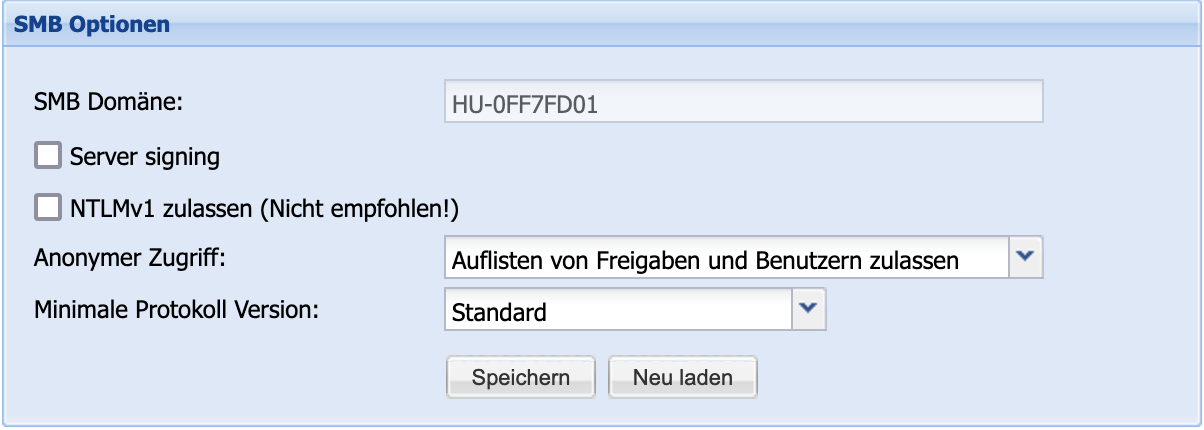
For further fine-tuning of the SMB service, the Miscellaneous area offers the SMB options section. Here you can enable the SMB Server Signing option to increase the security of communication. Likewise, for exceptional cases, the authentication option NTLMv1 can be switched on. Note that this significantly reduces the security of the SMB connection.
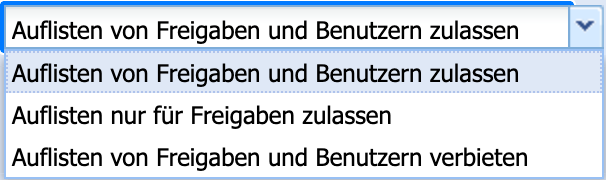
Another setting for adjusting security can be found under the Anonymous access item. Here you can specify which lists may be queried anonymously via the SMB connection.
Finally, the Minimum protocol version area can be used to specify which protocol version the accessing Samba service must support at minimum, in order to increase security here as well.
SCP options

For security reasons, the access options for SCP connections are also regularly updated, and outdated encryption and login methods are disabled. Using the Support for old SSH clients button, backward compatibility can be enabled if required. Note that this may come at the expense of system security.
Number of Cubes for parallel writing

If multiple Silent Cube storage systems are used, they are filled linearly by default, i.e. one after another. Optionally, internal data throughput and thus performance can be increased by writing in parallel to up to four Silent Cube storage systems. The desired number can be set using the Number of Cubes option and a drop-down menu.
Schedule
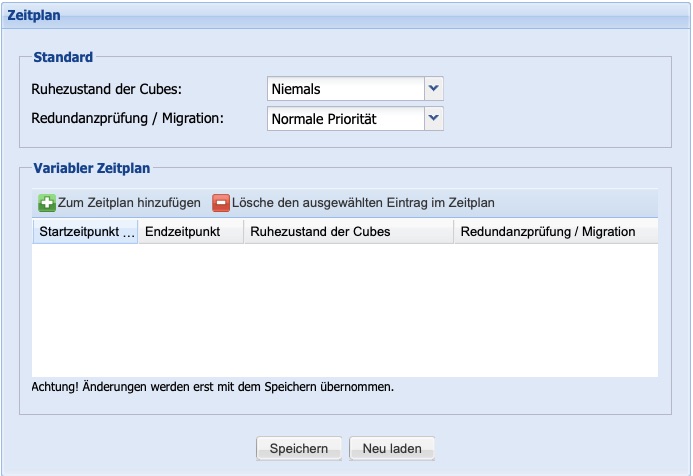
To save energy, the Silent Cube storage system can enter a sleep mode. In this state, a single storage unit requires only a few watts. Of course, the Silent Cube storage system remains reachable and "wakes up" as soon as a read or write access occurs. Using the Cubes sleep mode option (default = never) and a drop-down menu, you can set after how many minutes or hours of inactivity sleep mode should be initiated.
Redundancy check (synchronization of the two instances) and migration (moving data to a storage unit or Head Unit) are tasks that may consume system resources and thus affect overall performance. For this reason, a priority can be set for them.
Normal priority corresponds to the previous default setting and balances normal processes against the necessary redundancy check and any migration running in the background.
Low priority allows a redundancy check or migration during normal operation only when no other processes are currently active (system idle).
Not allowed stops the redundancy check and migration.
In addition to the default setting, any number of schedules can be created, for which both the sleep mode setting of the Silent Cubes and the priority of the redundancy check and migration can be defined for specific time periods. The default setting is thereby overridden in the specified schedules. For example, it is possible to never put the Silent Cubes into sleep mode during business hours and to prohibit a redundancy check or migration, thus shifting it to times when there is no access to the Silent Cubes.
All normal processes, in particular replication to a slave system, are not affected by these settings!
Service
The Service menu is primarily used to perform maintenance tasks.
Manually updating the Head Unit software
The software of the Silent Cube storage system is continuously being developed further and brings additional or improved features with each release. Software updates are made available, among other means, via the service area of the FAST LTA website (http://www.fast-lta.de ) as a file download for registered customers.
The system is unavailable during the update.
For replicated systems, it is essential to ensure that the Head Unit of the primary and secondary always has an identical software version, as malfunctions may otherwise occur!
Preparation
-
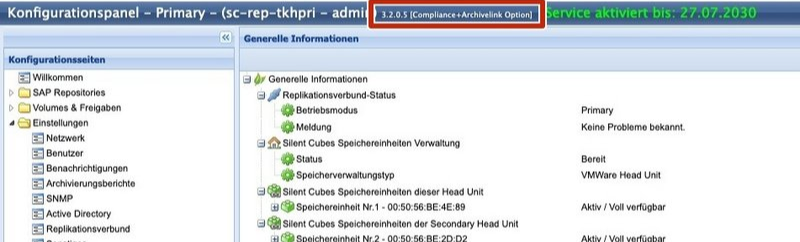
Check which software version is currently installed on the system.
For an update, the software version must be at least 3.X 3.0.0.6.
-
Check whether the system still has an active service contract. If the system no longer has an active service contract, it cannot be updated!
-
Download the required software version from the FAST Update Server:
http://swupdate.fast-lta.net
The .tar file must not be unpacked or renamed. The file is automatically unpacked and verified by the system.
-
Stop data storage to the system
-
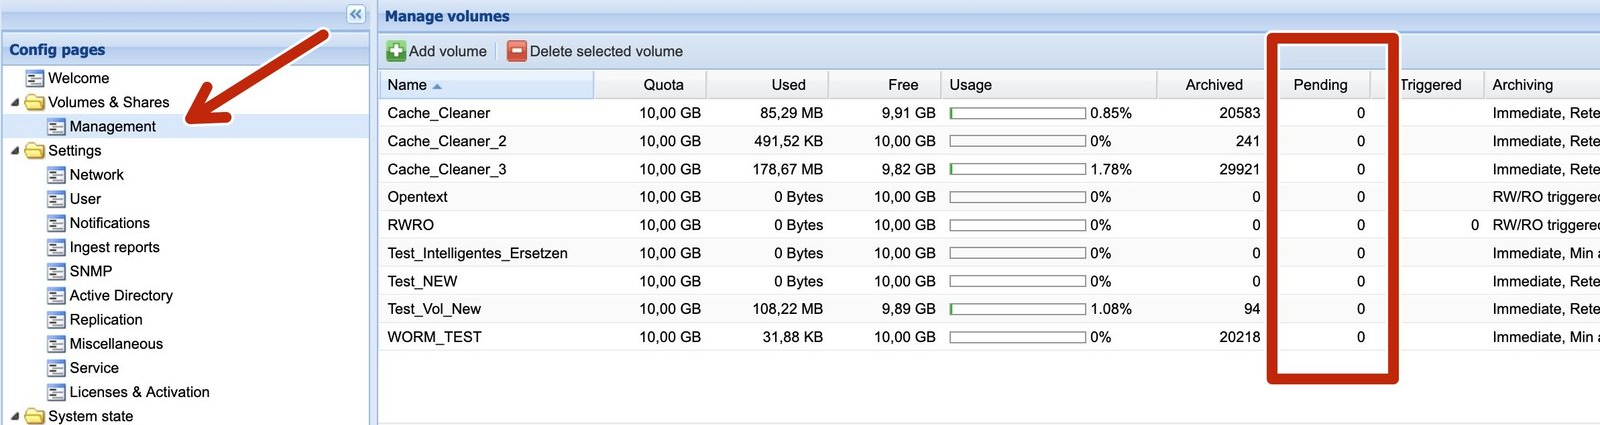
Before the update, the number of pending files should be at 0.
These files are located exclusively in the cache of the master Head Unit. The update can be performed with pending files, but there is a risk that these files may be lost if a problem occurs during the update.
-
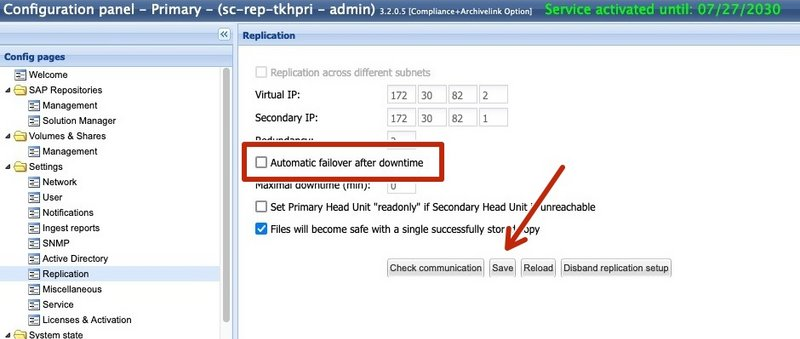
For replicated systems, make sure that Automatic failover is disabled. Disable it if necessary and save the change
-
Restart the primary and secondary Head Unit before the update to ensure that all access has been terminated.
Performing the update
For replicated systems, always start with the replication partner.
-
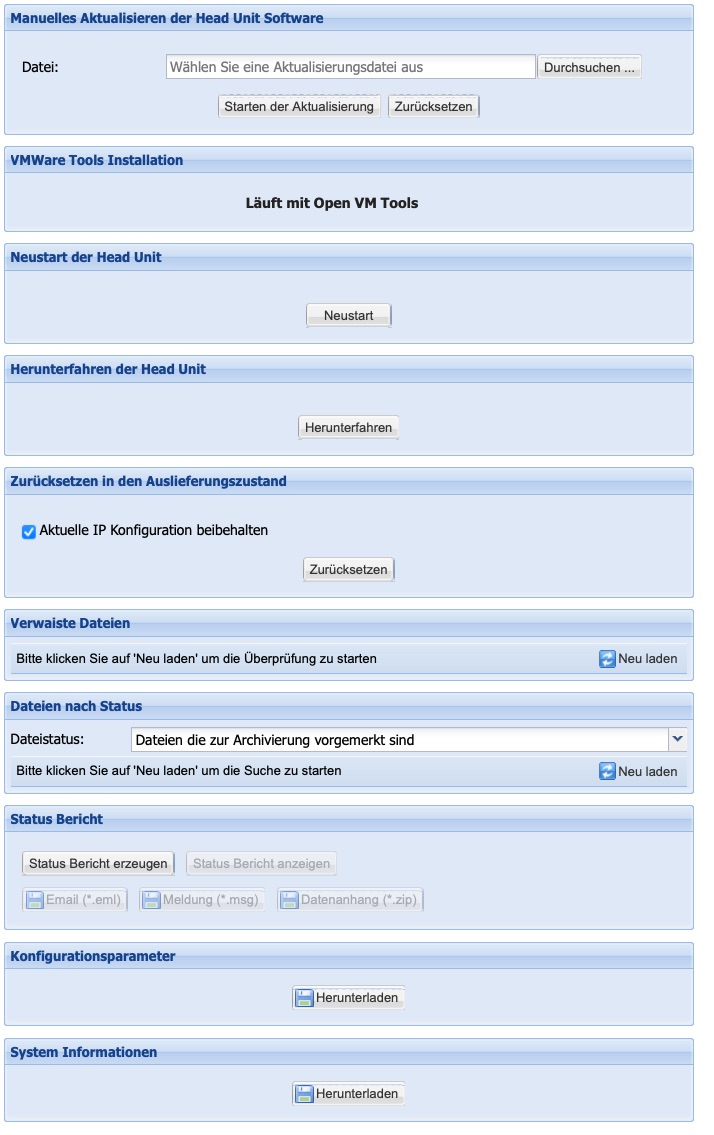
Go to Service -> Offline update of the Head Unit software. Click "Browse" and select the corresponding update file.
-
Once you have selected the correct file, click -> Start update.
-
The update file is now being uploaded to the Head Unit. This may take a few minutes.
-
The system must not be restarted or disconnected from the power supply during the update.
Depending on the software version, the hardware used, and the number of files stored, the update typically takes about 15-30 minutes per Head Unit.
Once the update has completed successfully, you will be prompted to restart the computer.
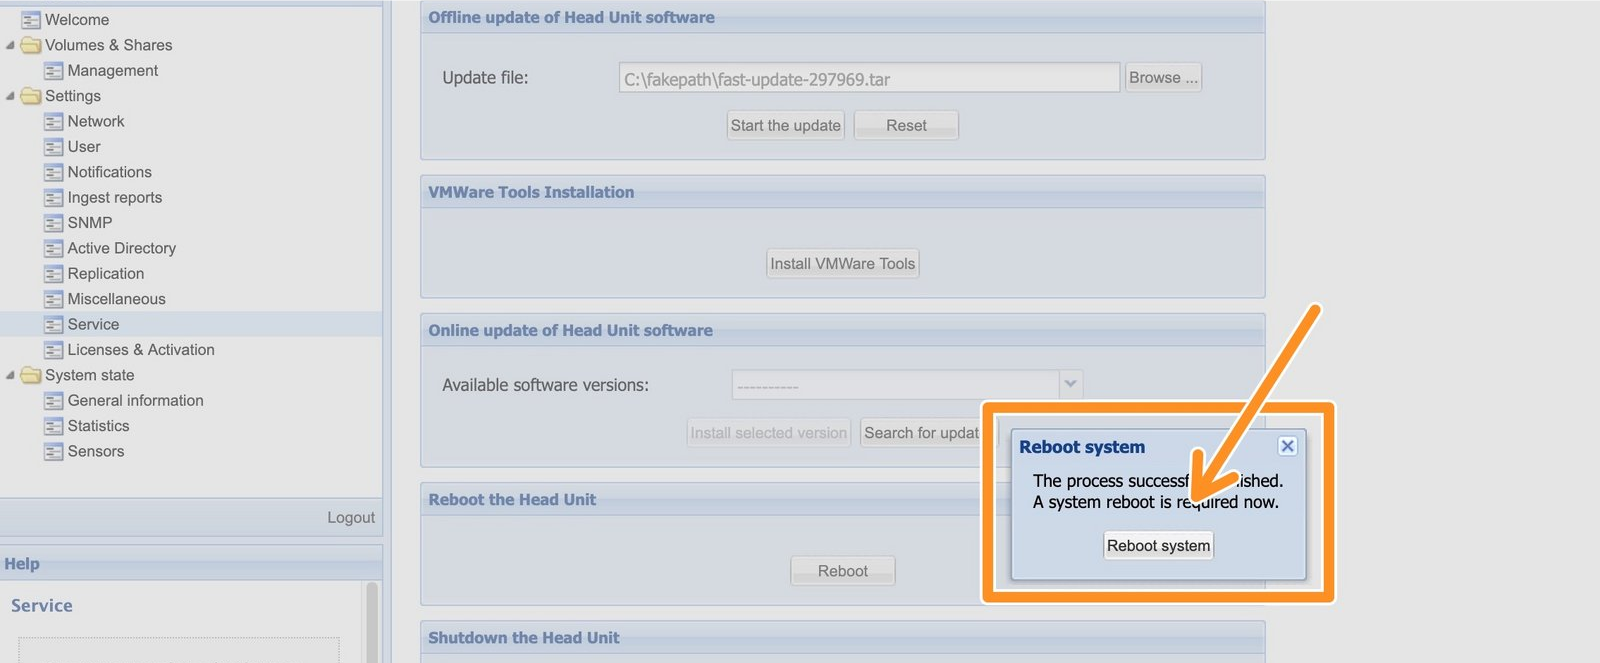
As a final step, check the system under General information.
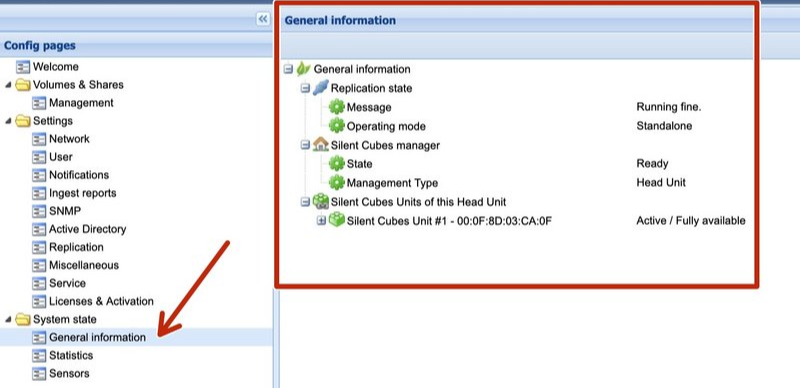
Everything should now be displayed in green here.
VMware Tools installation
If the Head Unit is operated in a VMware environment, the so-called VMware Tools must be installed after an initial installation has been completed or for the purpose of a software update. VMware Tools is a driver package required for the Head Unit to operate correctly. The required VMware Tools are provided by the FAST LTA support team.
Restarting the Head Unit
The Head Unit of the Silent Cube storage system is designed for continuous operation and only requires a restart in rare cases. Should this nevertheless become necessary, the process can be triggered using the Restart button. Note that the Silent Cube storage system will be out of service for several minutes.
To force a restart, the power plug of the Head Unit must never be pulled and reinserted without specific instructions from the FAST LTA support team!
Shutting down the Head Unit
To ensure that the Head Unit's operating system shuts down in an orderly manner and all running processes are correctly terminated, the Head Unit should be switched off using the Shutdown button.
Resetting to factory state
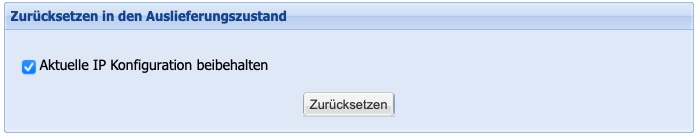
For service purposes, the system offers the option of performing a reset to factory state. You can decide whether the entire configuration should be reset, or whether the IP address should be retained to make subsequent connection configuration easier.
The reset only affects the Silent Cubes software, not the content of the Silent Cubes. Because they are equipped with a hardware WORM controller, this content cannot be reset.
After the reset, a time-consuming recovery of data from the connected Silent Cubes may be necessary. Therefore, use this function only in urgent service cases that have been coordinated with support.
Orphaned files

The Orphaned files area can be used to detect file system entries that, for example, could not be written correctly due to network errors. This allows faulty data deliveries to be corrected easily and efficiently.
Files by status

This function makes it possible to identify pending files. After selecting the file status and clicking Reload, the corresponding list is displayed, which can then also be saved locally.
Status report, configuration parameters & system
information
The status report and a summary of all configuration parameters primarily serve the FAST LTA support team for assistance and analysis, and contain no information about data already archived. This "offline" option is necessary when the Silent Cube storage system is located in a network that is completely closed off from the outside world, meaning that notifications cannot be transmitted to the FAST LTA Monitoring Service either.
To save a status report, it must first be created using the Generate status report button. It can then be viewed directly or saved locally on the administrator's computer in *.eml, *.msg, or *.zip format.
The configuration parameters are available in XML format and are saved in the same way. The saved configuration parameters can also be used, for example, for installation documentation purposes.
The System information area can also be used to generate a file with a system description, which is requested by service when needed.
Licenses & activation
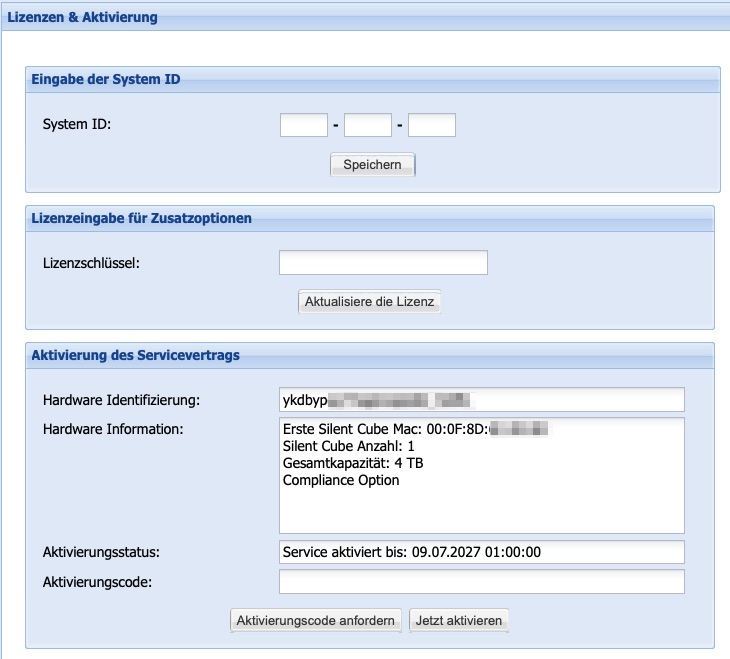
All Silent Cube storage systems are initially delivered with a license valid for 90 days (without license options). During this period, the standard functionality of the Silent Cube storage system can be used and configured according to the respective archiving requirements.
Of course, data that has already been archived on the Silent Cube storage system in the meantime is not lost even after the 90-day license expires. However, no new data can be archived.
With the purchase of a Silent Cube storage system, you receive a System ID, which can be entered as a unique identifier in the area of the same name. In addition, a service contract is concluded for a defined period. For this period, FAST LTA GmbH provides its customers with a corresponding license. This license code is sent by email to the registered administrator.
After the concluded service contract expires, a new service contract must be concluded with FAST LTA GmbH, and the registered administrator will then receive a license code again.
Note: After the service contract expires, the Silent Cubes storage system can continue to be used with its full range of functions!
In the Service contract activation menu, the license code must be entered in the Activation code field. Using the Activate now button, the license code is validated and saved. Information about the concluded service contract can then be read in the Activation status field. Above this is information about the Silent Cube storage system in use.
The activation code for any Compliance Option purchased is entered in the License key field in the License entry for additional options window. Using the Update license button, the functions of the Compliance Option are permanently unlocked after the activation code has been verified.
The header bar of the Silent Cubes software shows the activated licenses and options, as well as the remaining validity period of the service contract.
