Set notifications
In the “Notifications” section, you can configure notification settings.
First, you need to select the mail provider:

After clicking the “Edit” button, you can choose between Microsoft OAuth authentication or the Custom Mail Provider for custom settings:

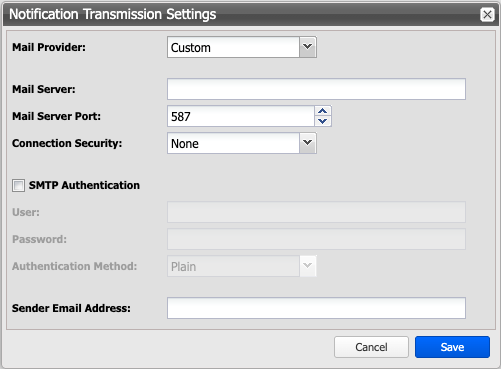
Custom Mail Provider
To configure custom mail provider settings for notifications, proceed as follows:
-
➤ Enter an IP address or server name for the mail server.
-
➤ Adjust the mail server port as needed.
-
➤ If a secure connection is supported, select the appropriate method from the “Connection Security” dropdown list.
-
➤ If authentication is required to access the mail server, enable the “SMTP Authentication” option.
-
➤ Use the field "Sender email address" to specify the address from which the Silent Brick System sends.
-
➤ To save your inputs, click the “Save” button.
-
➤ After successful saving, a test message can be sent using the “Send Testmail” button.
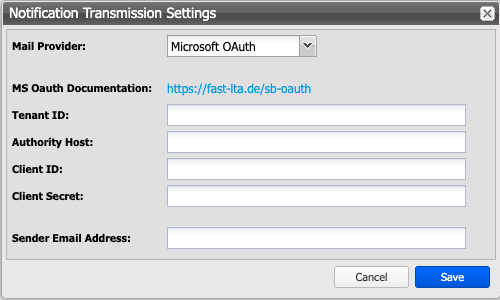
Microsoft OAuth Mail Provider
To configure OAuth authentication, proceed as follows:
-
➤ Enter the unique identifier for your organization within the Microsoft Cloud environment under “Tenant ID”. Example:
a1b2c3d4-e5f6-7890-1234-567890abcdef -
➤ Enter the authentication server for your Microsoft login under “Authority Host”. Example:
login.microsoftonline.com -
➤ Enter your credentials for authentication with the OAuth service under Client ID and Client Secret.
-
➤ Use the field "Sender email address" to specify the address from which the Silent Brick System sends.
-
➤ To save your inputs, click the “Save” button.
-
➤ After successful saving, a test message can be sent using the “Send Testmail” button.
General Settings
-
➤ To send an email to the FAST LTA Monitoring Service, select the option "Email to FAST LTA Monitoring Service.”
-
➤ To send an email to a specific list of email addresses, select the option "Email to address list below.”
-
➤ Then enter the email addresses to which the email should be sent.
-
➤ To add additional information to each message, complete the "Custom Message" field.
-
➤ To modify the time for sending the daily status message, use the "Daily Status sending" section.
-
➤ To save your inputs, click the “Save” button.
-
➤ To save your entries and send a test email, click the "Save and Send Test Mail" button.
-
➤ To cancel the operation, click the “Cancel” button.